Theme editor

Scale Model Shop

Tamiya Mossy FBVI 143 squadron

Status
Not open for further replies.

Ian M

Active member
Staff member
Admin
Joined
Dec 14, 2008
Messages
18,336
Reaction score
574
Points
113
Location
Falster, Denmark
1/3
Thread owner
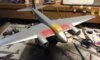
Well its been a while since I posted a WIP so I grabbed a few snaps of the current build. A Tamiya Mosquito FB VI.

As I already have a VI in Camo, I went for the 143 sqdr, bird NE*D One of the Banff mossies.

I will spare the blow by blow and just post the interesting bits....

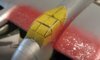
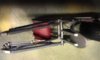
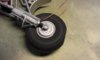
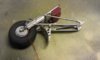
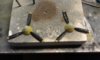
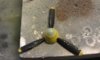
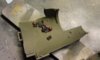
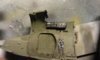
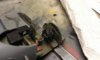
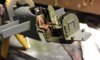
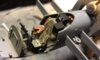
Here are a few of the cockpit before the fuselage was buttoned up.

View attachment 33820 View attachment 33819 View attachment 33821 View attachment 33822 View attachment 33818

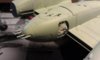
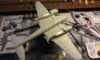
The next photos will be in basic paint as I forgot to take any of it in primer....

A question; I have read that the Banff's had Dark Sea Grey upper surfaces. I also have read that the had Extra Dark Sea Grey!!! I believe that the Extra Dark came at a later point but have not been able to find when. Can any one shed a bit of light on that??

Ian M

View attachment 38485

View attachment 38486

View attachment 38487

View attachment 38488

View attachment 38489

View attachment 151511

View attachment 151512

View attachment 151513

View attachment 151514

View attachment 151515
 

Attachments

  • IMAG0206.jpg
    IMAG0206.jpg
    2 KB · Views: 0
  • IMAG0205.jpg
    IMAG0205.jpg
    2 KB · Views: 0
  • IMAG0204.jpg
    IMAG0204.jpg
    2.2 KB · Views: 0
  • IMAG0203.jpg
    IMAG0203.jpg
    2.7 KB · Views: 0
  • IMAG0202.jpg
    IMAG0202.jpg
    2.8 KB · Views: 0
Looking forward to seeing this one built. I have one to do and i only live 30 mins from Banff where they were based :)
 
very nice start and stunning made cockpit...

watching this one project with pleasure

:)
 
Hey Ian.

Nice looking Mossie you got there.

I found this site,

http://www.scotshistoryonline.co.uk/rafbanff.html

It has some good pictures of Mossies on it.

Hope it's of some help.

Tony
 
Sorry I seem to be having a problem making the web site a link.

But if you type it into your browser - poor spellin - it should take you there.

Tony
 
Thread owner
Thanks for that Tony.

I have fixed the link so that all can go in via the link.

Ian M
 
Thread owner
Here are a few more piccies.

the main under carriage. The moulded on axle has been cut off so the wheel could be put in after painting. The clips drilled and a new axle made out of a bit of tube stock. I have added break lines! Unusual for me, I just thought why not. The ends have yet to be fixed as I have to determin their position after the legs are fitted. I used the heat from a cigarette to soften the plastic to give the tyres a weighted effect. If you are sensible and do not smoke a soldering iron could probably do the trick. I use the cigarette 'cause a) I smoke and b) it gives a gentle heat.

Soften the plastic and press down on a hard surface. Job done!

View attachment 33827 View attachment 33828 View attachment 33829

Underside painted in sky from Xtracrylics

View attachment 33830 View attachment 33831

Canopy masked and fitted. Then I realised a mistake, I thought I would give the salt chipping trick a try as its been a long time since I did it and the first time on an aircraft. I also wanted to paint the "keep off" crosses from the radiator panels. That was the mistake. I Will do a negative mask so I know I needed the red down before the Grey. The problem is that the crosses are painted on top of Grey and not under it!! Nob!

So try again; Grey;salt,red; mask; grey.....I think that will do the job. I found out that the leading edges of the wings where aluminium so they will also get a sprinkle of salt befor the Grey goes down!

View attachment 33832 View attachment 33833

Spent most of last night doing the props and spinners. Is it to much? Being on the coast I imagine they where up against all kinds of weather, salt and sand.

View attachment 33825 View attachment 33826

I now have an appointment with some masking tape and a salt shaker!

Ian M

View attachment 38492

View attachment 38493

View attachment 38494

View attachment 38495

View attachment 38496

View attachment 38497

View attachment 38498

View attachment 38499

View attachment 38500

View attachment 151518

View attachment 151519

View attachment 151520

View attachment 151521

View attachment 151522

View attachment 151523

View attachment 151524

View attachment 151525

View attachment 151526
 

Attachments

  • IMAG0219.jpg
    IMAG0219.jpg
    2.1 KB · Views: 0
  • IMAG0218.jpg
    IMAG0218.jpg
    2 KB · Views: 0
  • IMAG0217.jpg
    IMAG0217.jpg
    2.7 KB · Views: 0
  • IMAG0216.jpg
    IMAG0216.jpg
    2.1 KB · Views: 0
  • IMAG0215.jpg
    IMAG0215.jpg
    1.9 KB · Views: 0
  • IMAG0214.jpg
    IMAG0214.jpg
    1.8 KB · Views: 0
  • IMAG0213.jpg
    IMAG0213.jpg
    2.1 KB · Views: 0
  • IMAG0212.jpg
    IMAG0212.jpg
    2 KB · Views: 0
  • IMAG0220.jpg
    IMAG0220.jpg
    2.8 KB · Views: 0
Wing l/e were not aluminium; the whole airframe was made of wood, covered in madapolam fabric (a superior quality Egyptian cotton.) The fabric was attached using red dope, applied by hand with a paintbrush; it was then sprayed with silver dope, as an anti-u/v light guard, followed by the camouflage paint.

Any damage to the fabric had to be immediately made good, as did damage to the paintwork; by late 1942 it had been realised that wing leading edges needed to be kept specially smooth (Spitfires had the rivets and panel lines filled, and smoothed before painting,) and every countersunk screw (and there were thousands holding down the sheets of plywood on the Mosquito) was filled with brummer stopping, and sanded smooth.

The only metal parts were engine covers, canopy frame, ailerons and elevators, and, if you're doing a Banff Squadron airframe (or any used over the sea,) any bare metal would be quickly touched-up to avoid corrosion setting in.

Edgar
 
Thread owner
Ohhhhhh bo.......ther! where did I put that masking tape?

I have could of done with reading that about an hour ago lol. Oh well.

Thank you for a very informative reply Edgar. Looks like I got a bit of painting to do again. That will learn me to look into things a bit better won't it.

I saw some photos of a restoration, and as you said the wings and fuselage were red, the leading edges of the wings were a very bright and shiny aluminium colour, so I sort of assumed that they was skinned with alu to add some protection. I tell you what though, the guy that painted the silver dope had done a bloody good job! Had me fooled....

Ian M
 
Well, I do have a slight advantage; we built the vast majority of them in the furniture factories of this town.

Edgar
 
Great work so far Ian. And guess what, I've just started building the Revell 1:48 Mosquito. Typical, just like busses !

Colin M........
 
Thread owner
Well the decals are on. The codes where fun. First the yellow ones then black on top. T'was good fun getting those lined up so the yellow borders where even. The only problem was having two layers of the backing. So a quite half hour with a new scalpel blade and some micro set and they looked a bit better....

A quick splash of very well thinned light Grey to give the paint a faded 'sea side' look.

I lost the bloody wing tip lights!!! A rumage through the bits box and I found a couple of the 'rear' tip lights from another mossy I built a while ago. Not a perfect fit but I am hoping that the Kristal klear will even that out and fill the little gap. we will see tomorrow. Just needs a satin coat to even things out a bit and then its picture time...

Hopefully tomorrow night.

Ian M
 
Thread owner
Waiting for the top coat to dry the its roll out time in the finished section.

Ian M
 
Just a quickie, I am building the big Airfix Mossie also as a Banff Strike Wing bird. Are The cover panels over the radiators Aluminium or wood?

Keith
 
Thread owner
Well I have it on good authority that the only metal parts were engine covers, canopy frame, ailerons and elevators, and, if you're doing a Banff Squadron airframe (or any used over the sea,) any bare metal would be quickly touched-up to avoid corrosion setting in.

Ian M
 
Thread owner
lol wake up Andy, this is a old thread....but thank you.

Ian M
 
Status
Not open for further replies.
Back
Top