Theme editor

Scale Model Shop

Tamiya's Masterpiece - Their 1/32 scale Mosquito

Status
Not open for further replies.
Thread owner
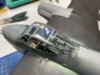
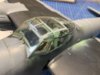
I have removed the masking from the canopy ready for clean up. There is not a lot of it to do.

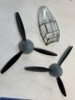
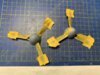
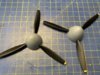
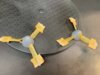
I have also removed masking from the props having painted the MSG spinners. One thing is missing, as you can tell, the yellow tips.

Yellow is a colour that gives problems with coverage and you might think yellow on black would just amplify the problem.

Next post I will show you how I deal with that so yellow coverage over black is dead simple.

View attachment 343002
 

Attachments

  • 406EEB74-7E74-4242-95B0-E2E6C2D89D7C.jpeg
    406EEB74-7E74-4242-95B0-E2E6C2D89D7C.jpeg
    2.8 KB · Views: 0
Thread owner
I didn’t rhjnk I would have time for this today...

Props done.

So, yellow....

No great mystery really

The paints I am using
View attachment 343051

The sand yellow primer is the key. Spray two light coats, they must be light coats to avoid a step. After the primer.
View attachment 343050

Then the base coat to ass colour. Again it is only necessary to do a light coat and it is done.
View attachment 343052

So, as I said the secret is the primer and the right colour primer is ideal for any colour that has issues with coverage.
 

Attachments

  • 5E9DC332-BA6E-4594-819E-870F0A36BD21.jpeg
    5E9DC332-BA6E-4594-819E-870F0A36BD21.jpeg
    3.3 KB · Views: 0
  • 9AA2FB93-21D8-452B-872B-AE2D81B0B76C.jpeg
    9AA2FB93-21D8-452B-872B-AE2D81B0B76C.jpeg
    3.6 KB · Views: 0
  • 9A837E9A-D6F9-4985-BF1B-B508BA1E273F.jpeg
    9A837E9A-D6F9-4985-BF1B-B508BA1E273F.jpeg
    2.8 KB · Views: 0
When doing your camouflage, would you ever use masks , lf models do one , but they are self adhesive
Would be concerned this would damage paint already applied .
 
Thread owner
When doing your camouflage, would you ever use masks , lf models do one , but they are self adhesive
Would be concerned this would damage paint already applied .
No not usually. I do some masking using the white tac snake method with gaps filled with masking tape but, using MRP, I have also found that I can get a good result freehand airbrushing. As for lifting paint it is not a problem with MRP though you should still clean finger and release grease from the model before spraying to be sure. If you use water based paint such as Vallejo then it is much more of a problem but, even so, by cleaning, using a good primer and leaving paint a day or two to cure it can be dealt with.
 
Then the base coat to ass colour.
If your ass is that colour yellow, maybe it’s time to take it to a vet :)

Yellow does cover really poorly, and putting a sand-coloured paint underneath is a trick I’ve used before too. Generally, though, I prefer to paint yellow first, preferably over a white undercoat. For those propeller blades, for example, I think I’d have sprayed the ends of the blades yellow, then masked them off and painted the rest black. But both methods work, of course.
 
Thread owner
Fat fingers. Yes both methods work but using the black basing method it means the props can just be left as primer.
 
Hi Barry
Canopy looks great. Excellent masking. Thanks for the yellow paint tip :thumb2:
Jim
 
Thread owner
Here are the props just needing some weathering.

View attachment 343115

Canopy fitted and looking good. It will need some careful masking.
View attachment 343112
View attachment 343113

Finally my clumsiness is a problem. The bomb bay door attachments are very vulnerable but I didn’t really have any choice but to fit them. The result is that not one is fully intact.
View attachment 343114
All are either broken off, some parts lost, or damaged. It is not irreparable but there is no way the bomb bay will do the model justice as repairs will need bodging

Some people may be delicate enough to be able to complete the build without damaging the parts, I am certainly not one of those.

I have therefore decided to close up the bomb bay. Sad but I did enjoy putting it together.
 

Attachments

  • 723A9322-9BBD-49F8-8DBB-AC6B65822FFA.jpeg
    723A9322-9BBD-49F8-8DBB-AC6B65822FFA.jpeg
    3.3 KB · Views: 0
  • 7885A0F2-6144-406B-AE24-6EE874B69F38.jpeg
    7885A0F2-6144-406B-AE24-6EE874B69F38.jpeg
    3.2 KB · Views: 0
  • 1F253A94-7AC3-4D64-A3B8-DEC06971862C.jpeg
    1F253A94-7AC3-4D64-A3B8-DEC06971862C.jpeg
    3.3 KB · Views: 0
  • 0B48C2BF-D276-4FA9-9C48-06B3AFCBE0AF.jpeg
    0B48C2BF-D276-4FA9-9C48-06B3AFCBE0AF.jpeg
    3.3 KB · Views: 0
That's a shame Barry, just when it was all looking so good.
Pete
 
That must be really disappointing for you Barry, you had made a great job of the interior detail.
 
Thread owner
Ultimately for me it is about enjoying the build and as I do like to see the clean lines on an aircraft it is not all negative.
 
Amazing work. Sorry for your loss. I would have been heart broken. PaulE
 
Hi Barry,
Love the clean lines of the Mosquito and your clean build. Shame about the bomb bay though. You did a pretty good job on the interior. The latest Tamiya's always a shake and bake kit with superb fit.

Cheers,
Richard
 
Thread owner
I have closed up the bomb bay. If I intended to do it from the start then it would have attached as a single piece but I had to cut it into three for an open bomb bay. To fix it closed I used some pieces of plastic card down the centre to strengthen the join. It all then fitted pretty much perfectly needing only a smear of putty which I wet sanded to preserve the detail. A quick run all over with a sanding sponge and it seems fine. I will only know if more work is needed once I have applied a coat of primer.

Here is how it now looks.
1B90619C-2C0B-4FF0-B95F-AEBA57C841F6.jpeg
A bit messy with all the work done.

I got on with masking
7C41610D-30F9-4C92-A5A4-790DC0544B71.jpeg
Canopy

A4541012-D23A-489D-8080-2226749A157E.jpeg
Tail wheel housing and starboard undercarriage. I will do the port side tonight and with luck get the first primer coat on to see what work, is any, is needed before a base coat.

I retrospect I should have left off the underside engine housing to be attached with the magnet system. It would have made the masking a lot easier but I did manage it OK.
 
Thread owner
I finished the masking and airbrushed my first primer coat. At a cursory look there are just a couple of small rough patches near the bomb bay to sand and the underside fuselage seam needs some attention. No doubt I will find more to deal with when I look closely with the optivisor on. Overall it looks pretty good.

18965986-6F56-43AB-8589-E9BD83216353.jpeg

3E749825-084C-4245-B5E5-B970542F448A.jpeg

Hopefully I will finish the surface preparation over the next couple of nights to get ready for the base coats. This is my favourite stage of the build, getting this blank canvas ready and then creating the 'look' of the real thing.

I will certainly be using a lot of the Medium Sea Grey!!!
 
Barry,

Been watching this from the sidelines, absolutely fabulous build so far.
Looking good just in primer.:thumb2::thumb2:

Paul.
:smiling3:
 
Status
Not open for further replies.
Back
Top