Li**, we regularily get them.....usually two in a box for around £2 odd. You sound surprised Patrick?\ said:And where do you get large pizza's for a quid??
Serves you right for living in 'The Smoke'. Things is right cheap up North! lol

Li**, we regularily get them.....usually two in a box for around £2 odd. You sound surprised Patrick?\ said:And where do you get large pizza's for a quid??
Thanks Monica, but why do that when your own stonework is so good?\ said:real do like the stone work you have done, i real must have a go at that one day,


\ said:Thanks for your comments folks.Trey, don't forget bud, off and on, this is a couple of weeks work I'm condensing into a few pages, until I get up to date with the build......
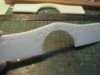
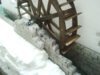
Right, the Mill building. Radical rethinking and alteration - Don't worry about doing this, it's all part of the fun, and is almost expected somewhere down the line.....
For now, I've dispensed with the left hand side of the building. There was too much flat wall and it didn't look right.
Also, I've removed a large portion of the outer mill race wall...too much stone and it seemed to over power the mill wheel and building.
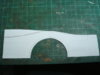
Here's the removal!
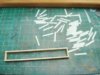
View attachment 82512
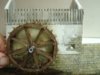
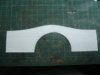
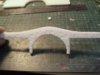
This shows the mill 'Kit' ready for assembly, then painting / weathering.
View attachment 82513
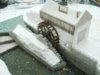
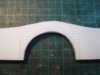
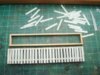
The building stuck together, the wheel added and placed dry to see what's what.....I've rested the cut off part of the building on the mill just to check I've done right by removing it......See the lowered outer wall? I think it gives a better balance...Too late to alter now!
View attachment 82514
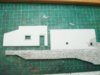
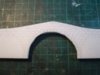
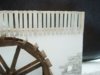
Happy with it, I've applied another coat of acrylic paint and added a cardboard roof ready for tiling.
View attachment 82515
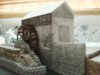
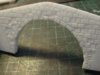
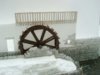
Here is the weathering on the mill up to now.....Always tilt the walls about 45 degrees, never flat, and do your brush work vertical, never across. Slosh the paint on and let it run down where it wants. This will show a natural water/ weather flow. Paint horizontal, and it will show through, no matter what you try, and it will look awful.....
See the darker grey splodge bit on the right of the cement work? It wasn't intentional, it just happened as the paint flowed down the polystyrene, but it looks great!
View attachment 82516 View attachment 82517 View attachment 82518
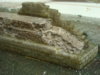
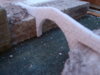
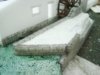
Finally, a quick word on the cut down outer mill wall...
I had a pleasant surprise with this. Because I cut down the wall, I had to break the poly. block to suit, and by accident came up with a great stone rubble texture...So apart from painting, I'm leaving it well alone.
View attachment 82519 .
That's it for this stage, next up bits and bobs and more brain storms, leading to more major alterations and additions!!!!!
Thanks for looking in.
Cheers all,
Ron


") this is breathtaking , you know what this reminds me of ?
this is breathtaking , you know what this reminds me of ?
scalemodelling.co.uk is a privately operated online discussion forum. All content posted by members reflects their own views and opinions and does not necessarily represent those of the forum owners or administrators. While reasonable efforts are made to moderate content, no responsibility is accepted for user-generated material. By using this site, you agree to comply with UK law and the forum rules.
") , coming together, well, cannot wait to see what you do next,
, coming together, well, cannot wait to see what you do next, 