Theme editor

Scale Model Shop

"There's an old mill by the stream, Nelly Dean!"

Status
Not open for further replies.
Thread owner
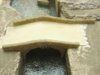
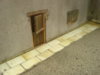
Here is the work I did on the bridge. This stage will more or less bring us up to date with progress....

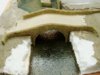
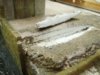
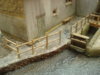
If you recall, the initial bridge build had wall extensions running on to the road.....Why I cut them off I don't know, 'cos it looks well sawn off! Luckily I didn't bin the ends so....

View attachment 83044


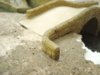
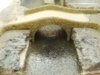
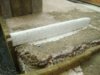
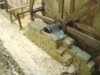
I've replaced, and bent them....For the hell of it really!

View attachment 83045


View attachment 83046


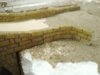
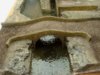
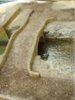
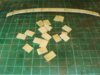
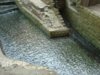
I didn't like the sheer sides below the bridge, so I got my fingers to work and literally picked the polystyrene away until I was happy with the stream bank.....Don't be afraid to do this sort of thing, it's all part of the diorama fun!

View attachment 83047


View attachment 83048


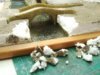
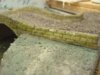
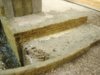
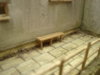
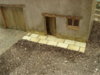
First coat on the 'stones'. I'll probably do something with them later, we'll see....

View attachment 83049


Next up, more work on the bridge and then the road is added.

Cheers,

Ron

View attachment 196067

View attachment 196068

View attachment 196069

View attachment 196070

View attachment 196071

View attachment 196072
 

Attachments

  • The Old Mill 083.jpg
    The Old Mill 083.jpg
    2.4 KB · Views: 0
  • The Old Mill 088.jpg
    The Old Mill 088.jpg
    2.6 KB · Views: 0
  • The Old Mill 089.jpg
    The Old Mill 089.jpg
    2.4 KB · Views: 0
  • The Old Mill 094.jpg
    The Old Mill 094.jpg
    3.1 KB · Views: 0
  • The Old Mill 093.jpg
    The Old Mill 093.jpg
    2.7 KB · Views: 0
  • The Old Mill 097.jpg
    The Old Mill 097.jpg
    2.8 KB · Views: 0
Thread owner
The bridge continues.......but before that, I decided to add a small wall to square off the area by the mill doors.....

View attachment 83055


View attachment 83056


View attachment 83057


Here is the first stage of the road. The sub-surface was PVA'd, then floor sweepings were sprinkled on...Job done!

View attachment 83058


I also added another section of bridge wall.

View attachment 83059


This shows all the extra walls fixed and the road surface ready for a bit more work. I think the brain storm of bending the walls adds a bit of variety.

View attachment 83060


Here is the bridge area thus far....with the addition of some green paint

View attachment 83061


That, good friends brings us up to date...well yesterday, before I butchered my finger!!

Now the main model is laid down, I need to think about starting to bring the model to life, so I've been sitting looking at the dio. and have come up with some ideas.

So next installment will hopefully involve getting started on some add-ons...

Thanks for looking,

Ron

View attachment 196078

View attachment 196079

View attachment 196080

View attachment 196081

View attachment 196082

View attachment 196083

View attachment 196084
 

Attachments

  • The Old Mill 109.jpg
    The Old Mill 109.jpg
    2.8 KB · Views: 0
  • The Old Mill 108.jpg
    The Old Mill 108.jpg
    2.7 KB · Views: 0
  • The Old Mill 112.jpg
    The Old Mill 112.jpg
    2.5 KB · Views: 0
  • The Old Mill 103.jpg
    The Old Mill 103.jpg
    2.6 KB · Views: 0
  • The Old Mill 090.jpg
    The Old Mill 090.jpg
    2.8 KB · Views: 0
  • The Old Mill 091.jpg
    The Old Mill 091.jpg
    2.6 KB · Views: 0
  • The Old Mill 100.jpg
    The Old Mill 100.jpg
    2.6 KB · Views: 0
Still so interesting Ron, although I'm surprised you haven't found a use for your lost blood! Perhaps a dye for a future build? ;)

I'm definitely going to try & replicate your effects on the walls etc - I think a dio is coming into my mind!
 
wow Ron ,looking great the little bits off altering have payed off, the bridge and road looks great :rolleyes:

you have do so well to blend in all the stone walls and make them uniformed, ;)

little changes make alot of diffidence to things ,

sorry to hear you cut your hand/finger, i could use the blood for my next one, oh lol, only jking hope its not to bad

looking forword to next update
 
Thread owner
Thanks for the great posts everyone.......also the wound has closed up a bit, so I'm able to do a bit more!

I've started to add a bit of detail now and putting them in, as and when the idea comes along.

Here I've added a rustic fence to stop people being chopped up by the wheel.....

View attachment 83154


A rudimentary 'Wheel clamp thingy'

View attachment 83155


Some paving slabs. These are 1/72 scale 3ft x 2ft and I've painted them in different shades of beige to break the blandness up a bit. I've purposely cut them into individual pieces to make them more natural and uneven when laid.

View attachment 83156


Here they are laid, complete with a diddy bench!

View attachment 83157


I laid some outside the house and also did a bit of groundwork...same as the bridge surface.

View attachment 83158


The surface here is a slurry of cement laid on with a brush to simulate rough concrete...

View attachment 83159


Another coat of varnish....This one I've confined to the center of the stream. See how it's smoothed out the middle a bit, but left the water below the steps still rippled, also the mill race appears deeper now, which was what I wanted.....

View attachment 83160


The second coat...see the slight difference?

View attachment 83161


I hope you like these 'add-ons'

Cheers,

Ron

View attachment 196177

View attachment 196178

View attachment 196179

View attachment 196180

View attachment 196181

View attachment 196182

View attachment 196183

View attachment 196184
 

Attachments

  • The Old Mill 085.jpg
    The Old Mill 085.jpg
    2.8 KB · Views: 0
  • The Old Mill 105.jpg
    The Old Mill 105.jpg
    2.8 KB · Views: 0
  • The Old Mill 119.jpg
    The Old Mill 119.jpg
    2.8 KB · Views: 0
  • The Old Mill 120.jpg
    The Old Mill 120.jpg
    2.4 KB · Views: 0
  • The Old Mill 122.jpg
    The Old Mill 122.jpg
    2.6 KB · Views: 0
  • The Old Mill 124.jpg
    The Old Mill 124.jpg
    2.2 KB · Views: 0
  • The Old Mill 082.jpg
    The Old Mill 082.jpg
    2.8 KB · Views: 0
  • The Old Mill 116.jpg
    The Old Mill 116.jpg
    2.9 KB · Views: 0
:eek: Wow Ron! This is unbelievable, just when I think 'Ron has done an exceptional job on this dio, there's nothing more to add, it's great! '...BANG there you go, add some here add some there...is there no end!? :P

Exceptional work, it really is outstanding Ron ;)

Lee :)
 
just by watching this build i think we can all learn from it,it really is awesome and the water spectacular

mobear
 
Thread owner
Lee and Ole, thank you both for your posts.....

Plenty more to come yet, I hope. Trees and general vegetation. Finish the water and add some sort of figures. Loads more weathering....That'll do for now!
 
wow Ron you never cease to amaze , all the little bits of detail,just add to the feeling of the place, its amazing your skills, ;)

looking real great, what are you going to surprise us with next :rolleyes:
 
Lovely work Ron, just amazing as it all comes together.

I may have missed it...more than likely...but what varnish have you used for the water effects, also does it dry or remain tacky?

Si:)
 
Ron that is incredible work this is going to be a masterpiece:)

And don't get sticking an optimistic doo dab on my post you modest chap lol:D
 
\ said:
Thanks for the great posts everyone.......also the wound has closed up a bit, so I'm able to do a bit more!I've started to add a bit of detail now and putting them in, as and when the idea comes along.

Here I've added a rustic fence to stop people being chopped up by the wheel.....

View attachment 83349

A rudimentary 'Wheel clamp thingy'

View attachment 83350

Some paving slabs. These are 1/72 scale 3ft x 2ft and I've painted them in different shades of beige to break the blandness up a bit. I've purposely cut them into individual pieces to make them more natural and uneven when laid.

View attachment 83351

Here they are laid, complete with a diddy bench!

View attachment 83352

I laid some outside the house and also did a bit of groundwork...same as the bridge surface.

View attachment 83353

The surface here is a slurry of cement laid on with a brush to simulate rough concrete...

View attachment 83354

Another coat of varnish....This one I've confined to the center of the stream. See how it's smoothed out the middle a bit, but left the water below the steps still rippled, also the mill race appears deeper now, which was what I wanted.....

View attachment 83355

The second coat...see the slight difference?

View attachment 83356

I hope you like these 'add-ons'

Cheers,

Ron
This is the dogs dangly bits Ron ole son masterful and ingenious.

scott
 
Thread owner
\ said:
what varnish have you used for the water effects, also does it dry or remain tacky?Si:)
Si, it's ordinary cheapo varnish, I found an old tin in my garage! Dries overnight.

Also, thanks to my good friends on here for your posts. All very embarrassing....but great reading!
 
Awesome and then some this forum is full of masters of their craft (oh yes you can tell they're masters as they make it all look so easy.
 
This is coming along very nicely.

Might have to try this one day.

Ian M
 
Yes, it's very inspirational stuff, and all so realistic looking. How do you distress the wood parts Ron?
 
Status
Not open for further replies.
Back
Top