
You are using an out of date browser. It may not display this or other websites correctly.
You should upgrade or use an alternative browser.
You should upgrade or use an alternative browser.
Trench Sections in 1:32 scale
- Thread starter Andy Belsey
- Start date
- Status
- Not open for further replies.
I have made a small bit of progress on the latest section which shows two parts of trench mines. When I have time, I'll post some photos, which I have at home - I have to post them from home, but never seem to have time to post! I 've just had a very welcome break from flood damage in Andorra.
Watch this space!
Andy
Watch this space!
Andy
Here are the promise progress shots of the little work I've done in recent months. I have to reduce them at home but never have time to post there these days, so I copied them to a memory stick and doing this during my lunch break at work. (I'm back home but have no end of tasks to do there!)
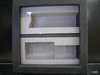
This is my 10th section model, which consists of two parts. The first shows tunnelers 'clay kicking' the soil as quietly as possible. The second, lower half, will show the tunnelers 'tamping' or blocking the mine charge with sandbags to force the explosion up rather than back through the tunnel.
View attachment 312225
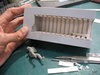
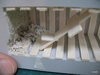
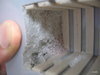
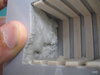
After creating boxes of acrylic, I clad the tunnels with strips of balsa. The roof timbers have a rebate to fix the upright to the walls.
View attachment 312226View attachment 312227View attachment 312228
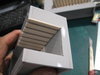
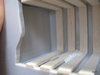
Where the explosive charge was I laid the timbers closer together. I've been following illustrations from a book by Peter Barton called Beneath Flanders Fields.
View attachment 312229
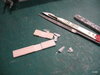
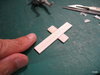
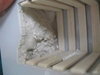
I made a 'crucifix' chair from balsa with a central rebate made by a mixture of cutting and filing.
View attachment 312230
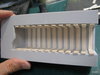
There will be some spare timbers waiting to be put in place once the next area has been clay kicked.
View attachment 312231View attachment 312232View attachment 312233
I had hoped to join the WW1 Group Build, but will not make much of a contribution, as time is still very scarce. Also I will have absolutely no chance of finishing on time as Mike Butler caught wind of what I was doing and has asked if he can paint the figures as Anzacs. I haven't even converted the figures yet. We have two other projects in the pipeline before he'll paint these, so it will be ages before this one is complete!! I'll try to get as much done as I can for Euro Expo in September.
Andy
This is my 10th section model, which consists of two parts. The first shows tunnelers 'clay kicking' the soil as quietly as possible. The second, lower half, will show the tunnelers 'tamping' or blocking the mine charge with sandbags to force the explosion up rather than back through the tunnel.
View attachment 312225
After creating boxes of acrylic, I clad the tunnels with strips of balsa. The roof timbers have a rebate to fix the upright to the walls.
View attachment 312226View attachment 312227View attachment 312228
Where the explosive charge was I laid the timbers closer together. I've been following illustrations from a book by Peter Barton called Beneath Flanders Fields.
View attachment 312229
I made a 'crucifix' chair from balsa with a central rebate made by a mixture of cutting and filing.
View attachment 312230
There will be some spare timbers waiting to be put in place once the next area has been clay kicked.
View attachment 312231View attachment 312232View attachment 312233
I had hoped to join the WW1 Group Build, but will not make much of a contribution, as time is still very scarce. Also I will have absolutely no chance of finishing on time as Mike Butler caught wind of what I was doing and has asked if he can paint the figures as Anzacs. I haven't even converted the figures yet. We have two other projects in the pipeline before he'll paint these, so it will be ages before this one is complete!! I'll try to get as much done as I can for Euro Expo in September.
Andy
Attachments

G
Guest
Guest
Andy .
All looking very smart and well researched. I particularly liked the timber of course and the halving joint is neat indeed. Good to see you back even if not that often.
John .
All looking very smart and well researched. I particularly liked the timber of course and the halving joint is neat indeed. Good to see you back even if not that often.
John .
G
Guest
Guest
Hi Andy do you mean Euro Miniaures Expo 2018. 22nd & 23rd September at Leas Cliff Hall, Folkstone, CT20 2DZ.
If so do you know which day or days you will be there, I'm going so I might bump into you so find a good place to hide or the teas are on you :smiling3::smiling3::smiling3:
Nice to see you back at the bench, another masterpiece coming up by the look of it :thumb2:
Pete.
If so do you know which day or days you will be there, I'm going so I might bump into you so find a good place to hide or the teas are on you :smiling3::smiling3::smiling3:
Nice to see you back at the bench, another masterpiece coming up by the look of it :thumb2:
Pete.
Yes Pete, That's the place. I'm trying to get permission from SWMBO to go both days, but will be there on Saturday. I will probably be based with Darren on the Tommy's War stand, so you should be able to track me down there. There are plans afoot to have my sections and diorama on display somewhere, but that's not finalised yet.Hi Andy do you mean Euro Miniaures Expo 2018. 22nd & 23rd September at Leas Cliff Hall, Folkstone, CT20 2DZ.
If so do you know which day or days you will be there, I'm going so I might bump into you so find a good place to hide or the teas are on you :smiling3::smiling3::smiling3:
Nice to see you back at the bench, another masterpiece coming up by the look of it :thumb2:
Pete.
Andy
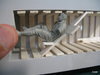
I'm using one of Tommy's War's gun crew for my clay kicker. I'll convert his leg so that both are bent equally to accommodate his spade (which I've not yet made.) When I've sanded his bottom a little, he won't be bashing his head on the ceiling.
View attachment 312304
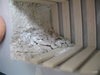
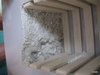
I'll show you a series of photos showing how I created the end wall using curing car body filler.
This photo shows the area before I added any filler.
View attachment 312305
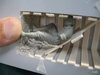
The first layer was added wet to get the basic shape of the wall.
View attachment 312306
I then added smaller area of filler to fill in the gap at the back corner.
View attachment 312307
I then added small areas of curing filler. It goes crumbly as it cures and the catalyst starts to act. You only have a minute or two, so have to do it in small bits. (I've got a fuller explanation on my website).
View attachment 312308
Notice how the latest area is darker pink because I added more catalyst.
View attachment 312309
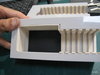
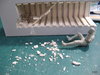
Lastly I put in some pieces of filler that I dug out of the front wall. I wanted to create an area where the spade had been working, so I stuck in a small chisel and gouged out an area while the filler was still soft. It gets harder after and hour or so. The pieces that were gouged out were then stuck on the floor with PVA as chunks of soil. I'll have a second guy lying on the floor collecting this loose soil.
View attachment 312310
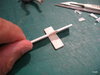
The crucifix chair sits between the support timbers, top and bottom. You'll see I've added the seat part.
View attachment 312311
Here's how the figure sits on it.
View attachment 312312
View attachment 312313
Andy B
View attachment 312304
I'll show you a series of photos showing how I created the end wall using curing car body filler.
This photo shows the area before I added any filler.
View attachment 312305
The first layer was added wet to get the basic shape of the wall.
View attachment 312306
I then added smaller area of filler to fill in the gap at the back corner.
View attachment 312307
I then added small areas of curing filler. It goes crumbly as it cures and the catalyst starts to act. You only have a minute or two, so have to do it in small bits. (I've got a fuller explanation on my website).
View attachment 312308
Notice how the latest area is darker pink because I added more catalyst.
View attachment 312309
Lastly I put in some pieces of filler that I dug out of the front wall. I wanted to create an area where the spade had been working, so I stuck in a small chisel and gouged out an area while the filler was still soft. It gets harder after and hour or so. The pieces that were gouged out were then stuck on the floor with PVA as chunks of soil. I'll have a second guy lying on the floor collecting this loose soil.
View attachment 312310
The crucifix chair sits between the support timbers, top and bottom. You'll see I've added the seat part.
View attachment 312311
Here's how the figure sits on it.
View attachment 312312
View attachment 312313
Andy B
Attachments
-
 IMG_3328.JPG2.4 KB · Views: 0
 -
 IMG_3329.JPG2.7 KB · Views: 0
 -
 IMG_3331.JPG2.8 KB · Views: 0
 -
 IMG_3332.JPG3.2 KB · Views: 0
 -
 IMG_3323.JPG2.4 KB · Views: 0
 -
 IMG_3321.JPG2.5 KB · Views: 0
 -
 IMG_3266.JPG2.7 KB · Views: 0
 -
 IMG_3317.JPG2.3 KB · Views: 0
 -
 IMG_3318.JPG2.4 KB · Views: 0
 -
 IMG_3320.JPG2.4 KB · Views: 0
G
Guest
Guest
The magic continues....
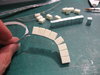
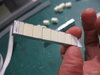
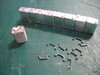
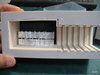
Here's how far I've got with the explosive side of my mining sections. The ammonal was stored in Flimsies (former Petrol cans). I've made them before so worked out ways to make a lot of them. Rather than making individual ones I made a lot in rows and just stuck the aluminium foil over them, burnishing it around the foam blocks.
View attachment 312759View attachment 312760View attachment 312761
View attachment 312762
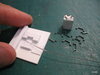
I've left the backs uncovered as no one will ever see it.
View attachment 312763
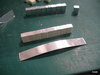
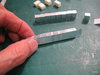
I wanted to find a way to create lots of handles easily so made a jig from bits of styrene strip. Press the two halves together with a strip of pie foil in the middle and they just need cutting to length.
View attachment 312764
View attachment 312765
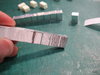
The spouts are just short lengths of styrene rod. I have quite a few to create and looking at photos of the real thing they didn't stack very well as the handles and spouts made them unstable. I'll try to recreate this on the upper levels. I'm only going to create a skirt of flimsies with a block in the middle.
View attachment 312766
The pile of flimsies will sit here with sandbags being piled up at the end of the tunnel to force the explosion up rather than back down the tunnel. I'll have lots of wires coming from the cans towards the detonators too.
View attachment 312767
Andy
View attachment 312759View attachment 312760View attachment 312761
View attachment 312762
I've left the backs uncovered as no one will ever see it.
View attachment 312763
I wanted to find a way to create lots of handles easily so made a jig from bits of styrene strip. Press the two halves together with a strip of pie foil in the middle and they just need cutting to length.
View attachment 312764
View attachment 312765
The spouts are just short lengths of styrene rod. I have quite a few to create and looking at photos of the real thing they didn't stack very well as the handles and spouts made them unstable. I'll try to recreate this on the upper levels. I'm only going to create a skirt of flimsies with a block in the middle.
View attachment 312766
The pile of flimsies will sit here with sandbags being piled up at the end of the tunnel to force the explosion up rather than back down the tunnel. I'll have lots of wires coming from the cans towards the detonators too.
View attachment 312767
Andy
Attachments

G
Guest
Guest
Andy.
Very neat idea, read a nice comment on You Tube earlier mentioning you work.
John.
Very neat idea, read a nice comment on You Tube earlier mentioning you work.
John.
- Status
- Not open for further replies.
Legal Notice
scalemodelling.co.uk is a privately operated online discussion forum. All content posted by members reflects their own views and opinions and does not necessarily represent those of the forum owners or administrators. While reasonable efforts are made to moderate content, no responsibility is accepted for user-generated material. By using this site, you agree to comply with UK law and the forum rules.
Currently on our website
Threads
37,392
Messages
707,805
Members
2,652
Latest member
Waffenträger Auf E-100