Theme editor

Scale Model Shop

Tristar Marder III Ausf H

Status
Not open for further replies.
Thread owner
Evening John,
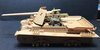
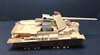
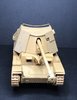
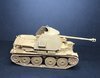
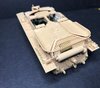
Good to see you:smiling2: The paints are a mixture of Tamiya and Vallejo. The red oxide and ivory (probably not correct colour but I like em:thumb2:) are Tamiya, As is the transmission and steering mech.
All other bits and bobs being Vallejo apart from the brass which was ak extreme metal? The whole lot was varnished with klear and then an enamel based filter I found at the back of the cupboard! Bet you wish you’d never aske ehh:smiling5:.


More progress tomorrow’s
Si
 
Hi Si - I have a couple of Tristar kits and some Hobbyboss re-boxes and they do seem to go a bit mad with the parts count.

I don't mind adding my own bits but somehow having them all there in a box seems rather daunting so I keep putting the kits back in the stash :flushed:

You seem to be getting on fine with this one anyway :thumb2:
 
Si,
Lot of nice work going on there, will keep an eye out for more.
Cheers,
MikeC.
 
Thread owner
Simon...sounds crazy but kinda makes sense. Not only lots of parts but some rather large/ awkward attachment points too...razor saw essential!

Mike...good to see you shaved for your new avatar pic:tongue-out3: Thanks for checking in mate:thumb2:

Small update for you folks....Has moved on quicklyView attachment 301761

View attachment 301762View attachment 301763
plenty of PE dotted about, and more left on the fret still.

Thanks for looking
Si
 

Attachments

  • 9C72FAA5-2892-43A9-8C7C-2ED97CEF06F3.jpeg
    9C72FAA5-2892-43A9-8C7C-2ED97CEF06F3.jpeg
    2.9 KB · Views: 0
  • 6BCE9CCE-2FBC-4CC1-89DE-1E579E5BE4F6.jpeg
    6BCE9CCE-2FBC-4CC1-89DE-1E579E5BE4F6.jpeg
    3.6 KB · Views: 0
  • 3AEAD4BA-D534-4416-B346-5AE328E1CE47.jpeg
    3AEAD4BA-D534-4416-B346-5AE328E1CE47.jpeg
    3 KB · Views: 0
This one is progressing lovely, Tristar kits have nice details. Keep going Si, you're on a roll.
 
OOOOOOOOoooo!!!
Mr. Benson goes bling...Film at 11 pm!!!

Seriously Si, You are doing a very nice job here. I love the colors and the clean work. I too have some Tristar kits in the stash and they look good. I'm surprised that you didn't scratch a motor for it though. You could rob one of the Dragon 38T based kits for one. Quite a few do have the complete engine compartment included...Have fun buddy!
Prost
Allen
 
Si.
I'm glad I did ask! :tongue-out3: Always interesting how others achieve the look. The Klear coat because of the enamel wash ?

John .
 
Si

Nice progress shots. Looks like it is all coming together well. Have you had a look at the PAK 40 yet? Any spare tracks left to put around the hull for extra armour?

Steve
 
Where are you Si ?
Probably at the branch meeting of the Tidy Bench Club perusing my 20th application form.:tongue-out3:
John.
 
Thread owner
Guy...:thumb2:

Allen...Good to see ya fellah, I’m really not sure about the Santa avatar...I like captain Jack better:cool: 
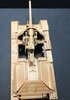
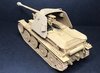
I did the 38t engine on a GB build from last year, so don’t feel I’m missing doing another so soon. Always having fun brutha :thumb2:

John...I tend to put a varnish coat on after the paint,before doing a wash/filter... Tamiya paint can be so matt that sometimes soaks up washes/ filters in a crappy way. I only used klear coz I found it in the back of the cupboard, brought in when I first started building 8yrs ago!!

Scottie...:thumb2:

Steve’o....( said in an Aussie accent:upside:) I just stated putting the Afv club gun together. It’s good but there is more part clean up compared to tristar. I got plenty of 38t tracks knocking about since this is now my 3rd:tongue-out3:

John...I think the TBC are auditing there own ranks...I saw a suspicious group of starlings looking through my window taking notes:anguished:

Si
 
Good morning Si, nice to see some progress on this one. Looking good there!

Cheers
 
Great start Si. Looks very detailed. Should be killer. PaulE
 
Thread owner
Wouter...:thumb2:
Paul...
You’re right about the details, tristar did a good job for such a cheap kit.


Spent a few hours Friday night assembling the pak 40...very fiddly!! Everything balancing in place for a dry fit. I think I read somewhere that getting the gun and shields to go together can be a pain?View attachment 302255
View attachment 302254
View attachment 302256

The AFV club pak 40 supplied in this kit isn’t as refined as the rest of the build.....either that or I’d had too much beer?
Either way I got a bit of filling and clean up to do.

Thanks for looking
Si
 

Attachments

  • 151CB981-6273-4A2D-814B-D58E5B4C3A72.jpeg
    151CB981-6273-4A2D-814B-D58E5B4C3A72.jpeg
    2.7 KB · Views: 0
  • 5B5D4D7D-C7D3-42CE-9B2A-BAB1771A2BB8.jpeg
    5B5D4D7D-C7D3-42CE-9B2A-BAB1771A2BB8.jpeg
    2.6 KB · Views: 0
  • EF245B2D-8BBC-4032-B44A-89B020E09CD7.jpeg
    EF245B2D-8BBC-4032-B44A-89B020E09CD7.jpeg
    3.2 KB · Views: 0
Too much beer should be alright I guess. I had litres of English beer last weekend (Camden Hell, quite good actually, and that coming from a Belgian LOL) and didn't feel anything of it :smiling5:.
Hope the fiddly part won't make things difficult in later stages ^^. Is the gun barrel a one piece barrel or did you need to glue two halves together?

Cheers
 
Si

I have a few PAK's now and they are a nightmare. Looks like you have tamed the beast. Does the kit come with a radio set on the outer guard?
 
Hi Si this has come together very nicely, looks really great :thumb2:
Pete.
 
Thread owner
Wouter...glad you enjoyed the English beer. If I’m honest I much prefer your stuff! Well the fiddly bits have tied me...but I’m moving along again. The gun barrel was one piece with a minor clean up...the muzzle break wasn’t and required some careful filling and clean up.

Steve...no radio set other than the one down below. I’ve looked for a am one but decided against it.
Pete...thanks for looking in mate:thumb2:


Update in bound.....
So after painting two more ammo racks for the interior, I moved onto the top parts and then the tracks.

View attachment 303822

View attachment 303823

View attachment 303824

View attachment 303825

The tracks need time to dry before painting up but shouldn’t take long. I managed to get a base coat on but it went grainy in places. Once I get the top coat on it should come together.

I’ve left the shield loose as I’ve got some more bit to add still.
Thanks for looking
Si
 

Attachments

  • F2FC4D89-BBF3-4948-822B-30F7AD144AE7.jpeg
    F2FC4D89-BBF3-4948-822B-30F7AD144AE7.jpeg
    2.8 KB · Views: 0
  • 10457919-C0B6-49DE-B7AC-44050B43164B.jpeg
    10457919-C0B6-49DE-B7AC-44050B43164B.jpeg
    3 KB · Views: 0
  • 43A5996D-7FD6-46BC-877B-CFF751C42DF9.jpeg
    43A5996D-7FD6-46BC-877B-CFF751C42DF9.jpeg
    2.9 KB · Views: 0
  • 4765E3CA-29B7-4D04-B351-2B009BADCF0B.jpeg
    4765E3CA-29B7-4D04-B351-2B009BADCF0B.jpeg
    3.3 KB · Views: 0
Build looking really goooooood:cool:. Should be ready for the wet stuff soon. Permission to carry on:smiling5:
 
Ah, good to see this one back up. I was thinking about the Marder this week. Looking good mate.

What paint did you use? If it's Tammi which has a grainy finish you can always spray Mr. Levelling Thinner on top of the model. It helps the paint level again. (don't touch the model while still wet with Mr. Levelling Thinner though LOL or you might need to restart)

Looking forward to the next update, now don't keep us waiting for too long mate :P

Cheers
 
Status
Not open for further replies.
Back
Top