
You are using an out of date browser. It may not display this or other websites correctly.
You should upgrade or use an alternative browser.
You should upgrade or use an alternative browser.
Trumpeter 1/32 Grumman Wildcat early version
- Thread starter Vaughan
- Start date
- Status
- Not open for further replies.
Sorry Vaughan - I had a problem loading the last lot of images before I posted and did not realise you had already closed up the fuselage. Its looking very good I have to say...
I am delayed with mine as I have decided to source a new undercarriage (had a bit of luck...) which should arrive within a week.
I am delayed with mine as I have decided to source a new undercarriage (had a bit of luck...) which should arrive within a week.
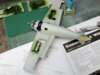
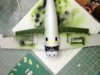
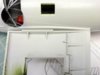
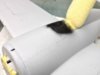
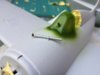
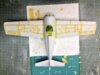
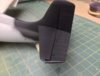
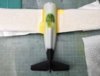
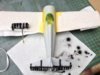
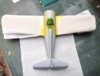
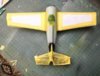
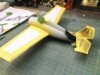
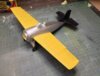
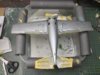
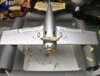
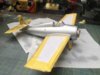
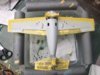
Well luckily after having a long think and a trawl of the many modelling forums I came up with a save on the fitting of the wings. Several build reviews had made comment about the poorly fitting wings and if possible, as Barry had suggested, to fit them first to the fuselage halves before buttoning it all up. Luckily for me there was an alternative which involved gluing the top half of the wing with the tab on to the fuselage first thus creating a near perfect fit and then follow up with the bottom half. I'm now half way through the process and all seems to be good.
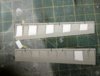
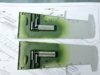
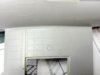
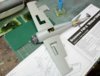
There's a fair amount of detail inside the wings so I thought I might have the inspection covers for the cartridge belt feeds open, but typically there are some very nice ejector pin marks on the inside of the covers so filling and sanding will be required. The same again with the wing flaps, this time I have opted to cover them with thin plastic card as filling and then sanding would have been near impossible. So having done all that hard work fiddling about with PE hinges and once offered up to the wings on a dry fit the flaps hardly move. Next will be to attach the lower halves of the wings and maybe work out a way of freeing up the flaps more.
Vaughan
View attachment 53416
View attachment 53417
View attachment 53418
View attachment 53419
View attachment 53420
View attachment 53421
View attachment 53422
View attachment 53423
View attachment 53424
View attachment 53425
View attachment 53426
View attachment 53427
View attachment 166442
View attachment 166443
View attachment 166444
View attachment 166445
View attachment 166446
View attachment 166447
View attachment 166448
View attachment 166449
View attachment 166450
View attachment 166451
View attachment 166452
View attachment 166453
Attachments
-
 IMG_2401.jpg2.8 KB · Views: 0
 -
 IMG_2413.jpg3 KB · Views: 0
 -
 IMG_2412.jpg2.4 KB · Views: 0
 -
 IMG_2411.jpg2.3 KB · Views: 0
 -
 IMG_2410.jpg2.3 KB · Views: 0
 -
 IMG_2405.jpg2.4 KB · Views: 0
 -
 IMG_2404.jpg1.7 KB · Views: 0
 -
 IMG_2403.jpg2.9 KB · Views: 0
 -
 IMG_2402.jpg2.1 KB · Views: 0
 -
 IMG_2418.jpg2.6 KB · Views: 0
 -
 IMG_2419.jpg2.1 KB · Views: 0
 -
 IMG_2417.jpg2.9 KB · Views: 0
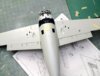
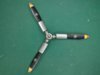
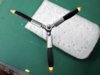
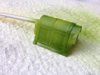
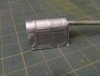
Hi All not much progress at the moment but I have completed the prop usual colour of black and silver. The tips should be painted red,yellow and blue and I would normally mask and spray them but the kit did supply decals. So I gave them a go and to my surprise they worked. Needed a bit of decalsoft and I'm pleased with the result. I then followed up with some dry brushing on the tips and leading edge.
Vaughan
View attachment 53906
View attachment 53907
View attachment 166932
View attachment 166933
Vaughan
View attachment 53906
View attachment 53907
View attachment 166932
View attachment 166933
Attachments
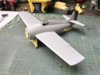
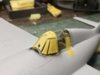
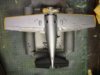
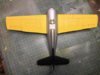
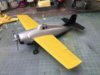
Here's a further update for anyone who's interested. I've masked the canopy and attached the front section. The Wildcat has had a coat of grey primer and I pre-shaded the wings with yellow and a drop of brown followed up with straight yellow. The result is nice and subtle. The next step will be to mask off the wings in readiness for the aluminium.
Vaughan.
View attachment 54422
View attachment 54423
View attachment 54424
View attachment 54425
View attachment 54426
View attachment 54427
View attachment 54428
View attachment 54429
View attachment 167448
View attachment 167449
View attachment 167450
View attachment 167451
View attachment 167452
View attachment 167453
View attachment 167454
View attachment 167455
Attachments

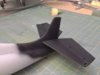
The wings are masked off so I can make a start on the tail section, first pre-shading with black and then following up with black and a drop of white. This hasn't produced the desired effect I was after, so I will have to post shade with true black airbrushing with a fine needle. Once I'm happy I will mask it off in readiness for the aluminium on the fuselage and wings. I have also made a tentative start with the aluminium and sprayed the canopy. Once cured I will apply a coat of Klear to protect it. Later today or maybe tomorrow morning I'll attempt to spray the engine cowling and control flaps.
Vaughan
View attachment 54549
View attachment 54550
View attachment 54551
View attachment 54552
View attachment 54553
View attachment 54554
View attachment 167575
View attachment 167576
View attachment 167577
View attachment 167578
View attachment 167579
View attachment 167580
Vaughan
View attachment 54549
View attachment 54550
View attachment 54551
View attachment 54552
View attachment 54553
View attachment 54554
View attachment 167575
View attachment 167576
View attachment 167577
View attachment 167578
View attachment 167579
View attachment 167580
Attachments
The canopy had a coat of klear yesterday and today I've given it a dark dirt wash to high light the rivet detail and then removed the masking. I'm pleased with the result. Still yet to sort out the post shading on the tail section once done I will mask it off ready for the aluminium. There's no escaping it I'm running out of other stuff to do.
Vaughan
View attachment 54579
View attachment 167605
Vaughan
View attachment 54579
View attachment 167605
Attachments
G
Guest
Guest
That wash really made the rivets pop Vaughan,looking forward to seeing you tackle that aluminum!
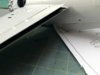
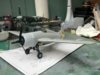
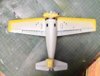
Here's my progress over the last two days. I masked off the tail section I hope I've got the profile right. Then the upper wing surface running over the leading edge and wing tips. Loaded up my Iwata BR with Vallejo Aluminium ( after shaking it till I thought my arm was going to fall off)and off I went. The paint went down well and I built up the layers slowly. This morning I took the masking off and I'm please with the results I will now have to allow the aluminium to cure for 48 hours and then seal with some Klear.
Vaughan
View attachment 54646
View attachment 54647
View attachment 54648
View attachment 54649
View attachment 54650
View attachment 54651
View attachment 54652
View attachment 54653
View attachment 54654
View attachment 167672
View attachment 167673
View attachment 167674
View attachment 167675
View attachment 167676
View attachment 167677
View attachment 167678
View attachment 167679
View attachment 167680
Attachments
-
 20121026_0869.jpg2.6 KB · Views: 0
 -
 20121026_0870.jpg2.9 KB · Views: 0
 -
 20121026_0882.jpg2.5 KB · Views: 0
 -
 20121026_0881.jpg2.3 KB · Views: 0
 -
 20121026_0880.jpg2.5 KB · Views: 0
 -
 20121026_0875.jpg2.7 KB · Views: 0
 -
 20121026_0874.jpg2.9 KB · Views: 0
 -
 20121026_0872.jpg2.8 KB · Views: 0
 -
 20121026_0871.jpg2.9 KB · Views: 0
G
Guest
Guest
That's amazing! I really appreciate the skills that you guys have.
Aidan
Aidan
G
Guest
Guest
Awesome masking technique ,nice crisp lines and no blow outs ! NMF is looking super clean Vaughan!
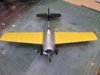
Thanks guys here's a quick sneak preview. I've sprayed the engine cowl and added the black band including a wash to highlight the rivet detail it's looking a little dull so will have to work on that one, but the rest I'm pleased with.
Vaughan
View attachment 54749
View attachment 54750
View attachment 167775
View attachment 167776
Vaughan
View attachment 54749
View attachment 54750
View attachment 167775
View attachment 167776
Attachments
- Status
- Not open for further replies.
Legal Notice
scalemodelling.co.uk is a privately operated online discussion forum. All content posted by members reflects their own views and opinions and does not necessarily represent those of the forum owners or administrators. While reasonable efforts are made to moderate content, no responsibility is accepted for user-generated material. By using this site, you agree to comply with UK law and the forum rules.