Theme editor

Scale Model Shop

Trumpeter 1/32 Grumman Wildcat early version

Status
Not open for further replies.
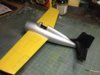
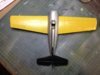
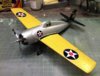
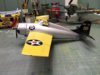
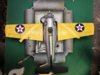
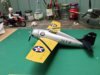
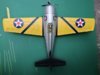
Look all like Vaughan standard here Vaughan. Super standard.

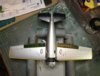
Very nice detailing. Like the aluminuim finish.

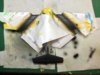
I flick of the spout on the Vallejo bottle & give a good mix with a little paint stirrer. Saves the arm wrestling bit.

Laurie
 
Thread owner

Attachments

  • 20121031_0892.jpg
    20121031_0892.jpg
    5.9 KB · Views: 0
  • 20121031_0894.jpg
    20121031_0894.jpg
    2.7 KB · Views: 0
  • 20121031_0893.jpg
    20121031_0893.jpg
    5.5 KB · Views: 0
Thread owner
The decals are down with the exception of the wing stripes which don't line up with the leading and trailing edge when trying to put them at the correct angle. Will have to have a re-think on this one, might need to get my airbrush and masking tape out but only as a last resort. Anyway the decals went down fine just a little Decalsoft needed.

Vaughan

View attachment 54867

View attachment 54868

View attachment 54869

View attachment 54870

View attachment 54871

View attachment 167893

View attachment 167894

View attachment 167895

View attachment 167896

View attachment 167897
 

Attachments

  • 20121101_0905.jpg
    20121101_0905.jpg
    5.7 KB · Views: 0
  • 20121101_0903.jpg
    20121101_0903.jpg
    2.8 KB · Views: 0
  • 20121101_0902.jpg
    20121101_0902.jpg
    3 KB · Views: 0
  • 20121101_0900.jpg
    20121101_0900.jpg
    2.8 KB · Views: 0
  • 20121101_0898.jpg
    20121101_0898.jpg
    2.8 KB · Views: 0
Looking very nice Vaughan.

Love that joint at the tail with the fuselage. Nice sweep & the paint joint between the two is perfect. What tape did you use for masking ?

Laurie
 
Thread owner
Thanks Laurie I used just good old 18mm Tamiya tape cut down to about 3mm so I could get the curve right.

Vaughan
 
Looking really sweet Vaughan,you've got some mad taping skills for sure!
 
Looking very nice Vaughan,

It will make a nice colourful alternative to all the camo' stuff we build. If think I need a bit of colour in my display cabinet.

Colin.
 
Thread owner
Thanks Guys

Still working on the wing stripes. I tried using the decals supplied but they just split and disintegrated, so it looks like it will be an airbrush job which I'm not looking forward to.

Vaughan.
 
Know how you feel Vaughan. On the Catalina there are black stripes along wings fuselage & you name it. All produced in decals. Just took one look & knew they were going to be a pain & wreck all the time I had spent. They just were not authentic.. So pleased at the end that I did airbrush them.

Bit of creep here & there under the tape despite lots of care. Also took a flat brush & with just a hint of Vallejo Matt varnish drew the brush along as much as possible the lower edge of the tape where it meets the plastic to provide a bit of a seal. Worked quite well.

Found it worth every effort in the final looks.

Laurie
 
Thread owner
Well I've bitten the bullet and started on the wing stripes. Firstly I masked with 10mm tape and then followed with 6mm either side and then removed the 10mm. Next I masked off the wings. Here's where I'm up to both upper and lower wings are up to this stage. Will allow it dry over night before I re-mask the centre with 8mm and spray the white. Fingers crossed this will work hopefully there will be no bleed.

Vaughan

View attachment 54954

View attachment 54955

View attachment 54956

View attachment 54957

View attachment 167980

View attachment 167981

View attachment 167982

View attachment 167983
 

Attachments

  • 20121103_0919.jpg
    20121103_0919.jpg
    2.8 KB · Views: 0
  • 20121103_0915.jpg
    20121103_0915.jpg
    2.8 KB · Views: 0
  • 20121103_0913.jpg
    20121103_0913.jpg
    2.9 KB · Views: 0
  • 20121103_0912.jpg
    20121103_0912.jpg
    2.9 KB · Views: 0
Vaughan looks like you have it well under control,looking forward to the money shot!
 
Thread owner
Well the white pin stripe has been added sorry no photos of the masked bands as I was keen to get on with the process. Anyway the masking is off and I'm very pleased with the result. There's a little tiding required on the leading edges but that's all that's needed.

Next will be a coat of semi-gloss varnish as I gather the paint work was gloss(full gloss would look OTT on this scale). I found this photo not of a Wildcat but it's a yellow wing of the era. Dangly bits like ariel masts, gun barrels, tail wheel, viewing windows on lower fuselage and gun sight yet to be added I'm nearly there!

Vaughan

View attachment 55005

View attachment 55006

View attachment 55007

View attachment 55008

View attachment 168031

View attachment 168032

View attachment 168033

View attachment 168034
 

Attachments

  • 20121104_0923.jpg
    20121104_0923.jpg
    2.7 KB · Views: 0
  • 20121104_0922.jpg
    20121104_0922.jpg
    6.1 KB · Views: 0
  • 20121104_0921.jpg
    20121104_0921.jpg
    5.5 KB · Views: 0
  • Screen shot 2012-10-01 at 09.10.36.jpg
    Screen shot 2012-10-01 at 09.10.36.jpg
    6.5 KB · Views: 0
Superb work vaughan , the paint job is top class. Nice pic of the devastator too , very useful as ive got one to do soon! looking forward to the finished pics , cheers tony
 
Nice work Vaughan those stripes look perfect & much better than any decals would.

Interesting to note the shot on board the carrier. They must be brand new aircraft they are prestine. Interesting to note the wooden flight deck of the American Carriers.

Laurie
 
Thread owner
Thanks, Apparently Laurie the aircraft in this case Douglas Devastators were cleaned every day during this period of time so might not have been new and also it's interesting to know that it's the same carrier USS Wasp that my model would have been based on.

Vaughan
 
Thread owner
Hi all the dangly bits have been added and I have posted the finished pictures in the Aircraft section. Thanks for all your comments and interest.

Vaughan
 
Status
Not open for further replies.
Back
Top