Theme editor

Scale Model Shop

Trumpeter .Ch tz s65 Tractor Diorama

  • Thread starter Thread starter Guest
  • Start date Start date
Status
Not open for further replies.
Thread owner
Dave.
Yes I can see this happening, the good thing is the top is bolted to the wall and cabinet, but I can see me on the floor as It comes off the Velcro !:smiling4: and things flying around .

John .
 
Thread owner
So you've finally roped the boss into the hobby! They all succumb in the end. Seriously though, the apron is a great idea:thumb2:.
 
Thread owner
Hi there John tractor looks awesome and you off to a great start with the tank! I don’t know if your tank came with decals or not ! If not and you need some let me know I can post some over to you as I just get a big sheet so loads ofspares for you! Regards Danny
 
Thread owner
Morning all .
Cooler today here with some cloud, no doubt heralding Peters holiday ! E
Jim ........Thank you , your so kind :smiling4:
Peter ..... Hello, certainly works, but I think C likes me out in the cave. :surprised: !
Danny ....Hi mate, thank you for the offer pm sent .

Right as it's the coolest place in the house I shall have my toast and coffee and get up. !
Good morning
JR
 
Thread owner
Having emerged from the coolest room I continued with the tracks. Excitement here at Race Towers was high. guess what the tracks FIT.........
OK not in expert track fitters league, but they are on.
View attachment 307914
Bit tight on the top run,
View attachment 307915
and on this side.
Plenty of spare on the bottom. I started on the top, then did the returns. If I had made the top slightly longer , say by 6 links per side, then I would not have had enough. Mind you I suppose I could have had less in those bottom runs, even not completing them as they won't be seen. But I managed it with about 6 spare. Next time I will know better ! :smiling4:

View attachment 307916
and one with the top on, unglued of course .

View attachment 307917
This year I have managed not to be bothered by figures any more and now tracks. How long this will last is anyone's guess
.!!! No I' not going to do a truck...... that's like shouting out MINIART to some on here.
Comments, abuse and the general feed back welcome .
John.

Thanks to Dave Ward for enabling me to do this with his suggestions. :thumb2::thumb2::thumb2:
 

Attachments

  • _MG_3251.jpgA1.jpg
    _MG_3251.jpgA1.jpg
    2.3 KB · Views: 0
  • _MG_3252.jpgA2.jpg
    _MG_3252.jpgA2.jpg
    2.4 KB · Views: 0
  • _MG_3254.JPG
    _MG_3254.JPG
    2.5 KB · Views: 0
  • _MG_3253.jpgA3.jpg
    _MG_3253.jpgA3.jpg
    2.4 KB · Views: 0
John,
that looks great - now you've got the technique, you shouldn't have any more trouble with tracks! Roll on the paint!
Dave
 
Thread owner
Dave,:thumb2:

Hi plastic fans.
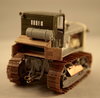
Here is the up date on the T40s
Plenty of small etch, and I managed not to loose any ( apron working well .) Ive been using some flexi CA by VMS.
I cleaned the back of the etch, just a slight abrade with a needle file, a slight dap of CA. and low and behold it fell off. So much for the advert saying it sticks well . I retried, of course I had to remove the ca from the model, you will still see quite a bit.
Some times it worked , spot on, not a fast grab, so if you move slightly then that's it back to square one.
Reverted back to my cheapo Tool Station CA, love this , quick spray with the accelerator, job done. Using some cheap plastic applicators, they clog up a little, but just clean off the end and start again.

There were some quite small parts in the kit, Allen Dewire had told me about these and how Hobby Boss will break a part down into far too many subsections. Several times I had to join very thin plates to the hull, then try to glue a towing eye, would have been better to do that in one part.
Two options for the turret fire power, I chose the METAL barrel over the larger machine gun. There was a plastic barrel, why anyone would want to fit that when the metal one was in the kit ?

Not a bad little kit, anyone with more experience would most likely sail through this. I did like the PE, some interesting bends, as in the light s, handed as well , but I managed this with out the jig .I even sanded lightly the end pins and to my amazement the pins went in to the pe brkts !!!
Just have to do a little clean up, I had the option to leave the hatches up, but didn't want to attempt in interior.So left the drivers hatch just open .Left off the tow rope, very nice piece of copper wire, but no towing eyes, strange thing to supply half finished. Ive left the pe brkts on the wing, and will use an Eureka XXL set with the StS65.
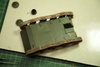
Also I had added a fuel drum, now converted to a water carrier to the back of the St 65, and will be hanging a bucket from the tap .

View attachment 308092
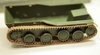
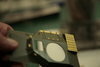
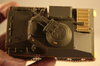
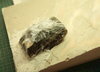
To me this was some serious bling :cool:, that bar section, above the three to the right of the engine grill was the thinnest part I have ever managed to remove with my saw with out snapping ..
Now you can hardly see it !.

View attachment 308094

View attachment 308095
View attachment 308096

View attachment 308097

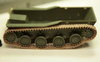
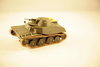
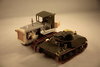
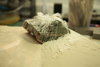
Shows how big the St65 was compared to this little tank. No problem in pulling this.!
View attachment 308099
View attachment 308100
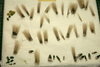
Tap !. I can see some clean up required on both of them before the paint.
Talking of, painting this will have to be done in between doing the dio. That way when I have to let something dry I can fall back on to the painting and the weathering.

Thanks for looking in. Comments welcome !

John .
 

Attachments

  • _MG_3284.jpgY7.jpg
    _MG_3284.jpgY7.jpg
    2.6 KB · Views: 0
  • _MG_3284.jpgY6.jpg
    _MG_3284.jpgY6.jpg
    3.3 KB · Views: 0
  • _MG_3269.jpgY1.jpg
    _MG_3269.jpgY1.jpg
    2.6 KB · Views: 0
  • _MG_3271.JPG
    _MG_3271.JPG
    2.2 KB · Views: 0
  • _MG_3272.jpgY2.jpg
    _MG_3272.jpgY2.jpg
    1.7 KB · Views: 0
  • _MG_3275.jpgY3.jpg
    _MG_3275.jpgY3.jpg
    1.7 KB · Views: 0
  • _MG_3278.jpgY5.jpg
    _MG_3278.jpgY5.jpg
    2.7 KB · Views: 0
  • _MG_3283.jpgY6.jpg
    _MG_3283.jpgY6.jpg
    2.2 KB · Views: 0
Hi John
A real successful 5 star day :smiling5:. Tracks looking good and PE sorted. This will be another great dio. You are right - that tractor will not even notice pulling that little tank.
Jim
 
Top Job Dude 2,

You're a regular Bling Meister Sir! I love the attachment pic. They look like the odd couple. Looking really good John!!!

Prost
Dude 1

PS, where's the big screen TV for the stand on the back??? you got some barrel thing there...…….
 
Your on form my man:thumb2: Awesome detailing. Loving the tap. You have certainly done well to rescue this dio. Well done mate
 
Thread owner
Early morning from Race Towers.
Last night we thought we were going to have some rain !! The weather people had said heavy rain , someone telling porkies :sad:. Moved all the Seam Foam in to the green house , only to see that we have had none. Grrr !

Jim.......Yes it was, thank you . Feeling a lot happier knowing that the tracks are on, could improve next time I'm sure.

Dude 1...... The tractor looks as if it's in a different scale! A beast indeed.

Steve... Cheers, the tap I thought just added to the overall look , wait until the bucket is hanging !

Paul ..... Thank mate .

Jim.........:thumb2: nice to see you .

Simon ......Hi, well life does get in the way !

Quite a lot has been going on, I've dug out a base I'd made when I was in the workshop. Section of ply cover with 50mm of pink foam (. Matches Steve's dressing gown . )
Cut and sanded the foam down into the shape I thought looked right of a steep bank . Still using the remains of the drywall filler , ( sets like stone and one of the hardest plasters I've very come across, ) I added a very thin coat . It's not a compound that you can put on thickly, anymore than 1/8 th of an inch or you will end up with cracks and poor adhesion.

I dug into the form at the river's edge and wrapped the tank in clingfilm , protecting the model as I put another layer of filler on. Removing it as soon as the filler started to firm up . The depth is too great for the drywall on this section to build it up so at normal filler was used . The whole thing has been drying since yesterday morning when the last coat was applied.

Figures are progressing, lots of arms being tried out to get the right look. I seem to have boxes of figures where I have used maybe half on other dios, so these have plundered yet again.
The other time consuming part it the reed bed,. Produce from a Wilkos shed paint brush. The lines of bristles are held in groves cut into the wooden base and then glued in. Once you have removed the outer thin metal band they are easily cut out . Coming out in clumps they can then be held with some Tamiya tape while the lengths are trimed , once this is done they are shapped, any really dark bristles removed and the lower section dipped in a thick PVAand allowed to dry. Trying out some very thin wire with a thin blob of PVA on the top , hoping to produce some bulrush heads. These will take a bit of time .
I will post some photos later .
Enjoy your day .
John .
 
Thread owner
Photos.
View attachment 308800View attachment 308801
Above you will notice the shine from a coat of pva, just to seal the first coat and assist the following one.

View attachment 308802View attachment 308803
Above is the white thicker filler around the tank, hence the clingfilm.
Now for the reeds.
View attachment 308805
The Tamiya tape has been removed, the pva having set over night. those smaller clumps at the front R/H side are the left overs from the trimming, having the adhesive from the brush added to .Theses will represent new growth .
View attachment 308806View attachment 308808View attachment 308809

The last 3 photos are showing the BULRUSH head.
View attachment 308810
By adding small amounts of PVA I can build up the stem
The last photo above the real reed is am attempt an using very thin copper wire, and using the same method.
They would take a lot longer, having to be primed as well , so my not continue, but worth a try. I pleased with the reeds, looking fwd to placing them on the dio.

Thanks for looking in, comments welcome.
John.
 

Attachments

  • _MG_3296.jpgB1.jpg
    _MG_3296.jpgB1.jpg
    2.8 KB · Views: 0
  • _MG_3299.jpgB3.jpg
    _MG_3299.jpgB3.jpg
    2.7 KB · Views: 0
  • _MG_3300.jpgB4.jpg
    _MG_3300.jpgB4.jpg
    2.4 KB · Views: 0
  • _MG_3302.JPG
    _MG_3302.JPG
    2.3 KB · Views: 0
  • _MG_3303.jpgB6.jpg
    _MG_3303.jpgB6.jpg
    2.4 KB · Views: 0
  • _MG_3304.jpgR1.jpg
    _MG_3304.jpgR1.jpg
    2.9 KB · Views: 0
  • _MG_3309.jpgB5.jpg
    _MG_3309.jpgB5.jpg
    2.3 KB · Views: 0
  • B3.jpgB4.jpg
    B3.jpgB4.jpg
    1.6 KB · Views: 0
  • _MG_3307.jpgR2.jpg
    _MG_3307.jpgR2.jpg
    1.1 KB · Views: 0
  • 1531823114026.jpeg
    1531823114026.jpeg
    3.4 KB · Views: 0
Nice work G. C.
Good to see a kindred spirit using their imagination and raiding Poundshops etc. for gear.
I get immense satisfaction and fun out of making my own stuff..... as I suspect you do too, good buddy!
 
Thread owner
Nice work G. C.
Good to see a kindred spirit using their imagination and raiding Poundshops etc. for gear.
I get immense satisfaction and fun out of making my own stuff..... as I suspect you do too, good buddy!

Thanks Ron.
Yes the paint used on the reed was cheap artists acrylic, just dry brushed. The brush was from as I said Wilko. The dry lining material from the cave job.
I've saw
this . at £11. 96 plus shipping . think the Wiko brush was about a £5,and looks exactly the same material . Its the challenge. :smiling4:

18900007375.jpg

Ive coated a section of spare foam with some dry lining adhesive. When its dry I'll seal with a mat varnish, then colour. Going to create the water with several thin coats of gloss varnish and then use a gloss medium todot the movement. I' ve read loads on resin water ,the for and against, also the acrylic ones. Just want to try this, saw it on an American railroad site and it looked good.
John .
 
Missed a bit of late, the little tank looks great with the tracks and bling John.:thumb2::cool:
Very nice scratchery, what did you use for the tap, solder?
Great start on the base , with some nice bulrushes too, looking forward to see how they end up.:smiling:
 
All is looking great John i love the tracked crawler it's coming on a treat, i will stay tuned if that's ok.

Steve.
 
Status
Not open for further replies.
Back
Top