Theme editor

Scale Model Shop

VII/41C U-boat

  • Thread starter Thread starter Guest
  • Start date Start date
Status
Not open for further replies.
G

Guest

Guest
Thread owner
Afternoon all.

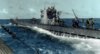
I'm in the process of building the 1/72 Revell VII/41C U-Boat kit.

I have been "opening" the limber holes throughout, sanding here and there...but I'm stuck on whether a certain part is to be "opened" or not.

I've looked at many many pics online...but can't determine whether the area circled in red should be "opened" or not.

Anyone done this kit before or are there any U-boat aficionados on board here?

Any help would be appreciated...thanks in advance.View attachment 96009

View attachment 96010

View attachment 96011


View attachment 209032

View attachment 209033

View attachment 209034
 
I believe these are what is called the free flooding area, so yes they should be opened up.

I will be watching this build with interest as I am in the middle of a build on the Gato.

Gregg
 
Nice subject and a nice start Andrew. I'm in agreement with Gregg on the holes you circled in red should be opened up
 
always wonted to do one,but dont know what scale i should be looking for some think about 300mm long ? :rolleyes:
 
If it's any help, right or wrong, when I did my two 1/144 U. Boats on here I opened up all the vent holes...even the small ones at the bow below the tube hatches. My reasoning being that if the vents are moulded into the hull, they need to be opened up.

I don't know enough about U.Boats to state whether I'm doing the right thing, but the vents sure look better opened out.....

I'm starting the same kit as you soon, and I intend opening all the vents on this too.....

Perhaps someone can come along with the definitive answer?
 
Check out this site for an amazing build.

modelbrouwer.nl modeling for an amazing build of the Revell Type VIIC/41 U-Boot 995

Builders name is foxbat and it's a 2010 posting.

In Forum Board index » Active model brewing at sea » Brew Records ships

He shows how and where the vents need opening etc.

Gregg
 
Thanks for the information Gregg. I've just had a look at the build...Brilliant!

I couldn't afford all that aftermarket stuff, but it's great for a reference.

I'm sure it will help Andrew - it sure helps me!

Thanks again for going to the trouble of posting it.

Ron
 
Not a problem Ron.

It was seeing his build, that moved me in the direction of doing a sub build as my next project.

His attention to detail is amazing.

Gregg
 
Thread owner
\ said:
Check out this site for an amazing build.modelbrouwer.nl modeling for an amazing build of the Revell Type VIIC/41 U-Boot 995

Builders name is foxbat and it's a 2010 posting.

In Forum Board index » Active model brewing at sea » Brew Records ships

He shows how and where the vents need opening etc.

Gregg
Wow...that is something very special.

Some great reference photos too...but all that PE would scare me to death.

Like the way they stressed the hull.
 
Thread owner
Ok...just notice I have put this thread in "Ships Under Construction", rather than the "Subs Under Construction" page. Sorry...don't know how I missed that!!!!! D'oh!!

Anyway...cut out the free flooding area vent/panel and placed some styrene strips inside the sub to simulate sections...however...as you may see, I have had a problem with the primer coming off the model.

I scraped it with my nail at some point and it just peeled off. I then put some Tamiya tape on there, as if I was masking...left it on for about 2 mins...pulled it off and the paint came with it.

I used Vallejo Polyurethane Primer USN Light Ghost Grey...it was the first time I have used this one, as I received it as a Xmas present.

The model had been washed in soapy water, left to air dry and then primed about 3 days later. I used the primer neat and also, slightly thinned with "Universal Modelling Products" airbrush thinner.

Is this an issue with polyurethane primers, or was it me?

Anyways...I will go back to my Halfords primer for the time being...once I've sanded a few areas etc.View attachment 96357

View attachment 96358


View attachment 209380

View attachment 209381
 
dose make a diffidence with the added in part,nice touch, ;)

I have done the very same thing as you with scraped it with my nail,and i just put

it down as it had not harden ,

so will be interested in what others say,as for why this may happen,:rolleyes:
 
Although you washed it down as lots of us do, how did you dry it!

Personally with large areas like this, I give a very light rub over with a very fine scour pad while washing the surface, to provide a mechanical grip.

The type I use I get from my local car body shop paint supplier, a box of 25 will last most modellers years.

A wipe over with iso before wiping with a tac-rag to pick up any loose residue.

Just the way I work, others have differing ways. :) :)
 
Thread owner
\ said:
Although you washed it down as lots of us do, how did you dry it!Personally with large areas like this, I give a very light rub over with a very fine scour pad while washing the surface, to provide a mechanical grip.

The type I use I get from my local car body shop paint supplier, a box of 25 will last most modellers years.

A wipe over with iso before wiping with a tac-rag to pick up any loose residue.

Just the way I work, others have differing ways. :) :)
I left it to air dry for about three days. Think I'll stick to my normal one from now on.
 
Thread owner
Built both the first two that Revell released before I left England and loved them really would like to do another, you are making a much better job of this than I did.
 
Vallejo primer is very good. You just have to remember a few basics.

A quick wipe over with IPA immediately before spraying, regardless of it being washed or not.

Although quick to dry, It needs at least 24 hours to cure. Once it has cured it is pretty darn tough.

Ian M
 
Status
Not open for further replies.
Back
Top