Theme editor

Scale Model Shop

Weathering using oil paints and applying rust

Status
Not open for further replies.

jspitza

New member
Joined
Jul 2, 2007
Messages
586
Reaction score
0
Points
0
1/3
Thread owner
Hello all:

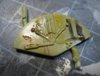
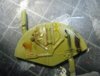
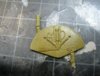
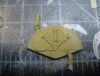
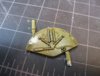
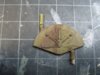
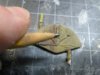
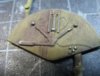
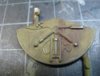
I've had the honor of being asked by a few here to demonstrate how I weather parts using oil paints and then create rust. I'll start by listing the items used in this tutorial and then add to the thread as pictures become available. I'll post the first and last pictures of the weathered piece now.

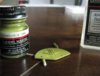
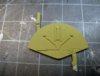
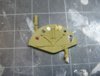
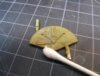
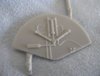
1. A piece of something from the Airfix Canberra kit (bomb bay wall)

2. Testors Modelmaster Panzer Dunkelgelb 1943 enamel

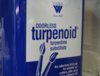
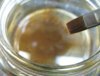
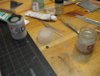
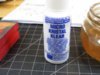
3. Weber Turpinoid (for thinning the oil paint)

4. Pollyscale Clear flat acrylic

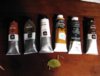
5. Various brands (dick blick student grade, something fancy but was on sale brand and Windsor cheap, we can't sell this stuff cause its crap line) Oil paints. My oil paint colors, six in all used were burnt sienna, raw umber, titanium white, Yellow Ochre, Ivory Black and Van Dyke brown

6. Tamiya neutral grey acrylic

7. Tamiya flat black acrylic

8. Testors Modelmaster chrome silver enamel

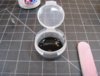
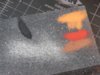
9. Various pastel chalks in four colors-brown, black, bright reddish something and an orangey tan thing. Please refer to the photos as your guess is as good as mine.

10.Micro krystal klear

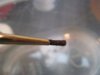
11. A #2 lead or graphite pencil

12 Testors Modelmaster flat lacquer

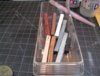
13. A flat shader or chisel brush-say an inch wide and one small pointed brush

14. A note pad to keep track of all of this and your progress!

View attachment 18155

View attachment 18156

View attachment 18157

View attachment 130681

View attachment 130682

View attachment 130683
 

Attachments

  • end1.jpg
    end1.jpg
    2.5 KB · Views: 0
  • start2.jpg
    start2.jpg
    2.9 KB · Views: 0
  • start.jpg
    start.jpg
    2.1 KB · Views: 0
That's a great looking rust-job you did on that piece, jspitza!

Looking forward to seeing the process.

Frank :)
 
Thread owner
Good morning!

You did let that part dry overnight, actually 24 hours BEFORE putting your paws on it, right? Good! Lets apply a coat of Pollyscale clear flat acrylic with a nice brush and let dry for a couple of hours. I choose 4 hours just to play it safe. This is a great time to tell your wife when you will finish all the chores since blowing them off to read this!:tulip:

View attachment 18160

View attachment 130686
 

Attachments

  • flatclear1.jpg
    flatclear1.jpg
    3.1 KB · Views: 0
Thread owner
Everything ok now? Laundry folded, floors mopped, dinner cooked? Good!

Lets take out our oil paints and choose the colors. I used all six and think that all of these help create more natural staining because of color blending. I only bought the cheapest paint possible and I used these colors:

burnt sienna, raw umber, titanium white, yellow Ochre, Ivory Black and Van Dyke brown

View attachment 18161

View attachment 130687
 

Attachments

  • oil-paints.jpg
    oil-paints.jpg
    3.2 KB · Views: 0
Thread owner
Lets take the clean brush and dip into the thinner. Start pulling the brush down onto each color, wipe clean onto a towel and dip into the thinner. Repeat until there looks like nothing is left! Please look carefully at the photos and you'll notice that it will take at least three to four passes before the colors blend and finally appear removed. Now look at the last photo and you'll see very faint traces of colors that flowed into the raised pieces. After the painting, I used light air blown from my airbrush onto the part to speed up the drying process. Let this dry overnight-say 8 hours or so. Its oil paint so If this was a bigger part or complete model, I'd give it almost a full week for the oil to evaporate!

View attachment 18164

View attachment 18165

View attachment 18166

View attachment 18167

View attachment 130690

View attachment 130691

View attachment 130692

View attachment 130693
 

Attachments

  • Brush.jpg
    Brush.jpg
    2.8 KB · Views: 0
  • 1st-stroke.jpg
    1st-stroke.jpg
    2.7 KB · Views: 0
  • 2nd-stroke.jpg
    2nd-stroke.jpg
    2.7 KB · Views: 0
  • final-strokes.jpg
    final-strokes.jpg
    2.4 KB · Views: 0
Thread owner
Good morning! You DID let this part dry overnight-at least 8 hours or so BEFORE putting your paws on it, right? Good! Look closely at the picture and your part. Notice the very subtle change in appearance.

:yes:

View attachment 18171

View attachment 130697
 

Attachments

  • All-dry.jpg
    All-dry.jpg
    2.5 KB · Views: 0
Thread owner
OK, lets start the next step!

I make a mixture of 91 percent Isopropyl alcohol, Tamiya (XF-1) flat black paint and distilled water to use as a wash. Just put a dab of the paint into the water, alcohol mix. The mix should look like blackish water. Take your paint brush, dip into the wash mix and brush everywhere. It should flow freely, like water. Next, take a cotton bud to selectively roll over the part, dabbing gently into the wash mix that pools up and stops flowing. Set the part aside to dry which should not take more than a few minutes. If you rub too hard, you'll rub down into the Pollyscale clear coat.

Good night, I'm beat!

View attachment 18172

View attachment 18173

View attachment 18174

View attachment 18175

View attachment 130698

View attachment 130699

View attachment 130700

View attachment 130701
 

Attachments

  • wash.jpg
    wash.jpg
    2.7 KB · Views: 0
  • wash-application.jpg
    wash-application.jpg
    2.5 KB · Views: 0
  • wash-drying.jpg
    wash-drying.jpg
    2.5 KB · Views: 0
  • wask-paint.jpg
    wask-paint.jpg
    2.7 KB · Views: 0
Thread owner
\ said:
That's a great looking rust-job you did on that piece, jspitza!Looking forward to seeing the process.

Frank :)
Thanks Frank!!!!!

Take care, Jeff
 
Thread owner
Hello all. Please accept my most sincere apologies for stepping out for awhile. Many problems sorted out this summer! I'm glad to once again participate and share with this wonderful group! I shall continue right from the point of stopping:

After our wash has dried, we will need to make a solution of water and Krystal Klear-but not too thick:

View attachment 19331

View attachment 131857
 

Attachments

  • Klear-dip-.jpg
    Klear-dip-.jpg
    2.2 KB · Views: 0
Thread owner
And then take a few of your chalks and spread the powder onto the palette.

Then Dip your brush tip into different colors and just lightly dab them onto the parts brake lines, crevices, ect. Remember, YOU control the nature effect and by this I mean how rusty things can get is unlimited! The Krystal klear will act as a glue so you can mix and match various shades and thickness to your liking. I like to make it caky (is that a word? and leave it be without painting it and allowing the texture to build up. The glue will hold it in place as will a final coat of clear varnish or final coat.

View attachment 19336

View attachment 19337

View attachment 131862

View attachment 131863
 

Attachments

  • Chalk-mixing-.jpg
    Chalk-mixing-.jpg
    2.2 KB · Views: 0
  • Rusty-brush.jpg
    Rusty-brush.jpg
    1.7 KB · Views: 0
Glad to see this progressing again jspitza, I'm actually playing around with some similar techniques myself at the moment and thoroughly enjoying it.
 
Thread owner
Hi Richard. Hope you've got something up your sleeve to test it on!
 
You live and learn. I've never seen the pastel powder/dilute glue technique before. It looks good and is one I'll definitely have a bash at!

Cheers

Steve
 
Thread owner
And finally a pencil rubbed or buffed across the surface detail makes a wonderful metallic finish. I hope you've enjoyed this article and hope you will use this and show us the end result! Take care, Jeff

View attachment 19410

View attachment 131936
 

Attachments

  • finish-.jpg
    finish-.jpg
    2.4 KB · Views: 0
Status
Not open for further replies.
Back
Top