Theme editor

Scale Model Shop

Yaks Chengdu J10s Vigorous Dragon , - 1/48 Bronco Models

Thread owner
I'm calling the bottom joint done , its been sanded ,filled ,sanded ,filled etc. and finally ive re scribed the missing lines and re instated the rivets. t looks 100% better and now i can move on to the next stage. I'm undecided as to which option for the canopy - I always like the clean lines of a closed canopy but its a nice cockpit so do I leave it open? Ive got to decide soon as its going to need sorting before anything else can continue. Heres a before and after of the joint ,cheers tony

View attachment 250047

View attachment 250048

View attachment 250049

View attachment 250050

View attachment 250051
 

Attachments

  • DSCN1668 [Desktop Resolution].JPG
    DSCN1668 [Desktop Resolution].JPG
    2.3 KB · Views: 0
  • DSCN1799 [Desktop Resolution].JPG
    DSCN1799 [Desktop Resolution].JPG
    2.6 KB · Views: 0
  • DSCN1798 [Desktop Resolution].JPG
    DSCN1798 [Desktop Resolution].JPG
    3 KB · Views: 0
  • DSCN1797 [Desktop Resolution].JPG
    DSCN1797 [Desktop Resolution].JPG
    2.6 KB · Views: 0
  • DSCN1796 [Desktop Resolution].JPG
    DSCN1796 [Desktop Resolution].JPG
    2.6 KB · Views: 0
Just caught up with this Tony ,its looking awesome! I vote for an open canopy ,be a shame to hide that excellent looking office
 
This is looking awesome Tony and there is a lot of detail you have rescribed. I was just wondering how you get the rivot back in as I'm about the same level with the filling and sanding the lower joint. I have. A rescribe girl tool but not the riveter ( where would I get one ) or is John the man to ask ?


Kind regards


Robert
 
Thread owner
Cheers guys , Robert I think john does a rivetting tool in the SM shop , I just used a pointed scriber and stuck it in ! Maybe looking back i should have used a straight edge too as some of the lines are a bit wonky!!! cheers tony
 
\ said:
Cheers guys , Robert I think john does a rivetting tool in the SM shop , I just used a pointed scriber and stuck it in ! Maybe looking back i should have used a straight edge too as some of the lines are a bit wonky!!! cheers tony
Thanks Tony,


I think I nave a few tools I can muster up to go along with rivets ( IE I have a few large needles kindly donated by the wife that I can use that I nave blunted down.


I personally think John might of heard enough from me of late ( he's got a lot on order at the moment with me :D :D:D:D:D:D:D


Regards


Robert
 
\ said:
Cheers guys , Robert I think john does a rivetting tool in the SM shop , I just used a pointed scriber and stuck it in ! Maybe looking back i should have used a straight edge too as some of the lines are a bit wonky!!! cheers tony
Great work Tony but that job needed to be done before you started drinking :)
 
Thread owner
Heres where Im at currently. It was a bit of a toss up between a closed canopy or open. I always prefer the clean lines of a closed canopy especially the upward opening types but it seems a shame not to open it and show the fine details Bronco have supplied so I'm going to deploy it open . The canopy has two inner rails with mirrors and grab handles on and the moulding is very fine , the grab handles being separate items! once installed and painted these are really going to enhance the cockpit area. Another thing that always makes a big difference on a modern jet is the HUD . The kit supplies a P.E. frame for this and clear plastic screens and projector. I replaced the clear plastic parts with my old faithful Holographic confetti , cut to size. When these catch the light it really captures the effect the real screens have. Next job is on with the windscreen then its a tricky mask up and primer.


Ive also got to replace the front ejector seat canopy breakers , the little horns that stick up on the top, I broke off and lost both these during the filling /sanding stage!!DOH!! cheers tony

View attachment 251136

View attachment 251137

View attachment 251138

View attachment 251139

View attachment 251140

View attachment 251141

View attachment 251142
 

Attachments

  • DSCN1812 [Desktop Resolution].JPG
    DSCN1812 [Desktop Resolution].JPG
    2.4 KB · Views: 0
  • DSCN1811 [Desktop Resolution].JPG
    DSCN1811 [Desktop Resolution].JPG
    2.5 KB · Views: 0
  • DSCN1807 [Desktop Resolution].JPG
    DSCN1807 [Desktop Resolution].JPG
    1.6 KB · Views: 0
  • DSCN1801 [Desktop Resolution].JPG
    DSCN1801 [Desktop Resolution].JPG
    2.4 KB · Views: 0
  • DSCN1800 [Desktop Resolution].JPG
    DSCN1800 [Desktop Resolution].JPG
    2.6 KB · Views: 0
  • DSCN1803 [Desktop Resolution].JPG
    DSCN1803 [Desktop Resolution].JPG
    3 KB · Views: 0
  • DSCN1802 [Desktop Resolution].JPG
    DSCN1802 [Desktop Resolution].JPG
    1.8 KB · Views: 0
I'm definatly liking what your doing with this Tony your really showing this to look very ooober


(Got any spare confetti as that is a awesome idea


Regards


Robert
 
I'd be well chuffed if all my cockpit's looked like this.


Excellent work:).
 
I'm liking that HUD bracket Tony, will make a difference to the cockpit through that big transparency.
 
Thread owner
After deciding on an open canopy I got to the stage of the build where its ready for primer so was faced with a tricky mask up of the open cockpit. I reckoned the best bet was to temporarily stick on the canopy (after masking it up first). It had a coat of primer and everything looked lovely , and after a few days Ive now given it its first paint , the light grey /blue for the underside (Vallejo 907) . It will hopefully move on a bit quicker now and who knows , I may even finish it before the end of april deadline! (but dont hold your breath!:rolleyes:)View attachment 251947

View attachment 251948
 

Attachments

  • DSCN1814 [Desktop Resolution].JPG
    DSCN1814 [Desktop Resolution].JPG
    2.1 KB · Views: 0
  • DSCN1813 [Desktop Resolution].JPG
    DSCN1813 [Desktop Resolution].JPG
    2.2 KB · Views: 0
\ said:
After deciding on an open canopy I got to the stage of the build where its ready for primer so was faced with a tricky mask up of the open cockpit. I reckoned the best bet was to temporarily stick on the canopy (after masking it up first). It had a coat of primer and everything looked lovely , and after a few days Ive now given it its first paint , the light grey /blue for the underside (Vallejo 907) . It will hopefully move on a bit quicker now and who knows , I may even finish it before the end of april deadline! (but dont hold your breath!:rolleyes:)View attachment 152595 View attachment 152596
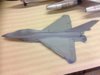
This is looking soooooo nice Tony and I'm not far behind you ( what year did we agree to finish this modern jet 2017!! :P :p:D:D:D:D:D:p:D:D
 
Thread owner
Top colour is now on, after lengthy sessions looking at loads if photographs i decided to ignore the paint call out on the instructions and went for what i consider to be the best match- model air 71-046 which is RLM 76 lichtblau. Next is a coat of klear to seal then its the black radome and decals and a very restrained panel line wash. Cheers tonyView attachment 252736
 

Attachments

  • image.jpeg
    image.jpeg
    2.2 KB · Views: 0
Back
Top