
You are using an out of date browser. It may not display this or other websites correctly.
You should upgrade or use an alternative browser.
You should upgrade or use an alternative browser.
Yaks Civilian Aircraft GB , Airfix 1/144 Boeing 737-200 Britannia airways
- Thread starter yak face
- Start date
- Status
- Not open for further replies.
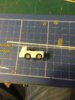
Well after looking at pictures and specs for ground tugs from the 70s Ive decided that the 1/200 Hummer is nowhere near big enough. This leaves only one option - build one from scratch . Ive seen photos of the Douglas DC -6 tug (no relation to the US aircraft maker , in fact its a british company) and its the one i want to roughly represent. Ive started to make a basic body from plastic sheet , luckily the shape is very square sided and sourced some appropriate sized wheels from the spares box . The real thing was about 16 feet long which equates to about 32mm . Ive got the cab to add to this and other bits and bobs . heres the pics and one of the completed aircraft -I'll do a fully completed thread once ive finished doing the tug and base on this one, cheers tonyView attachment 288438 View attachment 288439 View attachment 288440 View attachment 288441
Attachments
![DSCN2550 [Desktop Resolution].JPG](/data/attachments/96/96086-59d97f367cc52a4f0e6d2315c5b3a7d8.jpg?hash=mtYGMPmM1r)
![DSCN2551 [Desktop Resolution].JPG](/data/attachments/96/96097-af7a2722f585e9d1e1a325729d87c0f7.jpg?hash=udWxVvpwNs)
![DSCN2552 [Desktop Resolution].JPG](/data/attachments/96/96105-70354e92ac31ddad66b22c1e5f0c7c6c.jpg?hash=ytYzWUiE72)
![DSCN2574 [Desktop Resolution].JPG](/data/attachments/96/96125-18f54246c15e0cc719deb992189aa797.jpg?hash=9MH5RHiZAU)
G
Guest
Guest
Just catching up Tony, cracking build matey.
Have fun, John
Have fun, John
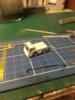
Heres the latest progress on the scratch built tug and base . I got a cheap A4 picture frame for the base frame ,im using a piece of hardboard for the actual runway which will be fitted in the frame. I scribed the concrete panel joints on this -looking at photos of manchester airport from the 70's i guessed the dimensions, this was then sprayed black followed by various greys and beiges ,ive still got to mucky it up a bit and add a few oil/fuel stains. The tug has had a few more bits of plastic card added to the inside ,to mount the wheels to and box off the cab.Ive added seats and a steering wheel to this. An old CD case was cut up for the clear cab sections and glued together then masked up ready to be attached to the body. Ive also put on some details on the rear deck and sprayed a couple of bumpers yellow and black . heres the pics
View attachment 288710 View attachment 288711 View attachment 288712 View attachment 288713 View attachment 288714 View attachment 288715 View attachment 288716 View attachment 288717 View attachment 288718 View attachment 288719 View attachment 288720 View attachment 288721 View attachment 288722 View attachment 288723 View attachment 288724
View attachment 288710 View attachment 288711 View attachment 288712 View attachment 288713 View attachment 288714 View attachment 288715 View attachment 288716 View attachment 288717 View attachment 288718 View attachment 288719 View attachment 288720 View attachment 288721 View attachment 288722 View attachment 288723 View attachment 288724
Attachments
-
![DSCN2596 [Desktop Resolution].JPG](/data/attachments/97/97876-f71a99ae1b1ec96def56fc46f9def781.jpg?hash=3FQcySa80k) DSCN2596 [Desktop Resolution].JPG2.5 KB · Views: 0
DSCN2596 [Desktop Resolution].JPG2.5 KB · Views: 0 -
![DSCN2595 [Desktop Resolution].JPG](/data/attachments/97/97866-50dad2e4f81e5fe40edd98af77ba1927.jpg?hash=FdBQBJEAkp) DSCN2595 [Desktop Resolution].JPG2.8 KB · Views: 0
DSCN2595 [Desktop Resolution].JPG2.8 KB · Views: 0 -
![DSCN2588 [Desktop Resolution].JPG](/data/attachments/97/97717-7d82a3aebc88039e964f40195c452715.jpg?hash=GEmhAz8ui7) DSCN2588 [Desktop Resolution].JPG1.7 KB · Views: 0
DSCN2588 [Desktop Resolution].JPG1.7 KB · Views: 0 -
![DSCN2589 [Desktop Resolution].JPG](/data/attachments/97/97729-b89f0167f639aa1707bfaec3089afa73.jpg?hash=EIgZANxrB0) DSCN2589 [Desktop Resolution].JPG2.1 KB · Views: 0
DSCN2589 [Desktop Resolution].JPG2.1 KB · Views: 0 -
![DSCN2590 [Desktop Resolution].JPG](/data/attachments/97/97742-04f6b40b1c9141ebe7be4ba1082f3a05.jpg?hash=y9G9VJQv2o) DSCN2590 [Desktop Resolution].JPG2 KB · Views: 0
DSCN2590 [Desktop Resolution].JPG2 KB · Views: 0 -
![DSCN2582 [Desktop Resolution].JPG](/data/attachments/97/97753-1b6643353cfa2db172113d6d5efc683d.jpg?hash=h021UaAlpu) DSCN2582 [Desktop Resolution].JPG2.7 KB · Views: 0
DSCN2582 [Desktop Resolution].JPG2.7 KB · Views: 0 -
![DSCN2583 [Desktop Resolution].JPG](/data/attachments/97/97765-c7335caad1df9d1ff2761e2bfafb4d6d.jpg?hash=f1PRMesjqP) DSCN2583 [Desktop Resolution].JPG3 KB · Views: 0
DSCN2583 [Desktop Resolution].JPG3 KB · Views: 0 -
![DSCN2584 [Desktop Resolution].JPG](/data/attachments/97/97778-a96633c10d5bfe49ca94e2fc160c4084.jpg?hash=73IyXBurJ3) DSCN2584 [Desktop Resolution].JPG2.4 KB · Views: 0
DSCN2584 [Desktop Resolution].JPG2.4 KB · Views: 0 -
![DSCN2585 [Desktop Resolution].JPG](/data/attachments/97/97790-86115827b950e369ad37c8bce2cf4684.jpg?hash=SkQgL53TfI) DSCN2585 [Desktop Resolution].JPG2.5 KB · Views: 0
DSCN2585 [Desktop Resolution].JPG2.5 KB · Views: 0 -
![DSCN2586 [Desktop Resolution].JPG](/data/attachments/97/97801-0573259e0ca50ba1b00e762367f6ff62.jpg?hash=KBC2WpXsOh) DSCN2586 [Desktop Resolution].JPG2.7 KB · Views: 0
DSCN2586 [Desktop Resolution].JPG2.7 KB · Views: 0 -
![DSCN2587 [Desktop Resolution].JPG](/data/attachments/97/97812-0bf911532fdbe6ee27492d8e9a7eb37f.jpg?hash=EQGr8paFgw) DSCN2587 [Desktop Resolution].JPG2.8 KB · Views: 0
DSCN2587 [Desktop Resolution].JPG2.8 KB · Views: 0 -
![DSCN2591 [Desktop Resolution].JPG](/data/attachments/97/97820-09d79cadbe66c68de10135c1b1b70644.jpg?hash=9YbpBd8KlF) DSCN2591 [Desktop Resolution].JPG2.9 KB · Views: 0
DSCN2591 [Desktop Resolution].JPG2.9 KB · Views: 0 -
![DSCN2592 [Desktop Resolution].JPG](/data/attachments/97/97833-9ea0f0319ac22a3b8dc7c84b56bd73be.jpg?hash=xRqHUtU_Zg) DSCN2592 [Desktop Resolution].JPG2.8 KB · Views: 0
DSCN2592 [Desktop Resolution].JPG2.8 KB · Views: 0 -
![DSCN2593 [Desktop Resolution].JPG](/data/attachments/97/97844-ecb1103d6265c0881b5dcb4d173c0ba5.jpg?hash=kWbCfb1y2p) DSCN2593 [Desktop Resolution].JPG2.7 KB · Views: 0
DSCN2593 [Desktop Resolution].JPG2.7 KB · Views: 0 -
![DSCN2594 [Desktop Resolution].JPG](/data/attachments/97/97855-78a3eb441bc6c0eceb144261a2f3b54f.jpg?hash=3GIoDj0283) DSCN2594 [Desktop Resolution].JPG2.6 KB · Views: 0
DSCN2594 [Desktop Resolution].JPG2.6 KB · Views: 0
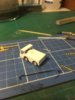
Bit more done today - the tug has been primed and painted gloss white and ive given the wheels a wash and stuck them on. Ive also made a towing bar from rod and two of the tiny wheels from the 1/200 hummer , the tug wheels were from the 1/144 revell concorde i did ages ago. Tomorrow ive got to stick on the bumpers and towing hitch , make some grilles and lights ( probably from spare bits of decal) then its just about ready for putting with the 737 on the base and taking to the newark show . Cheers tony
Attachments
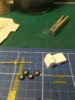
Well i got it done last night ,just in time for the Newark show tomorrow. I finished the tug off with some bits of spare decal - the unused landing lights from the Two six 737 sheet for the headlights and bits of the unused seat decal from the camaro kit for the grilles. I made rear lights and the amber beacon from poundland nail art gems and also used these to make the door mirrors , mounted on fuse wire arms. The towing hitches were made from pieces of U shaped evergreen rod with tiny bits of round rod added . Thebase was finished off with random splatters and fluid stains and fitted into the frame . Heres the pics of thetug and a couple of the finished frame and 737 , I'll be putting a full set on a completed thread later , thanks for watching cheers tonyView attachment 288811 View attachment 288812 View attachment 288813 View attachment 288814 View attachment 288815 View attachment 288816 View attachment 288817 View attachment 288818 View attachment 288819 View attachment 288820 View attachment 288821 View attachment 288822 View attachment 288823 View attachment 288824
Attachments
-
![DSCN2598 [Desktop Resolution].JPG](/data/attachments/98/98753-812efeac8234a1a78921ec8a7729d3b8.jpg?hash=lom9ghooxP) DSCN2598 [Desktop Resolution].JPG3.1 KB · Views: 0
DSCN2598 [Desktop Resolution].JPG3.1 KB · Views: 0 -
![DSCN2599 [Desktop Resolution].JPG](/data/attachments/98/98766-652eff90926486468e28972e2ed20a0c.jpg?hash=jAQC9cSqoA) DSCN2599 [Desktop Resolution].JPG2.9 KB · Views: 0
DSCN2599 [Desktop Resolution].JPG2.9 KB · Views: 0 -
![DSCN2600 [Desktop Resolution].JPG](/data/attachments/98/98777-9e518983d7936641c7158e1f0636e5f6.jpg?hash=wU32pZdbdd) DSCN2600 [Desktop Resolution].JPG2.9 KB · Views: 0
DSCN2600 [Desktop Resolution].JPG2.9 KB · Views: 0 -
![DSCN2601 [Desktop Resolution].JPG](/data/attachments/98/98792-536ebbd95707607d8ae154df4d5940a5.jpg?hash=cj8I9d4Pb8) DSCN2601 [Desktop Resolution].JPG2.9 KB · Views: 0
DSCN2601 [Desktop Resolution].JPG2.9 KB · Views: 0 -
![DSCN2602 [Desktop Resolution].JPG](/data/attachments/98/98804-ef85a6cd6282b15d9cd203ba9fdcc601.jpg?hash=xRQx69BXDu) DSCN2602 [Desktop Resolution].JPG2.9 KB · Views: 0
DSCN2602 [Desktop Resolution].JPG2.9 KB · Views: 0 -
![DSCN2603 [Desktop Resolution].JPG](/data/attachments/98/98815-2523dd2ad9c8764f30ab332cf72b587c.jpg?hash=uozuE6UKg9) DSCN2603 [Desktop Resolution].JPG2.7 KB · Views: 0
DSCN2603 [Desktop Resolution].JPG2.7 KB · Views: 0 -
![DSCN2604 [Desktop Resolution].JPG](/data/attachments/98/98828-da0a141f83a1a4e06166d8578290e95e.jpg?hash=kos9QJ4psC) DSCN2604 [Desktop Resolution].JPG2.8 KB · Views: 0
DSCN2604 [Desktop Resolution].JPG2.8 KB · Views: 0 -
![DSCN2605 [Desktop Resolution].JPG](/data/attachments/98/98843-4b312d0eff9b3096dea61937afcab5dc.jpg?hash=qctD3GNj38) DSCN2605 [Desktop Resolution].JPG2.6 KB · Views: 0
DSCN2605 [Desktop Resolution].JPG2.6 KB · Views: 0 -
![DSCN2606 [Desktop Resolution].JPG](/data/attachments/98/98854-4da4db4481828091856eccd29ee81eff.jpg?hash=7HiHohdCPm) DSCN2606 [Desktop Resolution].JPG2.7 KB · Views: 0
DSCN2606 [Desktop Resolution].JPG2.7 KB · Views: 0 -
![DSCN2607 [Desktop Resolution].JPG](/data/attachments/98/98864-2b3640432ee295a43d65a778423b60f5.jpg?hash=lb9nb0rpXr) DSCN2607 [Desktop Resolution].JPG2.5 KB · Views: 0
DSCN2607 [Desktop Resolution].JPG2.5 KB · Views: 0 -
![DSCN2609 [Desktop Resolution].JPG](/data/attachments/98/98876-15fe42d422f7572f84b475449b6d17e6.jpg?hash=nKkbn_Z447) DSCN2609 [Desktop Resolution].JPG2 KB · Views: 0
DSCN2609 [Desktop Resolution].JPG2 KB · Views: 0 -
![DSCN2610 [Desktop Resolution].JPG](/data/attachments/98/98896-7ce3b4660264eac2ca4659fdacf64178.jpg?hash=SB3mUbWfmi) DSCN2610 [Desktop Resolution].JPG2 KB · Views: 0
DSCN2610 [Desktop Resolution].JPG2 KB · Views: 0 -
![DSCN2611 [Desktop Resolution].JPG](/data/attachments/98/98914-44cc798a5c3757f6aebee7c38a5ba3a6.jpg?hash=vKtKGQaJ0c) DSCN2611 [Desktop Resolution].JPG1.8 KB · Views: 0
DSCN2611 [Desktop Resolution].JPG1.8 KB · Views: 0 -
![DSCN2612 [Desktop Resolution].JPG](/data/attachments/98/98945-a6eb60588e2ccb3d7610ecc6ce2b7ab1.jpg?hash=4D-RyvndGC) DSCN2612 [Desktop Resolution].JPG1.6 KB · Views: 0
DSCN2612 [Desktop Resolution].JPG1.6 KB · Views: 0
G
Guest
Guest
Wow!! Crackin' scratch building Tony.
Have fun, John
Have fun, John
- Status
- Not open for further replies.
Legal Notice
scalemodelling.co.uk is a privately operated online discussion forum. All content posted by members reflects their own views and opinions and does not necessarily represent those of the forum owners or administrators. While reasonable efforts are made to moderate content, no responsibility is accepted for user-generated material. By using this site, you agree to comply with UK law and the forum rules.
Currently on our website
Threads
36,580
Messages
699,670
Members
2,564
Latest member
Cat tree creator