Theme editor

Scale Model Shop

Yamaha YZR 500 Red Bull

Status
Not open for further replies.

Wendall

New member
Joined
Jun 3, 2013
Messages
918
Reaction score
0
Points
0
1/3
Thread owner
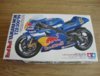
First motorbike, first GB so here goes. This will be my contribution I know nothing about motorbikes so my selection of a subject was based on pretty colours. I'll try not to make a hash of it but I just had a quick read through the instructions and I'm making no promises!!

View attachment 65296View attachment 65297View attachment 65298View attachment 65299

Jason

View attachment 66426

View attachment 66427

View attachment 66428

View attachment 66429

View attachment 179452

View attachment 179453

View attachment 179454

View attachment 179455
 

Attachments

  • DSC00697.jpg
    DSC00697.jpg
    2.9 KB · Views: 0
  • DSC00698.jpg
    DSC00698.jpg
    2.6 KB · Views: 0
  • DSC00699.jpg
    DSC00699.jpg
    2.8 KB · Views: 0
  • DSC00700.jpg
    DSC00700.jpg
    2.2 KB · Views: 0
It's my first bike too, just have fun and happy modelling!!

Nice to have you on the GB.

I will follow your thread with interest mate, my bike is similar!

Cheers. Polux
 
Go for it Jason......... One thing I have found with modelling bikes, the order of work is much the same as rebuilding the real ones.

Have fun.

Peter
 
Thread owner
Cheers guys, not getting much time to work on it this week. I've dry fitted some parts and started glueing and filling some of the sub assemblies. Need to stock up on paint so a trip to the model shop on Friday I think. Hope to get some update pics uploaded on the weekend.
 
\ said:
Go for it Jason......... One thing I have found with modelling bikes, the order of work is much the same as rebuilding the real ones.Have fun.

Peter
Y'know i'd never thought of it that way but pretty much yes, it is.

I find assembling as many sub-asemblies prior to paint helps too, instead of going step by step, break the instructions into categories, Frame / engine / forks / swingarm / fairing etcthen start looking at things like ca i glue any ancillaries to the engine which i can touch in with a brush later to help out, can i assemble the frame then fit the engine and swingarm after, (some you can, some you can't, I hate the can't ones as you have a glued seam to deal with after fitting them together with the engine and swingarm in) so dry fit as many subassemblies first to see what you can put together before priming.

Also, a big booster with a race bike is, get the fairing and body painted and decal-ed early, really helps motivate you seeing it waiting to sit on the frame.
 
I've already put close to 40 hours on my Katana ............ and all I have painted is the engine, rear shocks, rear brake assy, two wheel valves (only) and the chain links............... Most of that 40 hours has been scratch building, modifications and lots of filling and sanding............ :smile1:

Peter
 
Thread owner
Wow its been slow progress! Trouble is, when the sun comes out it is closely followed by a long list of jobs around the house and garden thus keeping me away from the Man Cave!

Anyway got some of the sup assemblies filled, sanded, test fitted and primed so here goes!

View attachment 65828View attachment 65829View attachment 65830View attachment 65831

Oh and a very generous relative has given me his Aztec airbrush. Never used one before so I'm pretty excited about it!!!!

View attachment 65833

Jason
 
\ said:
Wow its been slow progress! Trouble is, when the sun comes out it is closely followed by a long list of jobs around the house and garden thus keeping me away from the Man Cave!Anyway got some of the sup assemblies filled, sanded, test fitted and primed so here goes!

View attachment 65828View attachment 65829View attachment 65830View attachment 65831

Oh and a very generous relative has given me his Aztec airbrush. Never used one before so I'm pretty excited about it!!!!

View attachment 65833

Jason
I don't seem to be able to open the attachments Jason. Comes up as "Invalid Attachment" ?????

Peter
 
Thread owner
 

Attachments

  • DSC00701.jpg
    DSC00701.jpg
    2.3 KB · Views: 0
  • DSC00702.jpg
    DSC00702.jpg
    2.2 KB · Views: 0
  • DSC00703.jpg
    DSC00703.jpg
    2.4 KB · Views: 0
  • DSC00705.jpg
    DSC00705.jpg
    2 KB · Views: 0
  • DSC00706.jpg
    DSC00706.jpg
    2.1 KB · Views: 0
  • DSC00708.jpg
    DSC00708.jpg
    2.5 KB · Views: 0
Thread owner
Engine done! A combination of airbrush, drybrush, brush painting and some subtle wash, hopefully just enough to make the detail pop. I'm enjoying building it but if any bike experts out there spot any glaring mistakes feel free to shout!

View attachment 66187View attachment 66188View attachment 66189View attachment 66190

View attachment 67272

View attachment 67273

View attachment 67274

View attachment 67275

View attachment 180298

View attachment 180299

View attachment 180300

View attachment 180301
 

Attachments

  • DSC00713.jpg
    DSC00713.jpg
    2.2 KB · Views: 0
  • DSC00712.jpg
    DSC00712.jpg
    2.4 KB · Views: 0
  • DSC00711.jpg
    DSC00711.jpg
    2.5 KB · Views: 0
  • DSC00710.jpg
    DSC00710.jpg
    2.2 KB · Views: 0
Looking great and what a bonus a free airbrush to boot wish I had some generous relatives somewhere keep up the good work
 
Thread owner
Thanks Chaps,

Got a little bit more done over the last few days. She's taking shape but the progress is slow. I'm having a great time building it though, the level of detail in the kit is pretty impressive.

View attachment 66419View attachment 66420View attachment 66421

Steering damper and brake fluid reservoir.

View attachment 66422View attachment 66423

Swing Arm

View attachment 66424View attachment 66425View attachment 66426

and the rear wheel ready for paint. It took ages to remove the untidy seam through the middle but is should look OK.

View attachment 66427

Thanks for looking

Jason

View attachment 67499

View attachment 67500

View attachment 67501

View attachment 67502

View attachment 67503

View attachment 67504

View attachment 67505

View attachment 67506

View attachment 67507

View attachment 180525

View attachment 180526

View attachment 180527

View attachment 180528

View attachment 180529

View attachment 180530

View attachment 180531

View attachment 180532

View attachment 180533
 

Attachments

  • DSC00716.jpg
    DSC00716.jpg
    2.2 KB · Views: 0
  • DSC00718.jpg
    DSC00718.jpg
    1.4 KB · Views: 0
  • DSC00719.jpg
    DSC00719.jpg
    2 KB · Views: 0
  • DSC00720.jpg
    DSC00720.jpg
    1.8 KB · Views: 0
  • DSC00721.jpg
    DSC00721.jpg
    1.9 KB · Views: 0
  • DSC00722.jpg
    DSC00722.jpg
    1.6 KB · Views: 0
  • DSC00723.jpg
    DSC00723.jpg
    1.9 KB · Views: 0
  • DSC00724.jpg
    DSC00724.jpg
    1.9 KB · Views: 0
  • DSC00725.jpg
    DSC00725.jpg
    2.9 KB · Views: 0
Thread owner
Thanks Polux, the instructions said to paint the chain titanium silver but it was far too bright IMHO. So it got a coat of gun metal an oily wash and then drybrushed with some flat aluminum. Looks a bit more lifelike now I think.
 
Status
Not open for further replies.
Back
Top