Theme editor

Scale Model Shop

Tonys Airfix fw 190 a8

yak face

Moderator
Staff member
Moderator
SMF Supporters
Joined
Jun 13, 2009
Messages
14,496
Reaction score
1,183
Points
113
Age
61
First Name
Tony
Location
Sheffield
1/3
Thread owner
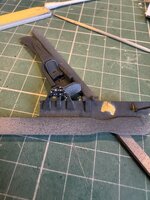
I mentioned earlier that I had the Airfix fw190 starter set and that I might get it going alongside the Eduard build so here it is . Its one ive built before and is a really nicely done kit. The detail is excellent for this scale and it builds up without any problems . The only downside to this particular boxing ( starter set ) is the rather plain choice of scheme ,plus the decals are quite basic with no stencils of any type included . Luckily the Eduard came with 5 decal options so by combining the iron crosses from this with the spare unit markings from the Eduard I can do a slightly more interesting scheme. 44676763-C32E-45BF-81D0-15C5BEFC9E0D.jpg CAA1C160-EBE2-44E4-9E7D-9F33B24D1A83.jpg DA305702-1438-4A64-8B97-65AADB2DD647.jpg
 
Thread owner
Seems like quick progress but I actually started this a few days ago but only just got round to starting the thread. Cockpit is now done , very nicely done by Airfix - not a thousand separate pieces but enough to give a very good representation ,the instrument panel decal being very effective . Only thing extra thats needed is the addition of some Eduard pre painted PE belts .
30AE8FB9-70E5-40CC-9CF2-884C2677C242.jpg 471E8CFD-C510-4200-9356-5885A193BF94.jpg 707CC6DE-AF15-4B37-A29F-2EA5084EC15C.jpg AF45A862-53B9-46D9-B879-13566A018293.jpg
 

Attachments

  • 30AE8FB9-70E5-40CC-9CF2-884C2677C242.jpg
    30AE8FB9-70E5-40CC-9CF2-884C2677C242.jpg
    384.2 KB · Views: 1
By a real coincidence not only am I building the same Eduard kit but I have also build this a year or so ago. Off to a fine start. You are definitely right in adding those belts.
 
Thread owner
Started to get the airframe together , starting with the wing top and bottom . The instructions say to fit the cannons and machine guns between the top and bottom but I just know they would get knocked off .So like the Eduard build the base of the cannons was cut off , fitted and drilled out so I can fit brass tube replacements last off . The machine guns were similarly cut off and drilled ready for brass tubing later.
IMG_4947.jpg IMG_4946.jpg IMG_4948.jpg IMG_4950.jpg
 
Coming on a treat Tony. I have just got to the cannons on the Eduard kit and, like you, I'm certain to damage them if fitted early. Yours is such a sensible solution.
 
Thread owner
Coming on a treat Tony. I have just got to the cannons on the Eduard kit and, like you, I'm certain to damage them if fitted early. Yours is such a sensible solution.

It helps that I was planning on replacing them with brass tube anyway Jim, the tubing always looks good and is a lot easier than trying to drill out the ends !
cheers tony
 
Had the problem on my Airfix build. I broke 3 cannons off and lost 2.
 
Thread owner
Wings now on and the two panels on the top of the fuselage are fitted . The Airfix kit features machine guns on the nose - the Eduard kit has these faired over and the decal option i’m intending to use for this from the Eduard kit also features faired over gun troughs . Do for the second build in a row cocktail sticks were employed !
I cut off the ends and sanded them to less than half their thickness, these were then superglued to the cowling . Once theyve had a coat of primer they should be fine .
IMG_4953.jpg IMG_4954.jpg IMG_4955.jpg
 

Attachments

  • IMG_4953.jpg
    IMG_4953.jpg
    375.9 KB · Views: 1
Thats a clever idea Tony 🙂
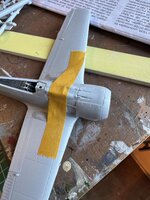
. Looks like it’s coming together very nicely.
 
Thread owner
Windscreen now fitted and masked so it was out with the primer .The closed undercarriage option pieces Airfix have provided were great for masking up the wheel bays , just a little bit of sponge needed adding at the inboard ends. The primer will show up if anything needs fettling before the paint .
Click image for larger version  Name:	CAC96867-97A1-418D-95CD-802C16212EC8.jpg Views:	4 Size:	488.0 KB ID:	1248356 Click image for larger version  Name:	0C6ED9F1-86D3-4068-8078-59D2AC7735D5.jpg Views:	4 Size:	475.3 KB ID:	1248357 Click image for larger version  Name:	CAC96867-97A1-418D-95CD-802C16212EC8.jpg Views:	4 Size:	488.0 KB ID:	1248356 Click image for larger version  Name:	CAC96867-97A1-418D-95CD-802C16212EC8.jpg Views:	4 Size:	488.0 KB ID:	1248356 Click image for larger version  Name:	CAC96867-97A1-418D-95CD-802C16212EC8.jpg Views:	4 Size:	488.0 KB ID:	1248356
 
Last edited:
Thread owner
RLM76 now on and drying , the primer didnt show anything that needed major attention , just a tiny bit of acrylic putty round the cannon shrouds , wiped off with a wet finger .
IMG_4969.jpg IMG_4970.jpg
 
Thread owner
Red band now on , next step mask up for the top colours
IMG_4977.jpg IMG_4979.jpg
 
Thread owner
Top colours now on and masking removed.
B8122F34-118C-4610-9388-DD1DFCEF03D5.jpg 62181BD2-60B3-42C5-BC72-0A1D99396F01.jpg
Mottle has now been applied . According to the Eduard colour profile the machine I’m doing has a much smaller / lighter mottle pattern than the one I'm doing on the Eduard kit .
1BDD7DA6-9A75-4817-B4A2-56B4BE3E94FD.jpg 21AFF317-B3C0-47AC-B4CF-835105254169.jpg
 
Back
Top