Theme editor

Scale Model Shop

Revell 1/72 Boeing B17G Flying Fortress Boeing

  • Thread starter Thread starter Guest
  • Start date Start date
Status
Not open for further replies.
G

Guest

Guest
Thread owner
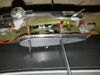
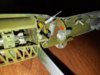
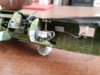
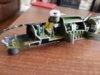
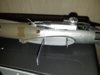
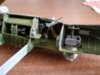
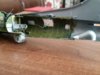
Revell B17 I'm going to try and do this as a cutaway model, first thing I notice(planes are not my normal thing) checking on photos of the real thing the callout colourwise for the bomb bay (which is the first part on the instructions is wrong) it says the bombs are olive green which is what I've done them and when I look at pics of the bombs they are a medium green not the nearly black as you can see from the pics, the olive green I've done them (I'm using Vallejo air paints ) also they have yellow banding which seems to vary according to which picture you look at, some have 3 bands in the middle some have one in the middle others have one at the tip and a silver tip in front of that. I wouldn't normally worry too much about that but if I'm doing this as a cutaway it needs to be more accurate, help please.
IMG-20190422-36359.jpg

IMG-20190422-49811.jpg

IMG-20190422-21327.jpg

IMG-20190422-2841.jpg

IMG-20190422-32348.jpg

IMG-20190422-14948.jpg
 
Going to watch this build. I'd really like a B-17G kit. built the old Academy one and i'm either getting the Revell or Airfix one
 
Thread owner
it says the bombs are olive green which is what I've done them and when I look at pics of the bombs they are a medium green not the nearly black as you can see from the pics, the olive green I've done them (I'm using Vallejo air paints ) also they have yellow banding which seems to vary according to which picture you look at, some have 3 bands in the middle some have one in the middle others have one at the tip and a silver tip in front of that.
According to TM 9-1325-200/NAVWEPS OP 3350/TO 11-1-28 of 29 April 1966 (this also covers what it calls “old series” bombs, that is, the type used in the Second World War), American general purpose bombs were olive drab, not olive green. Though this may seem like a minor point, the difference between the two colours is quite clear. Olive green is basically a military green, while olive drab is much more brown (it’s basically made from black and ochre pigment).

As for the bands, the same manual says they were yellow, but doesn’t say where these bands were painted at all — not in the general description and not in that of the individual bomb types. I would suspect the band to be at the centre of gravity, though. If your kit’s bombs have lugs on them, there should be two lugs on one side and possibly one lug on the other. That single lug is on the centre of gravity line, so if the yellow line should also be at that point, the lug makes it easy to locate.
 
Good looking kit this. I've had one sat here for years. There's an amazing amount of interior detail in there.
 
Hi Ken

I have my seat pulled up tto follow you on this one - I do like cut-aways.

Are you going to add figures? I made a cut-away B-17 F a couple of years ago and used Legend figures which are quite good.

Peter
 
My notes say US 500lb GP bombs had a single narrow yellow stripe at the ctr. of gravity, or one yellow stripe next to the silver fuse, or two narrow stripes at either end about a qtr. of the way in from fuse & fins. Incendiary 500lb will have a blue stripe at the ctr of gravity. Semi-armor-piercing 500lb are slimmer than the aforementioned with a more bullet shape. PaulE
 
Thread owner
Thanks for all the info guys Peter figures might be a good addition.
 
Thread owner
Hi all bit more done to this, trying out some aluminium foil on the inside to see the effect before I try it on the outside, i must say I think it looks quite good.
IMG-20190428-42727.jpg

IMG-20190428-11478.jpg

IMG-20190428-51149.jpg

IMG-20190428-1497.jpg

IMG-20190428-40218.jpg

IMG-20190428-26956.jpg
 
HI Ken how much of a cutaway are you doin just small sections ? this will be quite intresting to see
chris
 
Hi Ken
You're off to a fine start. Bomb bay is nice. Interested to see how you do the cutaway.
Jim
 
Thread owner
I think I going for small areas for the cutaway, however once I start who knows where I will stop.
 
Hi Ken, nice start and very daring to do a cutaway on your first wingy thing.

Cheers,
Richard
 
Thread owner
Hi all well made more progress on the interior, loads more to do (there's a lot of detail in this kit) I'm wondering wether to add some lighting to the internals, its quite dark even without adding the side with the cut outs in.
Done some of the exterior paint ( not my best work as I'm using a brush since my compressor is dead)
IMG-20190503-8489.jpg

IMG-20190503-24526.jpg

IMG-20190503-35559.jpg

IMG-20190503-47703.jpg

IMG-20190503-55794.jpg

IMG-20190503-16454.jpg

IMG-20190503-2439.jpg
 
Thread owner
Is there any way of getting rid of the white stuff you get with superglue, I ask because I'm trying to do the belly turret on the plane which is moulded in clear I'm using Revell clear glue and it just keeps coming apart when I'm handling it whilst trying to paint it (incidentally how do you manage that it's almost impossible I've had to take it off a load of times as the paint seeps under the masking tape and my hands arnt steady enough to do it free hand) anyway i was thinking of gluing it with superglue if I could get rid of the white vapour stuff you get with it.
 
Thread owner

Attachments

  • IMG-20190508-50645.jpg
    IMG-20190508-50645.jpg
    2.8 KB · Views: 0
  • IMG-20190508-59577.jpg
    IMG-20190508-59577.jpg
    2.9 KB · Views: 0
  • IMG-20190508-9394.jpg
    IMG-20190508-9394.jpg
    2.8 KB · Views: 0
  • IMG-20190508-40107.jpg
    IMG-20190508-40107.jpg
    2.9 KB · Views: 0
  • IMG-20190508-45514.jpg
    IMG-20190508-45514.jpg
    2.2 KB · Views: 0
  • IMG-20190508-50156.jpg
    IMG-20190508-50156.jpg
    2.8 KB · Views: 0
  • IMG-20190508-22624.jpg
    IMG-20190508-22624.jpg
    2.5 KB · Views: 0
A very interesting build Ken. Not seen one done like this before. Press on my man. Cheers, Rick H.
 
Status
Not open for further replies.
Back
Top