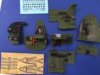
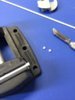
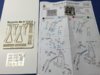
Excellent detail, but the ejector pin marks will be a pain to sand down and fill, as they look to be numerous
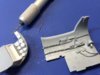
The bulk of them inside the cockpit are not ejector pin marks but detail. The Mossie was fitted with round wooden hard points to fit instruments and equipment to. You can see the same detail in the Tamiya Mossie.
There are ejector pin marks in places, mosty 'proud' and easily sandable the only one found so far is the one I filled. They are no worse than any decent kit, so far anyway and better, fewer than many.

")