Theme editor

Scale Model Shop

Jambo's Airfix Bf109E-4 1/72

Status
Not open for further replies.

Jambo

New member
Joined
Dec 29, 2014
Messages
80
Reaction score
0
Points
0
1/3
Thread owner
OK,


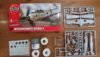
So, popped along to hobbycraft and had a little look through. I considered the starter kit for the BF109E-3 with paints, but the E-4 box kit looked like it would have a little bit more detail called out for paint as it wasn't trying to hold the whole thing down to 4 colours, and I thought the white wing tips looked quite smart.


Of course the paints I have at home were not the ones needed for this and some colours were only available in Humbrol enamel rather than acrylic, so a few tactical substitutions will be made. This is going to be very much out of box, as if it's not done by Friday I suspect life's going to get in the way again and it'll go on a shelf for 3 months.


,View attachment 266019


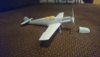
Initial impressions are that the kit itself looks very nicely made, but there are a pretty staggering number of decals to apply. All painting will be done with a hairy stick as I don't have an airbrush setup so I decided to steer clear of any paint schemes that looked like blending would be required.


Off we go!


Jambo
 

Attachments

  • DSC_0627_picmonkeyed.JPG
    DSC_0627_picmonkeyed.JPG
    2.6 KB · Views: 0
This is a good kit, Jambo - I made it a few years ago. It all went together very well, if I remember it right, apart from the wing/fuselage joint. It seemed as if the gap between the two top wing halves, where the fuselage fits, was too small, forcing the wings downwards so they had no dihedral. I had to sand the fuselage wing roots back a bit - no big deal but worth looking out for. I often don't bother putting all the stencil decals on in 1/72 - sometimes they're a bit overscale and make the result look cluttered. Plus I'm a bit lazy!
 
Thread owner
This is a good kit, Jambo - I made it a few years ago. It all went together very well, if I remember it right, apart from the wing/fuselage joint. It seemed as if the gap between the two top wing halves, where the fuselage fits, was too small, forcing the wings downwards so they had no dihedral. I had to sand the fuselage wing roots back a bit - no big deal but worth looking out for. I often don't bother putting all the stencil decals on in 1/72 - sometimes they're a bit overscale and make the result look cluttered. Plus I'm a bit lazy!

Thanks for the tip, I'll keep an eye out for that!


Cheers for the encouragement all, Office is together and 2 fuselage halves are setting now, it's nice to have the detail from the dials, but they sometimes come up a little larger than the panel. So far no major gotcha's:


View attachment 266041


View attachment 266040


Jambo
 

Attachments

  • DSC_0634_picmonkeyed.JPG
    DSC_0634_picmonkeyed.JPG
    2 KB · Views: 0
  • DSC_0631_picmonkeyed.JPG
    DSC_0631_picmonkeyed.JPG
    2.7 KB · Views: 0
Thread owner
OK,


So we're pretty much there on the assembly, some tamiya tape used to mask off the canopy, and as suggested by Doug, some sanding and filling was required for the wing joins.


View attachment 266163


Jambo
 

Attachments

  • DSC_0637_picmonkeyed.JPG
    DSC_0637_picmonkeyed.JPG
    1.7 KB · Views: 0
Thread owner
OK, not a massive amount of progress in the last week, will be picking this back up. Having made the mistake of leaving the plane unattended The wife has tidied up and the rear wheel is now nowhere to be found.


Will have as little think here perhaps something can be fashioned from some spare sprue, that'll teach me...


Jambo

I've got a spare rear wheel if you want me to send it to you just PM me your address.
 
Thread owner
I've got a spare rear wheel if you want me to send it to you just PM me your address.
Thank you very much sir,
109 now assembled and awaiting paint. I do not remember there being so many teeny tiny parts when I was younger, either my hands are a lot bigger or the kits are more detailed...

Next up, paint.

Jambo
 
Thank you very much sir,
109 now assembled and awaiting paint. I do not remember there being so many teeny tiny parts when I was younger, either my hands are a lot bigger or the kits are more detailed...

Next up, paint.

Jambo
Anytime Jim, I'm now looking forward to the paint going on.
 
Status
Not open for further replies.
Back
Top