Theme editor

Scale Model Shop

Revell 1:72 Boeing P 26A (approx' 1966 vintage)

Status
Not open for further replies.

colin m

Moderator
Staff member
Moderator
Joined
Dec 26, 2008
Messages
9,113
Reaction score
381
Points
83
Location
Stafford, UK
1/3
Thread owner
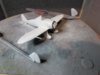
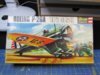
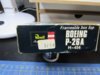
The diminutive 1:72 Boeing P-26A. This kit is so old I'm not sure I should build this. It's something like 49 / 50 years old ! This, I'm quite sure is the oldest kit I've ever built. Including first time building as well.
So, what is it. This colourful little thing. Although, I think I'll substitute the green for blue as most seem to be that way. Also, the decals are very yellow. I'm trying the sunlight trick, but I don't hold much hope for them so I'll have to try something else. Masking will be tricky due to the rivets - 1960's remember.
View attachment 281582

About 17 pence I believe.
View attachment 281583

1966, a couple of years before I made an appearance.
View attachment 281584

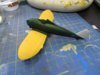
At least the colours seem simple enough.
View attachment 281585

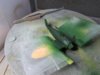
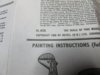
But wait, where am I going to find these very special paints ?
View attachment 281586

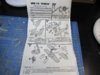
And this is it for the instructions.
View attachment 281587

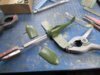
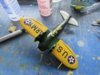
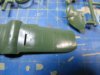
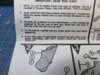
Some good news. Even back in 1966, Revell put the holes in ready for the rigging. So no excuse here.
View attachment 281588

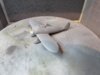
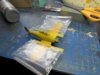
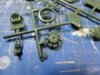
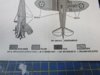
A typical sprue. Top left is the cockpit. Top right engine shroud, look at the size of the sprue gates. Nice engine.
View attachment 281589

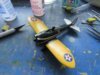
Well, let battle commence.
 

Attachments

  • IMG_1125.JPG
    IMG_1125.JPG
    3.1 KB · Views: 0
  • IMG_1137.JPG
    IMG_1137.JPG
    3.2 KB · Views: 0
  • IMG_1135.JPG
    IMG_1135.JPG
    2.7 KB · Views: 0
  • IMG_1130.JPG
    IMG_1130.JPG
    2.5 KB · Views: 0
  • IMG_1131.JPG
    IMG_1131.JPG
    3 KB · Views: 0
  • IMG_1128.JPG
    IMG_1128.JPG
    2.3 KB · Views: 0
  • IMG_1127.JPG
    IMG_1127.JPG
    2 KB · Views: 0
  • IMG_1126.JPG
    IMG_1126.JPG
    2.9 KB · Views: 0
oh boy, that brings back memories, i can remember building that when i was a nipper

look forward to seeing this progress
 
You've got your work cut out for you on this one Colin. It can still make into a nice model like so many older kits.
 
Nice one Colin in a sick and twisted way I'm going to watch this one mate. :)
 
I remember building this in my youth. I started model making around the time this came out in 1966.
 
Thread owner
Nice to have you all along for this journey into the past. Yes, it's certainly old, but it fits quite well. Then again, with so few parts, it would be difficult not to fit.

Just 6 parts required to get to here.
View attachment 281651

The propeller was a bit out of shape and needed heating up before bending it straight.
View attachment 281652

So, it wasn't long before primer was applied. A bit of paint certainly makes all those rivets and raised panel lines stand out.
View attachment 281653

And then an undercoat of white.
View attachment 281654

Most of the wings and the stabilisers will be painted yellow, hence the white undercoat. I'll probably go with a blue fuselage, just like everybody else does, even though the instructions say green. But, any masking is going to be a right pain with all these rivets.
 

Attachments

  • IMG_1147.JPG
    IMG_1147.JPG
    2.1 KB · Views: 0
  • IMG_1145.JPG
    IMG_1145.JPG
    2 KB · Views: 0
  • IMG_1139.JPG
    IMG_1139.JPG
    2.4 KB · Views: 0
  • IMG_1140.JPG
    IMG_1140.JPG
    3 KB · Views: 0
This brings back memories! I made this sometime in the 1980s, when modelling standards (mine in particular) may not have been quite so high. I seem to remember it made an eye-catching model, mostly due to the unusual shape, and the colours. I hope you read all the advice in the instructions, and didn't let any excess cement run and damage the details.:)
 
Thread owner
This brings back memories! I made this sometime in the 1980s, when modelling standards (mine in particular) may not have been quite so high. I seem to remember it made an eye-catching model, mostly due to the unusual shape, and the colours. I hope you read all the advice in the instructions, and didn't let any excess cement run and damage the details.:)
It certainly is a blast from the past for many. Not for me though, it escaped me first time around. I do remember building a P12 as a kid, but not his one.
So, work has been delayed as summer hit us rather suddenly. But as summer is now over, work continues.
After an undercoat of white, yellow went on, and what a pain it was. But, it will do. Now masked up for the green. Yes, I've decided to go with the instructions and avoid the blue that everyone seems to do.
The little bags ? Just a simple way to quickly mask the wings off.
View attachment 282191

Dark green is what Revell asked for.
View attachment 282192

And that is what it got.
View attachment 282193

A quick gloss coat and onto the 50 year old decals. They have been sitting on a window sill for the whole of summer and the yellowing has reversed itself nicely. But that is no guarantee they won't fall apart in the water. But guess what, they have behaved themselves quite nicely. Even going on over all these rivets.
View attachment 282194
View attachment 282195

The ones on the tail don't fit too well, but a small touch up with a bit of black should fix that. The decals are very thick, but then again, the surface detail is 'big' as well, so it all works.
 

Attachments

  • IMG_1155.JPG
    IMG_1155.JPG
    2.9 KB · Views: 0
  • IMG_1154.JPG
    IMG_1154.JPG
    2.8 KB · Views: 0
  • IMG_1150.JPG
    IMG_1150.JPG
    2.2 KB · Views: 0
  • IMG_1149.JPG
    IMG_1149.JPG
    2.7 KB · Views: 0
  • IMG_1156.JPG
    IMG_1156.JPG
    3 KB · Views: 0
Very nice work Colin, and the gods we're smiling on you with those decals.
 
Thread owner
It's finished. Pic's in the completed section.
 
Status
Not open for further replies.
Back
Top