
The Corsair has to be one of the best carrier fighters of WW2 though initially it was rejected by the USN as unsuitable for carrier operations. It was the British FAA that developed the techniques and skills to land these on carriers safely so it is appropriate to build my Tamiya Corsair F4U-1a as a Corsair II of the Royal navy with the clipped wings needed for them to fit inside the smaller British carriers.
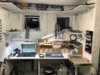
But first - my work area has had some modification. Having switched to spraying MRP paint my spray booth was no longer adequate so I decided to invest in a new Bench Vent booth. There are a lot cheaper solutions but I decided on this one after looking at reviews, yes it is a lot more expensive than some, several times more expensive and I just told myself that it will last years and just costs the same as two of the Tamiya Mossies.....
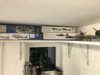
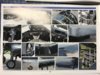
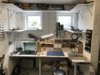
Here is what my work area looks like now after my 'between project' deep clean and modifications:
View attachment 286846
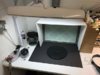
A few close-ups:
View attachment 286847
You can see my 'bottle shaker' handy and ready for use to the left. I use the foam board, a large white one under the whole painting area and a black one where most of the spraying will happen. The latter will be swapped (or turned over) after each project while I hope the white board will last for several projects.
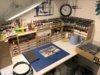
View attachment 286848
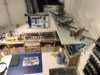
For good measure here is the build area with the new project out and ready. I will be making a few more modifications to this area in coming weeks to increase the number of MRP paints it holds, reducing the Vallejo and some new drawers.
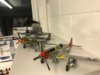
While I am at it, how about a few more close-ups...
View attachment 286849
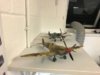
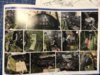
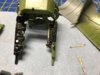
My right lower display shelf with a couple of Tammy Mustangs (1/32 as are all my models) and my Birdcage Corsair.
View attachment 286850
My left lower shelf with a couple of Spittys, a Mk VIII will be joining them which will be the build after I finish the Corsair.
View attachment 286851
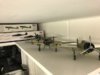
A pair of Zeros with at the back a Frank on my top right shelf with a glimps of part of my stash.
View attachment 286852
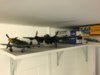
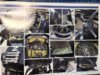
Opposite left to shelf, my Mig 3 and the HK Models Mossie with another glimps of my stash...
View attachment 286853
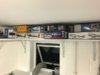
The left side of my stash shelf.
View attachment 286854
The right side of my stash shelf.
View attachment 286855
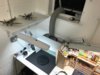
While I was stood on the chair a look down at the build area...
View attachment 286856
And, another look down at the spray area
Now over to the build about which this thread is all about.
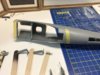
I have not yet started cutting plastic but I have been preparing the for it.
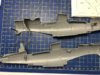
View attachment 286857
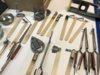
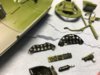
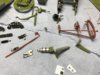
I labelled all the sprues for easy identification. OK it takes a bit of time but save a lot of time later....
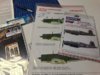
View attachment 286858
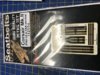
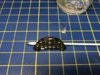
I have a Techmod decal set and a Montex mask set. I was unimpressed with the Techmod decals I used with the Spitty IX as they splintered so I am expecting to use a mix of masking for the main marking and the decals. I think I will build the top of the three Techmod aircraft you can see under the mask pack. The national insignia are somewhat different to the similar ones in the masks but I think they will work, they are the right size, I just do not spray the yellow and red using white for those areas instead.
As for the fabric seatbelts - I have failed with these every time just having not got on with them. But, I will try again and have a Eduard Steel set available if needed.
I will start cutting plastic tonight.
Paints will be MRP of course, using Dark Slate, Extra Dark Sea Grey and Sky for the main colours. I will assume that the interior was painted in US colours and their primers were used.
What am I trying out new...
I will use the MRP Silver primer and will not black base this build. I will be using chipping solution, doing a 'double chipping', first Yellow Chromate Primer chipped over the silver primer, that will be sealed then I will chip the camo colours over the yellow chromate.... I am hoping for a very realistic chipping effect. I will not overdo it or the weathering in general, bearing in mind this aircraft operated off a carrier, HMS Victorious. AKI Chipping Fluid will be used.
I am also thinking that I will equip the aircraft with the centre line bomb that comes with the kit. Yes it is USN ordnance but as the RN were working closely with the USN it should not 'jar'.
But first - my work area has had some modification. Having switched to spraying MRP paint my spray booth was no longer adequate so I decided to invest in a new Bench Vent booth. There are a lot cheaper solutions but I decided on this one after looking at reviews, yes it is a lot more expensive than some, several times more expensive and I just told myself that it will last years and just costs the same as two of the Tamiya Mossies.....
Here is what my work area looks like now after my 'between project' deep clean and modifications:
View attachment 286846
A few close-ups:
View attachment 286847
You can see my 'bottle shaker' handy and ready for use to the left. I use the foam board, a large white one under the whole painting area and a black one where most of the spraying will happen. The latter will be swapped (or turned over) after each project while I hope the white board will last for several projects.
View attachment 286848
For good measure here is the build area with the new project out and ready. I will be making a few more modifications to this area in coming weeks to increase the number of MRP paints it holds, reducing the Vallejo and some new drawers.
While I am at it, how about a few more close-ups...
View attachment 286849
My right lower display shelf with a couple of Tammy Mustangs (1/32 as are all my models) and my Birdcage Corsair.
View attachment 286850
My left lower shelf with a couple of Spittys, a Mk VIII will be joining them which will be the build after I finish the Corsair.
View attachment 286851
A pair of Zeros with at the back a Frank on my top right shelf with a glimps of part of my stash.
View attachment 286852
Opposite left to shelf, my Mig 3 and the HK Models Mossie with another glimps of my stash...
View attachment 286853
The left side of my stash shelf.
View attachment 286854
The right side of my stash shelf.
View attachment 286855
While I was stood on the chair a look down at the build area...
View attachment 286856
And, another look down at the spray area
Now over to the build about which this thread is all about.
I have not yet started cutting plastic but I have been preparing the for it.
View attachment 286857
I labelled all the sprues for easy identification. OK it takes a bit of time but save a lot of time later....
View attachment 286858
I have a Techmod decal set and a Montex mask set. I was unimpressed with the Techmod decals I used with the Spitty IX as they splintered so I am expecting to use a mix of masking for the main marking and the decals. I think I will build the top of the three Techmod aircraft you can see under the mask pack. The national insignia are somewhat different to the similar ones in the masks but I think they will work, they are the right size, I just do not spray the yellow and red using white for those areas instead.
As for the fabric seatbelts - I have failed with these every time just having not got on with them. But, I will try again and have a Eduard Steel set available if needed.
I will start cutting plastic tonight.
Paints will be MRP of course, using Dark Slate, Extra Dark Sea Grey and Sky for the main colours. I will assume that the interior was painted in US colours and their primers were used.
What am I trying out new...
I will use the MRP Silver primer and will not black base this build. I will be using chipping solution, doing a 'double chipping', first Yellow Chromate Primer chipped over the silver primer, that will be sealed then I will chip the camo colours over the yellow chromate.... I am hoping for a very realistic chipping effect. I will not overdo it or the weathering in general, bearing in mind this aircraft operated off a carrier, HMS Victorious. AKI Chipping Fluid will be used.
I am also thinking that I will equip the aircraft with the centre line bomb that comes with the kit. Yes it is USN ordnance but as the RN were working closely with the USN it should not 'jar'.
Attachments
-
 IMG_2514.JPG3.2 KB · Views: 0
 -
 IMG_2515.JPG32.4 KB · Views: 0
 -
 IMG_2516.JPG3.6 KB · Views: 0
 -
 IMG_2517.JPG2.5 KB · Views: 0
 -
 IMG_2518.JPG2.3 KB · Views: 0
 -
 IMG_2519.JPG2.3 KB · Views: 0
 -
 IMG_2520.JPG2 KB · Views: 0
 -
 IMG_2521.JPG2.2 KB · Views: 0
 -
 IMG_2522.JPG2.2 KB · Views: 0
 -
 IMG_2523.JPG3.3 KB · Views: 0
 -
 IMG_2524.JPG3 KB · Views: 0
 -
 IMG_2525.JPG3 KB · Views: 0
 -
 IMG_2527.JPG2.8 KB · Views: 0


")

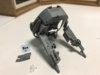

 . See my Corsair below. All in 1/48.