
You are using an out of date browser. It may not display this or other websites correctly.
You should upgrade or use an alternative browser.
You should upgrade or use an alternative browser.
Fleet Air Arm Corsair II - Tamiya 1/32
- Thread starter BarryW
- Start date
- Status
- Not open for further replies.
Google MRP Paint Paul and a supplier will come up. Sorry but I don't have the details here and cannot get them until I am in my office Monday but they are high on the list if you Google..Looking great Barry, as always.
I'm thinking of giving the MrP range a go. Where's the best place to find the range
I'm just about to check the shop just in case John has stocked them...
Thanks
P
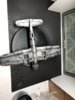
More progress and a small disappointment.
I pre-shaded the underside as the lighter colours are more difficult to modulate without either black basing or pre-shading.
View attachment 288862
The underside is painted Sky. As I found to be best with MRP I sprayed overall at 15psi, with a .4 needle, fairly close in. A light coat initially. It gives a fairly mottled appearance but then I go over the model slowly building up colour where I wanted it a little lighter, leaving it darker where needed. I then did a mist coat of 60% Mr Levelling Thinner and 40% base coat. This results in a beautifully smooth and shiney finish perfect for decalling and washes.
View attachment 288864
View attachment 288865
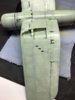
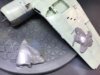
Now the disappointment. I sprayed Zinc Chromate in the main areas where I want chipping after applying a coat of chipping fluid. I then worked at the cipping with a stiff brush and cocktail stick. It certainly produce a chipped appearance but the MRP paint was resistant to this and I am concerned at how it might affect the top coat damaging the appearance rather than enhancing it. Consequently I have decided not to use this method but I do have an idea to enhance my normal method that should give a similar appearance using Zinc Chromate and metal powders.
View attachment 288863
It looks OK in the picture but I am not convinced.
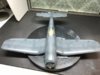
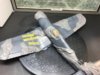
So I just sprayed the Extra Dark Sea Grey without bothering with chipping fluid. Once I laid down that coat I modulated the colour with Dark Sea Grey sprayed in places that would catch the light and inside panels. I finished with EDSG sprayed as a mist coat pulling it all together and resulting in that glossy finish below
View attachment 288866
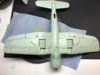
Dark Slate Grey next modulated with Light Slate Grey.
I pre-shaded the underside as the lighter colours are more difficult to modulate without either black basing or pre-shading.
View attachment 288862
The underside is painted Sky. As I found to be best with MRP I sprayed overall at 15psi, with a .4 needle, fairly close in. A light coat initially. It gives a fairly mottled appearance but then I go over the model slowly building up colour where I wanted it a little lighter, leaving it darker where needed. I then did a mist coat of 60% Mr Levelling Thinner and 40% base coat. This results in a beautifully smooth and shiney finish perfect for decalling and washes.
View attachment 288864
View attachment 288865
Now the disappointment. I sprayed Zinc Chromate in the main areas where I want chipping after applying a coat of chipping fluid. I then worked at the cipping with a stiff brush and cocktail stick. It certainly produce a chipped appearance but the MRP paint was resistant to this and I am concerned at how it might affect the top coat damaging the appearance rather than enhancing it. Consequently I have decided not to use this method but I do have an idea to enhance my normal method that should give a similar appearance using Zinc Chromate and metal powders.
View attachment 288863
It looks OK in the picture but I am not convinced.
So I just sprayed the Extra Dark Sea Grey without bothering with chipping fluid. Once I laid down that coat I modulated the colour with Dark Sea Grey sprayed in places that would catch the light and inside panels. I finished with EDSG sprayed as a mist coat pulling it all together and resulting in that glossy finish below
View attachment 288866
Dark Slate Grey next modulated with Light Slate Grey.
Attachments
G
Guest
Guest
I have to admit, I bought both AK's chipping fluids, and found them both wanting - ended up using cheap hairspray, which still works fine! But at 1/32, you must be tempted to paint the chips on? I reckon a triple 000 would work a treat. My next 1/48 plane is going to have painted insignia, which I believe you've already used on your builds?
Glad to hear it not just me with AKI chipping!!!
yes, John, I will actually be using the Uschi metal pigments rather than paint or metaliser which produces an excellent result, I love the stuff. The silver pencils are also useful in some respects.
As for masks, yes I have used them several times and it is my intention to make more use of them in the future pretty much as stanedard practise. I find them easier and giving better results than decals. That said I will now be using decals on this build having change my mind on what aircraft to replicate.
If you are interested John has the metal powders, there being three types, don't get too hung up over 'steel type or 'chrome' for chipping. The difference is minimal.
Here is a link to them: https://www.scalemodelshop.co.uk/25ml-steel-metal-polishing-powder-uschi-van-der-rosten-4009.html
Uschi has good information and tutorial on his site and there are plently of other YouTube tutorials and reviews out there.
https://www.uschivdr.com/shopping-c...nts-pigments-primer/metallic-colors-pigments/
G
Guest
Guest
Interesting stuff, what do you coat it with after application, I'm gathering it is quite a delicate surface? But I can see it'll a really useful thing to have on the shelf!Glad to hear it not just me with AKI chipping!!!
yes, John, I will actually be using the Uschi metal pigments rather than paint or metaliser which produces an excellent result, I love the stuff. The silver pencils are also useful in some respects.
As for masks, yes I have used them several times and it is my intention to make more use of them in the future pretty much as stanedard practise. I find them easier and giving better results than decals. That said I will now be using decals on this build having change my mind on what aircraft to replicate.
If you are interested John has the metal powders, there being three types, don't get too hung up over 'steel type or 'chrome' for chipping. The difference is minimal.
Here is a link to them: https://www.scalemodelshop.co.uk/25ml-steel-metal-polishing-powder-uschi-van-der-rosten-4009.html
Uschi has good information and tutorial on his site and there are plently of other YouTube tutorials and reviews out there.
https://www.uschivdr.com/shopping-c...nts-pigments-primer/metallic-colors-pigments/
I dont coat it at all John, for what I use it for. What I would not recommend it for is doing a NMF as if you do that would need a varnish coat and that detracts from the metal look.
It is great for effects such as chipping or to make plastic look like painted metal. Where you might dry brush metal, such as an engine block painted matt black, it is perfect. Dry brushing on the cockpit internals of an aircraft gives a brilliant worn paint look, picking up the raised detail and giving a sheen to edges and corners. I always dry brush these over the matt coat and where it is not handled there are no issues needing varnishing.
When I am doing chipping I will often apply it with the end of a cocktail stick, or an Extra Small Tamiya cotton bud.
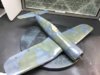
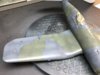
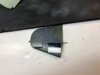
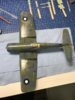
It has been slow progress this week. I dropped the aircraft and the outer port wing broke away, the spar having snapped. Without the spar the join between the outer and inner wing is quite insecure. Having glued it on I started to mask with Clever Putty and it broke again.
I cemented it in place again, holding it together with tape. You can see the join where I needed to do a little sanding after reglueing the first time. I finished off the masking with the wing taped on.
View attachment 289091
With the tape removed, ready to paint Dark Slate Grey.
View attachment 289092
View attachment 289093
Having finishes the DSG I then used Light Slate Grey to modulate the colour. There is is above at 'maximum contrast', it looks even more contrasting in the photo than it really looks. As usual I 'knock back' the contrast with a mist spray of the Dark Sea Grey and 75% Mr Levelling Thinner.
With the masking putty removed this is how she looks now with the modulated effect knocked back to what I wanted.
View attachment 289094
If you look at the port wing you can see that the join has cracked again...... Dammit....
I will fix that tonight before touching up the paint with localised masking. You can just make out some masking material left on the demarkation between colours in some places. It seems the 'hot' MRP paint causes this but it is not a problem, I just rubbed it off, easy leaving it looking good.
A quick word about the Clevel Puttty. If you have not tried it, do so. It is the ideal method of masking up wavy RAF style camo schemes. It does seem an expense when you buy it but this is the fourth build in which I have used it and I expect it to go on and on representing good value. What is so good is how easy it is to manipulate into shape and then remove with no real 'stickyness'. I use two tins of this, simply because I model in 1/32 scale. My Mossie needed all of the two tins with both lots fitting back into a single tin.
Attachments
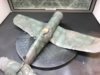
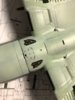
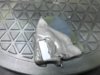
I seem to have finally fixed the wing and have been getting on with some detail painting.
View attachment 289101
The MRP Burnt Iron looks superb. Just seen in the photo a small touch up in the exhaust though that I didn't see with the naked eye.
The the handbrushed detail is Vallejo.
View attachment 289102
Tomorrow I will apply decals straight onto the MRP Paint. A sealing coat of gloss then ready for washes
Attachments
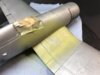
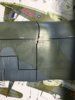
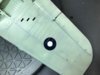
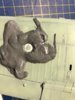
I am not sure Ian. While applying the walk lines a moment ago I touched the tip of the wing and this happened....
View attachment 289113
Every time I try a repair the finish deteriates. I am not sure that I can finish the build. I have cemented it back and I will see what happens. I am not confident.
View attachment 289113
Every time I try a repair the finish deteriates. I am not sure that I can finish the build. I have cemented it back and I will see what happens. I am not confident.
Attachments
G
Guest
Guest
Barry
That is a really shame after all the effort you have put in.
That masking putty stuff you are using is it the brand i have seen advertised as "Panzer Putty"?
That is a really shame after all the effort you have put in.
That masking putty stuff you are using is it the brand i have seen advertised as "Panzer Putty"?
Decalling is by far the job I dislike the most on a kit. Tamiya decals are dreadful, its not just that they are thick, it is their brittleness. The Techmod decals are a lot thinner but are nearly as brittle. The best decals I have used were Kits World who manage to combine being thin and not cracking apart when getting them into position.... You cannot get away from decals though my plan is to use masks instead in most cases. Not this model though and I have been using a combination of the Tammy and techmod decals. Two of these splintered during application and need a touch up.
I decided to experiment and touch up with an airbrush but to do that I need to mask over the decal and that means masking with something non-sticky. I decided to try Clever Putty...
Here we are with the masking done, for the white.
View attachment 289209
View attachment 289210
I used a straight edge where I could but the roundel one had to be by eye though.
After spraying
View attachment 289211
View attachment 289212
View attachment 289213
I have a little bit of touching up to do but its not too bad. The roundel is not great but I can improve it with touching up and once it has been weathered it will be acceptable. The fin-flash is better and is easier to touch up. Again once weathered this will be better than just acceptable. if I were to rate this out of 10, 7 for the roundel and 9 for the fin flash.
Incidentally - I initially intended to touch up the blue with MRP 'Marking Blue' which is a good colour but I found that their 'Oxford Blue' was a perfect match for the Techmod decals. I do mean perfect, when brushed on the paint literally disappeared against the decal background.
I touched up the blue with a fine brush. As this paint is not good for a brush you do need to do it the right way. Place a drop of paint in a dish and let most of the solvent to evaporate leaving a thicker paint. When applying it with a small brush you dab it on, not brush it. Let it find wits own level and you may need to have a second go. It works well for small touch up that you cannot do with the airbrush.
Attachments
G
Guest
Guest
That burnt iron looks amazing, I may have to have a bottle of that...I seem to have finally fixed the wing and have been getting on with some detail painting.
View attachment 289101
The MRP Burnt Iron looks superb. Just seen in the photo a small touch up in the exhaust though that I didn't see with the naked eye.
The the handbrushed detail is Vallejo.
View attachment 289102
Tomorrow I will apply decals straight onto the MRP Paint. A sealing coat of gloss then ready for washes
") despite my worries of H&S, I mean, it's only gonna be a couple of drops...
despite my worries of H&S, I mean, it's only gonna be a couple of drops...As for your breakage, I feel your pain, that's gotta hurt!
Hi Barry
I feel your pain Barry, that wing breaking is a sickener. Hats off for persevering though, especially after subsequent repeat breakages. You do right to stick at it as this build is looking really excellent.
My fingers are crossed that you're through the worst now and I look forward to another fantastic result.
Cheers
Paul
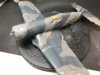
I have had a few more troubles and tribulations all of my own making. A tip - always put the lid on the airbrush cap...... MRP varnish slopping over the side onto the model does not exactly help the finish. If it does happen, don’t touch it. The solutions adopted to reduce the damage with water based paint makes it worse with these. Let it dry and deal with the consequences after, as the damage will be limited.
Anyway gloss done and panel line washes tomorrow before the first matt coat.
A quick pic of the model drying.
View attachment 289379
Anyway gloss done and panel line washes tomorrow before the first matt coat.
A quick pic of the model drying.
View attachment 289379
Attachments
G
Guest
Guest
I very much like the colour scheme you have used on this one Barry.
- Status
- Not open for further replies.
Legal Notice
scalemodelling.co.uk is a privately operated online discussion forum. All content posted by members reflects their own views and opinions and does not necessarily represent those of the forum owners or administrators. While reasonable efforts are made to moderate content, no responsibility is accepted for user-generated material. By using this site, you agree to comply with UK law and the forum rules.