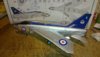
They're not too bad Tony, and adhere well. I used Decalfix to enable them to settle into the recessed lines. They're quite thin. I worked the lower fuselage (some are tucked up under the high wing), from rear to front, then the same for the fuselage above the wing. Then the wing undersides, then the wing tops. After that I did the same method for the main decals. This way I didn't need to handle the model too much in areas where I had already applied decals.
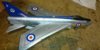
It's a very attractive scheme isn't it? I'm glad I got brave and didn't chicken out with the green scheme.


")
 .
.