Theme editor

Scale Model Shop

Pete's Eurocopter

Status
Not open for further replies.
Thread owner
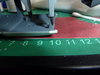
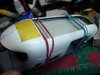
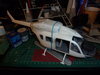
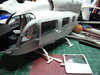
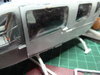
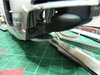
Sorry for the lack of updates recently. Not much has happened, as I've been trying to get the fuselage sides to fit together around the inner cabin parts shown above. It's been a real struggle, not helped by the fact that I can't really see what's stopping them going together. I've sanded quite a lot from the cabin sides and roof. Another problem was that the insides of the doors were slightly warped, and they came unglued while trying to bend the fuselage sides to fit. I had to cut a notch in the forward part of the roof to get clearance for the doors.
View attachment 295601
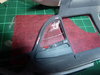
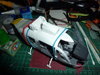
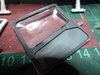
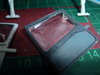
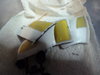
Decals are now on the inside of the doors (why does the pilot need an EXIT sign on his door?)View attachment 295602 and have been clear coated with Galeria matt.
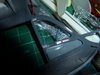
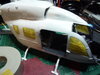
View attachment 295603
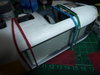
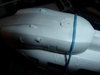
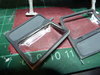
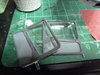
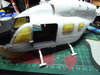
so tomorrow I'll try to clamp/tape/rubber band the fuselage sides in place and then run some Extra Thin into the joint. Wish me luck!

Pete
 

Attachments

  • P1140136.JPG
    P1140136.JPG
    2.6 KB · Views: 0
  • P1140137.JPG
    P1140137.JPG
    3 KB · Views: 0
  • P1140138.JPG
    P1140138.JPG
    2.9 KB · Views: 0
That's the problem when you need to put the sides on, it was a struggle even with the Airfix Merlin I'm doing, I had sanding and gaps to fill afterwards. Nice work so far though.
 
Thread owner
Thanks Ian. I think the windscreen is likely to need some filler round the edges, so I'm expecting to need to polish it after sanding the filler.

Pete
 
Thread owner
Well, fingers crossed, it went together quite well.
View attachment 295687View attachment 295688View attachment 295689
Woke up in a panic this morning thinking I'd forgotten the front lower windows, but luckily they get fitted from the outside!
And finally, on its own feet:
View attachment 295690
There's a bit of filling and sanding to do, but it's not looking too bad. That pointy bit of the roof over the centre console has to have a decal added!:fearful:

Pete
 

Attachments

  • P1140139.JPG
    P1140139.JPG
    3.4 KB · Views: 0
  • P1140140.JPG
    P1140140.JPG
    3.3 KB · Views: 0
  • P1140141.JPG
    P1140141.JPG
    3 KB · Views: 0
  • P1140142.JPG
    P1140142.JPG
    3.7 KB · Views: 0
Thread owner
Thanks Ian.
Quite a bit of filling and sanding to do tomorrow, but it's starting to take shape now.

Pete
 
Thread owner
Thanks Joe!
Interestingly, the Medstar version doesn't have 'EXIT' above the doors.

Pete
 
Thread owner
A bit more progress. The bit on the top over the engines (I'm sure there's a technical term for that) Didn't want to fit (why am I not surprised?) as the boss that holds the pin on which the rotor will turn clashed with part of the interior structure that supports the air intakes. I had to shave a good 2 - 3 mm off it before I could fit the top part.View attachment 295989
Then the rear of that part (engine cover?) was mis-shapen right at the part where the tail boom attaches, so I had to control that with the usual mixture of tape, clamps and rubber bands, then do some filing, but at last the tail boom fits! View attachment 295990
Still need to do something about the front though: View attachment 295991
Maybe it'll look better when it gets some paint on it. Actually it'll probably look worse!

Pete
 

Attachments

  • P1140164.JPG
    P1140164.JPG
    2.1 KB · Views: 0
  • P1140162.JPG
    P1140162.JPG
    2.9 KB · Views: 0
  • P1140163.JPG
    P1140163.JPG
    2.3 KB · Views: 0
It's fighting you all the way this kit Pete, but I'm sure you'll get the better of it.
 
Thread owner
It's certainly not shake and bake Ian. I'm wondering what to do about the canopy/windshield. Being frameless, the edges where it meets the body are going to show. Should I paint the edges interior colour, or exterior colour, or black, to look like a rubber seal? Thankfully the fit doesn't look too bad.
I'm at the stage where I'm going to have to ignore the sequence of the instructions and try to work out how I'm going to paint the thing. It'll have all the doors closed to make the masking a bit easier.
I would mask the canopy leaving a 1mm gap at the edges, then when you fit it fill the gaps you can sand it smooth, or use something like Vallejo white putty which you can smooth with a damp cloth or cotton bud then just paint it.
 
Thread owner
Seeing the hassle with this, not sure i am even going to get this out of its box, may just 'move it on' :angry::sad:
Steve, I'm sure a more experienced modeller than me wouldn't make such heavy weather of it.

Pete
 
Thread owner
I would mask the canopy leaving a 1mm gap at the edges, then when you fit it fill the gaps you can sand it smooth, or use something like Vallejo white putty which you can smooth with a damp cloth or cotton bud then just paint it.
You mean to 'lose' the joint in the body colour Ian? Interesting idea, I'll have a think about that.

Pete
 
Thread owner
It could be just a bad kit that Peter's got Steve.:rolling:
It certainly hadn't been stored well, when I bought it it had been in the sun on a baking hot day for a few hours. Some of the problems are just bad design though.

Pete
 
Thread owner
Two steps forward, one step back...
I'm sure nobody will be surprised to learn that the side doors don't fit. Well, they didn't, but a few hours of sanding sorted them out. However, the sanding dust, perhaps mixed with a little sweat, sunk into the Clear I'd dipped the windows in and left them looking like a frosted bathroom window.:angry:
I've just finished cleaning them up with IPA on a cotton bud, but they'll need a bit of a polish, and of course the paint now needs touching up.
View attachment 296223View attachment 296224View attachment 296225
But to look on the bright side, they fit now!
View attachment 296226
View attachment 296227

Pete
 

Attachments

  • P1140172.JPG
    P1140172.JPG
    3.2 KB · Views: 0
  • P1140173.JPG
    P1140173.JPG
    3.4 KB · Views: 0
  • P1140174.JPG
    P1140174.JPG
    3.8 KB · Views: 0
  • P1140175.JPG
    P1140175.JPG
    3.4 KB · Views: 0
  • P1140171.JPG
    P1140171.JPG
    2.8 KB · Views: 0
Thread owner
Thanks Joe.
I'm pleased to report some good progress today. The windows responded nicely to a quick polish with the stuff I use on my 1:1's windscreen - Autoglym glass polish.
They're now as clear as their maker intended:
View attachment 296272
Next task was to apply two decals that fit inside the pointy bit at the front of the roof, between and above the seats. You might be able to make out the switch panel in these photos, but I doubt if you can see the other one - white test, about 3mm square, in front of it! These were a real struggle to get into the right place.
View attachment 296273
View attachment 296274
To give credit where it's due, these decals are really good, surviving all sorts of abuse - the switch panel decal was removed and refitted about 4 times, and the small text decal was snatched from my tweezers by the carpet monster after soaking, yet when I found it, after a quick rinse to remove the cat hair, it stuck well!
The decals had a dose of Microset/Microsol, and while that was drying I thought I'd get all the windows masked. First a surprise - the rear doors actually fit! I was so surprised I forgot to take a photo, but will later when they're glued in.
Here's the masking so far:
View attachment 296275
View attachment 296276
View attachment 296277
Just the two windows to fit and mask below the pilots' feet, and then the big one - the windscreen :thinking::worried:
I'll give the interior a good blow out to remove any remaining dust from all the sanding, and then fit the doors. Then I need to work out how many of the little fiddly bits can be left off until after the painting. Anyone any experience of Tamiya gloss white?

Pete
 

Attachments

  • P1140176.JPG
    P1140176.JPG
    3.1 KB · Views: 0
  • P1140178.JPG
    P1140178.JPG
    3.6 KB · Views: 0
  • P1140179.JPG
    P1140179.JPG
    3 KB · Views: 0
  • P1140180.JPG
    P1140180.JPG
    2.5 KB · Views: 0
  • P1140181.JPG
    P1140181.JPG
    3.5 KB · Views: 0
  • P1140182.JPG
    P1140182.JPG
    3.7 KB · Views: 0
Status
Not open for further replies.
Back
Top