Theme editor

Scale Model Shop

Matchbox Curtiss SBC4 Hell Diver on Deck

Status
Not open for further replies.

rtfoe

Active member
Joined
Apr 29, 2018
Messages
9,251
Reaction score
542
Points
113
Location
Shah Alam, Malaysia
1/3
Thread owner
Hi All,

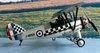
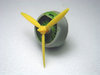
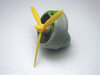
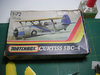
I've always wanted to know if there was a last bi-plane in US Navy WW2 service. It turned out to be the Curtiss SBC4 Helldiver. Although it never went to battle it had the distiction to be the last bi-plane in US carrier service.

I featured this in the last MM forum and I bet many here have not seen it come up from the start...

View attachment 308420

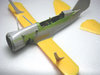
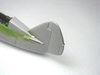
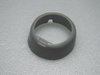
This old Matchbox kit was amongst my stash for quite a while and it was time I had a go at it...

View attachment 308407 View attachment 308408

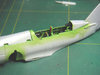
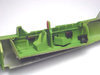
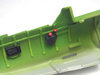
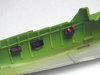
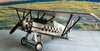
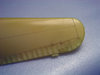
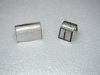
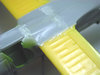
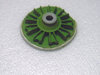
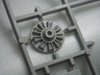
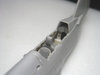
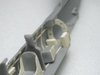
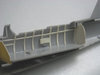
The parts were crisp and they came with the usual multi coloured plastic. The horizontal surfaces like the wings panel lines are engraved, the fuselage was raised so scribing was needed for that.

View attachment 308409 View attachment 308410

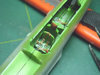
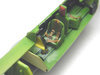
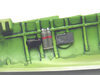
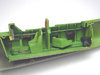
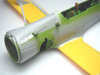
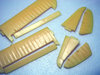
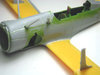
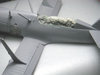
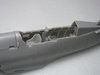
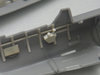
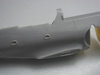
The interior was very spartan basically empty ...I added ribbing and basic throttle box and firewalls.

View attachment 308411 View attachment 308412

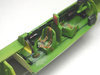
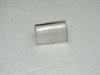
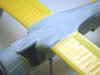
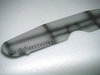
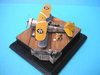
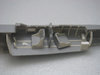
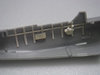
The seats were just L shaped plastic so plastic card and some shaping took care of that.

View attachment 308413 View attachment 308414

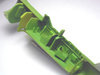
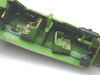
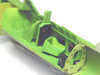
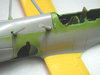
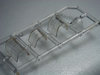
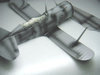
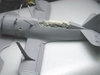
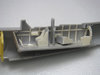
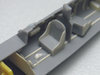
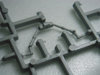
More gizmology was added including tracks to the floor and hump for the joystick. I drilled holes to the back firewall to simulate light weight panelling.

View attachment 308415 View attachment 308416View attachment 308417 View attachment 308418

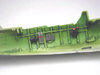
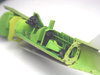
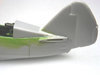
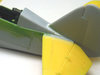
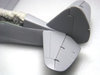
I dry fitted the halves together to check if the additions blocked fitting.

View attachment 308419

Next painting the interior...
 

Attachments

  • 102.jpg
    102.jpg
    6.5 KB · Views: 0
  • 8.jpg
    8.jpg
    4.8 KB · Views: 0
  • 7.jpg
    7.jpg
    4.8 KB · Views: 0
  • 6.jpg
    6.jpg
    5.3 KB · Views: 0
  • 5.jpg
    5.jpg
    5 KB · Views: 0
  • 4.jpg
    4.jpg
    5.2 KB · Views: 0
  • 3.jpg
    3.jpg
    5.8 KB · Views: 0
  • 2b.jpg
    2b.jpg
    4.4 KB · Views: 0
  • 2a.jpg
    2a.jpg
    5.2 KB · Views: 0
  • 2.jpg
    2.jpg
    5.3 KB · Views: 0
  • 1c.jpg
    1c.jpg
    5 KB · Views: 0
  • 1b.jpg
    1b.jpg
    4.7 KB · Views: 0
  • 1a.jpg
    1a.jpg
    5.7 KB · Views: 0
  • 1.jpg
    1.jpg
    6.8 KB · Views: 0
Thread owner
I sprayed the assembly with interior green including the undercarriage bay...the green may look a bit glaring on camera but it's a bit duller

View attachment 308421 View attachment 308422

Then I slowly picked out details with paint.

View attachment 308423 View attachment 308424

A wash was applied to the right fuselage...that helped bring out more detail.

View attachment 308425 View attachment 308426

Then the left side got attention...

View attachment 308427 View attachment 308428

Reference showed oxigen bottles so some were fashioned from clear sprue...I don't know why I used clear sprue as any plastic rod could have been used.

View attachment 308429 View attachment 308430View attachment 308431 View attachment 308432

Wash was applied to this side...looks a little heavy but looked alright once the fuselage halves were closed.

View attachment 308433 View attachment 308434View attachment 308435 View attachment 308436

Seat belts made from wire and tape were glued on...

View attachment 308437 View attachment 308438View attachment 308439 Another dry fit to see if everything was covered...next the clear canopy was tackled.

Cheers,
Richard
 

Attachments

  • 24.jpg
    24.jpg
    6 KB · Views: 0
  • 23.jpg
    23.jpg
    6.8 KB · Views: 0
  • 22.jpg
    22.jpg
    6.3 KB · Views: 0
  • 9.jpg
    9.jpg
    5.6 KB · Views: 0
  • 11.jpg
    11.jpg
    5.8 KB · Views: 0
  • 12.jpg
    12.jpg
    5.7 KB · Views: 0
  • 21.jpg
    21.jpg
    6.1 KB · Views: 0
  • 20.jpg
    20.jpg
    6.1 KB · Views: 0
  • 19.jpg
    19.jpg
    5.5 KB · Views: 0
  • 18.jpg
    18.jpg
    6.2 KB · Views: 0
  • 17d.jpg
    17d.jpg
    4.7 KB · Views: 0
  • 17c.jpg
    17c.jpg
    4.2 KB · Views: 0
  • 17b.jpg
    17b.jpg
    4.6 KB · Views: 0
  • 17a.jpg
    17a.jpg
    4.9 KB · Views: 0
  • 17.jpg
    17.jpg
    5.9 KB · Views: 0
  • 16.jpg
    16.jpg
    5.8 KB · Views: 0
  • 15.jpg
    15.jpg
    5.8 KB · Views: 0
  • 14.jpg
    14.jpg
    6.1 KB · Views: 0
  • 13.jpg
    13.jpg
    6 KB · Views: 0
Hi Richard
I don't think I remember this. Could be that my old brain ain't what is was but it does mean I can enjoy watching this come together. Off to your usual, painstaking start.
Jim
 
The SBC-4 was one of my favourite Matchbox aircraft, I must have made it 4 or 5 times, as the US Navy, and the RAF Cleveland. Heller also made a SBC-4 ( different moulds ). The Boeing P-12 was also made in several versions. The Matchbox biplanes were all pretty good, the Fury being pretty good. I made the Siskin recently.............. View attachment 308527

View attachment 308528

Sadly this was the model that convinced me that I could no longer do 1/72 aircraft models
justice - too small!
Dave
 

Attachments

  • matchbox 1-72 Siskin Dave Ward 03.jpg
    matchbox 1-72 Siskin Dave Ward 03.jpg
    2.7 KB · Views: 0
  • matchbox 1-72 Siskin Dave Ward 01.jpg
    matchbox 1-72 Siskin Dave Ward 01.jpg
    2.6 KB · Views: 0
Thread owner
Hi Guys...thanks for dropping in for a look and commenting.

Jimbo, nothing like a refresher to get the brain juices flowing. This is enjoyable pain.
Ian, great to have you along.
Dave, wow...you must have quite a collection of the SBC4's. I remember your Siskin, got one myself. Sadly deteriorating eyesight can get the better of us. I'm not looking forward to the day that I have to switch to larger kits.

Cheers,
Richard
 
Oooooh! Thats nice. A wonderful subject to build. Looking forward to seeing some more of your magic
 
Thread owner
Hi Steve, abracadabra and poof! you're here. Thanks. Nice to have you on board the Matchbox journey.

Cheers,
Richard
 
Keeping up with these little gems .
Why was green as internal colour picked Richard ?
 
Thread owner
Good question John, at the time I took for granted that all US aircraft cockpit interior was interior green and the rest insignia green. It should be silver as planes of this era just prior to WW2 had their cockpits in silver just like wheel wells for the Spitfire and Typhoon were in silver as well.
By the time I realised was too late as the fuselage had been glued so I've got to live with it.

Cheers,
Richard
 
Thread owner
For once the Matchbox clear parts were slightly undersized but the frames were still bulging and plastic thick. I wanted to pose the cockpit canopy slide back and to do this I had to thin the pilots canopy and use the gunners canopy as the canopy just behind the pilot

View attachment 308773 View attachment 308774

Sanding and polishing achieved the thickness that I needed. Joints needed extra plastic shims for a gradual slop towards the tail.

View attachment 308775 View attachment 308776

All surface elevators were cut and repositioned including the tail.

View attachment 308777 View attachment 308778View attachment 308779 View attachment 308780

Gaps were filled and sanded.

View attachment 308781 View attachment 308782View attachment 308783 View attachment 308784

Finer putty was applied and final sanding done.

View attachment 308785 View attachment 308786

The tail was positioned to follow the elevators for a right turn.

View attachment 308787

Next ...engine cowling

Cheers,
Richard
 

Attachments

  • 30.jpg
    30.jpg
    6.3 KB · Views: 0
  • 29.jpg
    29.jpg
    6 KB · Views: 0
  • 28.jpg
    28.jpg
    6.3 KB · Views: 0
  • 27b.jpg
    27b.jpg
    5 KB · Views: 0
  • 27a.jpg
    27a.jpg
    7.1 KB · Views: 0
  • 27.jpg
    27.jpg
    5 KB · Views: 0
  • 26.jpg
    26.jpg
    4.7 KB · Views: 0
  • 25c.jpg
    25c.jpg
    4.7 KB · Views: 0
  • 25b.jpg
    25b.jpg
    4.4 KB · Views: 0
  • 25a.jpg
    25a.jpg
    5.2 KB · Views: 0
  • 31.jpg
    31.jpg
    6.2 KB · Views: 0
  • 32.jpg
    32.jpg
    6.2 KB · Views: 0
  • 33.jpg
    33.jpg
    6.1 KB · Views: 0
  • 34a.jpg
    34a.jpg
    4.3 KB · Views: 0
  • 34.jpg
    34.jpg
    5.5 KB · Views: 0
Thread owner
Here's the engine and cowling...the part look ok so I didn't bother detailing it. Spraye it interior green...should have been insignier yellow/green...back then everything was interior green to me.:rolling:

View attachment 308952 View attachment 308953

But I did slightly detail the cowling by drilling out the air scoop

View attachment 308954 View attachment 308955

Dry fitted the parts and propeller...the propeller had a pronounced distance from the cowling so I shortened and moved it closer. Later I painted the pistons and push rods flat black and dry brushed silver to bring out raised detail.

View attachment 308956 View attachment 308957

Unfortunately I don't have pictures of the painted engine.

Cheers,
Richard
 

Attachments

  • 40.jpg
    40.jpg
    5.1 KB · Views: 0
  • 39.jpg
    39.jpg
    5 KB · Views: 0
  • 38.jpg
    38.jpg
    4.7 KB · Views: 0
  • 37.jpg
    37.jpg
    4.7 KB · Views: 0
  • 36.jpg
    36.jpg
    5.6 KB · Views: 0
  • 35.jpg
    35.jpg
    5.7 KB · Views: 0
Why not? Your not letting your standards drop are you Richard?:smiling2::smiling5:

Terrific work on the fuselage
 
Thread owner
Hi Steve, well the eagerness to assemble the parts got the better of me and I just forgot to photograph the progress. Basic black and silver dry brushing and dirty wash was all it needed.

Cheers,
Richard
 
Lovely. An old, sorry, vintage Matchbox kit. It's great to see one being built. Nice job to, with all the extra detail.
 
Nice trip down nostalgia lane chaps.When i got into models aged 9 our local newsagents and model shops stocked Matchbox kits.I dont know about you chaps but the wonderful Matchbox box art grabbed my attention and eager paws.I remember having a tooth out at Dentist and mum treating me to the monoplane Matchbox helldiver model.I loved Matchbox kits and now nearly 50 i look back with affection and a tear or two at a bygone age in the 70s when life wasnt so much rush here and there.
Richard.
 
Thread owner
Thanks Collin and Richard. Nice to have jolted old memories on a vintage kit. I still like building Matchbox kits when I get hold of any because of their clean rivetless molds.

Cheers,
Richard
 
Thread owner

Attachments

  • 46.jpg
    46.jpg
    5 KB · Views: 0
  • 45.jpg
    45.jpg
    5.5 KB · Views: 0
  • 44.jpg
    44.jpg
    5.2 KB · Views: 0
  • 43.jpg
    43.jpg
    5.3 KB · Views: 0
  • 42.jpg
    42.jpg
    5.4 KB · Views: 0
  • 41.jpg
    41.jpg
    5.4 KB · Views: 0
Status
Not open for further replies.
Back
Top