Theme editor

Scale Model Shop

Trumpeter 1/32 TMB-3 Avenger

Status
Not open for further replies.
Thread owner
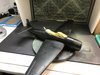
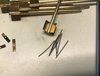
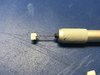
I finished the body of the rockets and have cut the ignition wires as 1.5cm lengths of lead wire. I will attach these when it comes to final fittings.
View attachment 316310
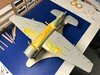
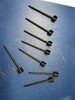
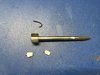
I then cut the rocket wing mounts from the kit parts.
View attachment 316311
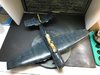
And drilled holes for the ignition wires
View attachment 316313
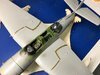
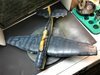
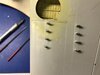
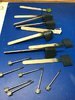
Cementing them into place. Lots of care using mk1 eyeball to make sure they lined up
View attachment 316312
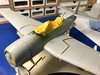
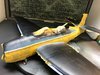
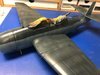
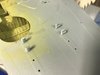
When firmly glued in place I used first a scriber to score a guidline, then the corner of a square file, followed by a round file to get a curve to which to fix the rockets
View attachment 316315
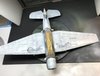
Then some primer sprayed onto the rockets.
View attachment 316316

I am now in the process of masking, a long one.......
 

Attachments

  • 1B60CDD6-8BC7-4ADF-BDAD-AF79A22EC240.jpeg
    1B60CDD6-8BC7-4ADF-BDAD-AF79A22EC240.jpeg
    3 KB · Views: 0
  • 3C0DA291-EA25-4D7B-A9EF-721114B0DD8F.jpeg
    3C0DA291-EA25-4D7B-A9EF-721114B0DD8F.jpeg
    3.1 KB · Views: 0
  • 762A9617-732A-4B39-824C-66419E45AF2F.jpeg
    762A9617-732A-4B39-824C-66419E45AF2F.jpeg
    3 KB · Views: 0
  • 208C8690-C66F-4C7E-B0E2-200942BE3C6A.jpeg
    208C8690-C66F-4C7E-B0E2-200942BE3C6A.jpeg
    2.8 KB · Views: 0
  • 4E481869-467A-498A-8E25-49C285E1A328.jpeg
    4E481869-467A-498A-8E25-49C285E1A328.jpeg
    2.7 KB · Views: 0
  • B6F09199-9D44-49CF-A320-FD0B3AE56945.jpeg
    B6F09199-9D44-49CF-A320-FD0B3AE56945.jpeg
    2.6 KB · Views: 0
This aircraft project is just great. Going to be a cracker, I suspect.
 
Barry

I am beginning to understand just how much work goes into building a decent aircraft model. You seem to go that one step further to add the extra finish to your models that make them stand out from the crowd. very nicely done and I am watching closely to learn from.

John
 
Thread owner
Thanks everyone.

This is a very time-consuming model but well worth the effort.

I have finished the rockets and done some canopy painting while also working on masking the main airframe. Hopefully the masking will be finished tonight so I can lay down the first coat of primer to highlight flaws.

here is a shot of the rockets all painted and the canopy masked and painted USN Sea Blue.
View attachment 316480
 

Attachments

  • IMG_4270 (004).jpg
    IMG_4270 (004).jpg
    3.2 KB · Views: 0
Interesting attachment. Too bad it doesn’t say what web site it’s about, though :)
 
Thread owner
Interesting attachment. Too bad it doesn’t say what web site it’s about, though :smiling3:
Mmmmmm...... Yes, I thought I had deleted that when I realised I linked to the wrong thing Jakko... anyway deleted now....
 
Thread owner
I have been masking up...
underside done
View attachment 316545
Top-side to do tonight.
View attachment 316546
Then it is on with the disposable gloves and an alcohol wipe all over the aircraft before the first black primer coat.

I will also find the time to remove the masking from the canopy glass as that has been painted, wash applied and a varnish coat done.
 

Attachments

  • IMG_4272 (002).jpg
    IMG_4272 (002).jpg
    3.4 KB · Views: 0
  • IMG_4271 (002).jpg
    IMG_4271 (002).jpg
    3.9 KB · Views: 0
I’m now wondering: what are the brass strips on the wings for? That is to say, what do they represent that couldn’t be moulded in plastic straight onto the wing parts?
 
They look like wing skin strengthening plates to me.Trumpeter do more than one version of the Avenger. Maybe earlier aircraft didn’t have these plates.So it would make sense for Trumpeter to provide them as PE instead of having to mould two different wings.
 
Thread owner
I finished the masking process last night.
View attachment 316581
Tonight I will be spraying MRP Black primer after the alcohol wipe.
 

Attachments

  • IMG_4273 (002).jpg
    IMG_4273 (002).jpg
    3.8 KB · Views: 0
Thread owner
Black Primer sprayed. It helped highligh some flaws that I addressed with a little filler, sanding stick and scriber.
View attachment 316782

I then layed down a very thin white primer coat on the underside. As the underside is white I wanted to first tone down the black basing just a little. Primer being a little thicker and less translucent is ideal for this.

I then sprayed the underside with the base coat, a light overall coverage first then I focussed on the centre of panels to lighten them along with other areas that I wanted lighter and closer to the base colour.

View attachment 316783
I am pleased with the overall modulated look but I think I need one or maybe two more mist coats to pull it together and slightly reduce the contrast.

I will decide tomorrow when I get some more benchtime.
 

Attachments

  • F7E97774-A9A4-432F-A5A4-587E2F2BF4DB.jpeg
    F7E97774-A9A4-432F-A5A4-587E2F2BF4DB.jpeg
    3.3 KB · Views: 0
  • ED3ED341-1C98-4910-ACEE-7DA0E51876EC.jpeg
    ED3ED341-1C98-4910-ACEE-7DA0E51876EC.jpeg
    3.7 KB · Views: 0
Thread owner
I am progressing well with the painting.

Underside painted white, the sides intermediate blue and she is masked up ready for sea blue.
View attachment 317517

I adopted my usual method of base coat application for darker colours.

First an overall application then I mix the base colour with a little white to spray into the middle of panels and in areas that would catch the light.
View attachment 317518
Next it all needs blending in and toning it down with repeated mist coats of thinned base coat until you get the effect that you want.View attachment 317519
You just have to be careful not to overdo these mist coats.
I then end with a final mist coat of Mr Levelling Thinner. This helps even out the paint and makes sure it is nice and shiny for decals. All paints are MRP of course.

here she is with some of the masking removed. The rest will be removed when I have finished the matt coats after weathering..
View attachment 317520
There are just a few areas where I need to touch up. The touching up will be done by airbrush using Clever Putty for local masking.

Next I will be painting details before decalling.
 

Attachments

  • IMG_4278 (002).jpg
    IMG_4278 (002).jpg
    3.1 KB · Views: 0
  • IMG_4277 (002).jpg
    IMG_4277 (002).jpg
    3.3 KB · Views: 0
  • IMG_4276 (002).jpg
    IMG_4276 (002).jpg
    3.4 KB · Views: 0
  • IMG_4279 (002).jpg
    IMG_4279 (002).jpg
    3 KB · Views: 0
Thread owner
Thanks Dave - yes thats right, the MRP range, not the Gunze products.
 
Status
Not open for further replies.
Back
Top