
You are using an out of date browser. It may not display this or other websites correctly.
You should upgrade or use an alternative browser.
You should upgrade or use an alternative browser.
Tamiya's Masterpiece - Their 1/32 scale Mosquito
- Thread starter BarryW
- Start date
- Status
- Not open for further replies.
Not if it's the new 1/24 Airfix Hellcat!My only worry is, whatever you build next, you might just be a little - let down by the kit ?
Jim
That Hellcat looks a nice kit and I may well be tempted but my concern is that like the Typhoon in that scale while the engineering will be superb the manufacturing will let it down. That awful soft poor quality plastic Airfix uses is a real problem. With the Tiffy you spend as much time cleaning the mould lines, sink holes and filling gaps where the plastic clearly shrunk, as you do assembling the parts.Not if it's the new 1/24 Airfix Hellcat!
Jim
Well I have joined the fuselage to the wing. Once again while a complex mix of shapes to bring together the fit can only be described as perfect.
A screw gives a really good strong join, supplemented by liquid cement brushed along the seams.
View attachment 340225
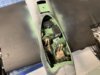
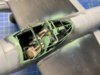
Take a look at that cockpit, not to mention those joins....
View attachment 340224
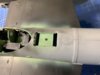
The underside fit
View attachment 340226
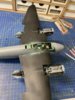
An overview.
View attachment 340227
A screw gives a really good strong join, supplemented by liquid cement brushed along the seams.
View attachment 340225
Take a look at that cockpit, not to mention those joins....
View attachment 340224
The underside fit
View attachment 340226
An overview.
View attachment 340227
Attachments
- Joined
- Apr 27, 2018
- Messages
- 15,043
1/3
Barry,
Great work as always. You are not wrong for your praise for this kit the fit looks superb.
Great work as always. You are not wrong for your praise for this kit the fit looks superb.
G
Guest
Guest
An amazing level of detail in the kit, brought together and finished superbly.
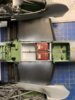
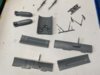
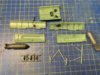
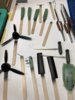
I have started to pull together the front cannon assembly

Note the p.e. jigs to ensure that the barrels have the right spacing. These will be removed before the next stage of the assembly, more thoughtful Tamiya engineering.
I will not be leaving this area open to view but I will have the bomb bay open.
Note the p.e. jigs to ensure that the barrels have the right spacing. These will be removed before the next stage of the assembly, more thoughtful Tamiya engineering.
I will not be leaving this area open to view but I will have the bomb bay open.
I am having the bomb bay section open and gun bay closed or on other words ‘half open’ as per the Tamiya description.
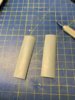
The bomb bay doors come as a single piece so some cutting is required.
I used tape to provide a guide to the cross cut.
View attachment 340640
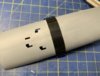
I then used my finest razor saw to cut, working slowly and letting the saw do the work.
Here it is after cutting needing only a swipe of a sanding sponge
View attachment 340641
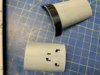
I then did the same to separate the two bomb bay doors.
View attachment 340642
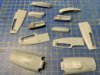
Her is a view of the next lot of sub assemblies ready to paint except for the two bombs as I have some sanding to do having treated the seams with Mr DIssolved Putty
View attachment 340643
The bomb bay doors come as a single piece so some cutting is required.
I used tape to provide a guide to the cross cut.
View attachment 340640
I then used my finest razor saw to cut, working slowly and letting the saw do the work.
Here it is after cutting needing only a swipe of a sanding sponge
View attachment 340641
I then did the same to separate the two bomb bay doors.
View attachment 340642
Her is a view of the next lot of sub assemblies ready to paint except for the two bombs as I have some sanding to do having treated the seams with Mr DIssolved Putty
View attachment 340643
Attachments
Progress seems rather slow this week
Here are some bomb bay parts painted, weathered and ready to install
View attachment 341537
Between waiting for parts to dry I have been pulling together various sub assemblies.
View attachment 341536
Here are some bomb bay parts painted, weathered and ready to install
View attachment 341537
Between waiting for parts to dry I have been pulling together various sub assemblies.
View attachment 341536
Attachments
Been going through some pretty undramatic routine work on the Mossie
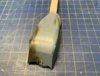
Some subs black primed and most base coated. Still to paint the spinner and bomb bay door outsides.
View attachment 342549
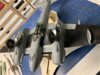
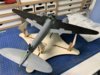
This is what the main structure now looks like.
View attachment 342550
View attachment 342551
No fit issues at all.
Some subs black primed and most base coated. Still to paint the spinner and bomb bay door outsides.
View attachment 342549
This is what the main structure now looks like.
View attachment 342550
View attachment 342551
No fit issues at all.
Attachments
I have put together the inner canopy frame. There is a little tidying up to do, brought out by the expanded photo.
View attachment 342982
I have painted the canopy itself as well. A test shows that it fits perfectly over the frame. I will be removing the masking, gluing or it place and then remasking for when I paint the fuselage.
View attachment 342983
Sound odd removing the mask and remasking but I have decided that the clean up will be easier off the model.
Attachments
Hi Barry
Everything is looking sublime.
Jim
Everything is looking sublime.
That sounds like a very wise decision.Sound odd removing the mask and remasking but I have decided that the clean up will be easier off the model.
Jim
- Status
- Not open for further replies.
Legal Notice
scalemodelling.co.uk is a privately operated online discussion forum. All content posted by members reflects their own views and opinions and does not necessarily represent those of the forum owners or administrators. While reasonable efforts are made to moderate content, no responsibility is accepted for user-generated material. By using this site, you agree to comply with UK law and the forum rules.