Theme editor

Scale Model Shop

Kitty Hawk 1/32 OV-10D Bronco

Status
Not open for further replies.

BarryW

Active member
SMF Supporters
Joined
Jul 23, 2011
Messages
6,147
Reaction score
462
Points
83
Age
70
1/3
Thread owner
I have never built a Kitty Hawk kit before but they are producing some interesting subjects in 1/32 scale so it is time to build one.

I remember back ‘in the day’ when Airfix first released their 1/72 Bronco and there was something about this ungainly aircraft that sparked my imagination. So when Kitty Hawk released this kit it was inevitable that I would get it.

Here is the box:
A2E37E0D-68A0-4CA5-80B0-0AD63BCF11BC.jpeg

I have also bought some aftermarket.
0B883934-3B54-475A-8136-8F0023203A28.jpeg

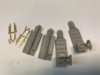
These are the kabuki tape type of masks,which are far better than vinyl. They are essential for the huge area of canopy on this kit, but also using masks for the major markings produces a much better result than using decals, particularly in this scale. I find them just as easy, or easier, than decals to apply. The metal landing gear is also an essential buy for this kit as the kit plastic is not strong enough, as is often the case in this scale. I have decided to use the seat harnesses in the kit rather than a.m.

0E492364-70FE-4577-B718-451DAC063B59.jpeg

Speaking of which here are the decals, p.e. and supplied nose weight. They all seem in register.

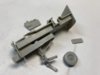
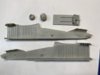
Here is an example of a sprue. Nice and cleanly molded, there is very little flash. The plastic is that brittle type so particular care is needed when removing parts from the sprues specially as there are a lot of small parts and some sprue gates are large relative to the size of the part. Detail is very nice indeed. One thing I noticed is that to identify a sprue you need to cross reference to the instruction’s diagrams as they are not labelled A, B, C etc. Two of them, with the booms, are almost identical so you really need to compare them carefully with the drawing. For that reason it is more important than ever to clearly labe each sprue, as in the picture, with a post-it and sprue letter. Do secure the post-it with a little sellotape. Not only will this simple bit of preparation save you a lot of time during the build, as it always does, it could save you a lot of grief.

C3EFBFCD-5254-41A1-9B17-ADE6E9C49F4C.jpeg

The clear parts are securely and safely packed in their own box and they are high quality, as they need to be with this kit.

8EE8181C-5A9D-492C-9FC7-6F06281CBB74.jpeg

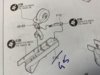
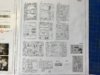
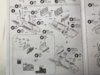
The instructions are clear and in colour.

D3A2CCFE-4353-4367-9FB5-CC516C11EC4D.jpeg

There are four schemes with the kit and some very nice ones indeed. It is a difficult choice for me between these three:

775C464B-7CA9-4298-91AF-B9E9BCC3B9C2.jpeg

The one above is the most likely one....

D3F08512-CFEC-469D-98A7-A1B67BEFD193.jpeg

This desert one is nice too.....

17731881-EB2E-4ECA-B02C-23410C3A82B9.jpeg

Something about this two tone grey scheme is also calling me....

Decisions, decisions. All will be revealed in a later post.

AE83F2F8-30E2-4065-9B12-D7A31C6555D1.jpeg

Well, the bench is all cleaned up after the Mossie, refreshed supplies on order and the bench prepared, set up for the build.

More to follow..........
 
Thread owner
I started cutting plastic today.

Care is needed over the seats as the instructions are not clear over the angle of the backs and I nearly got it wrong. When Googling to check on how they should fit I found a resin seat and decided to order it all the way from Australia. It will take a few weeks to arrive but given the high visibility of the cockpit they will make a huge difference.

I got the kit seats ready for paint anyway.
View attachment 346848
They are not too bad but nothing like as good as what I ordered.

Take a look at this pic and see all the parts on sprue G.
View attachment 346849

Here is the sprue diagram and as you can see there is no sprue G.

View attachment 346850

Clearly J is really G .....

Need to be careful of these instructions.
 

Attachments

  • 5416245C-56BA-4BF3-A93E-958940EFDA3B.jpeg
    5416245C-56BA-4BF3-A93E-958940EFDA3B.jpeg
    2.9 KB · Views: 0
  • A5C5BE9A-EBCF-4D5E-8EE8-9DFB321847F3.jpeg
    A5C5BE9A-EBCF-4D5E-8EE8-9DFB321847F3.jpeg
    3.2 KB · Views: 0
  • E15CA47A-335D-40DB-A60F-210EFFD539CD.jpeg
    E15CA47A-335D-40DB-A60F-210EFFD539CD.jpeg
    2.4 KB · Views: 0
Barry,
I am looking forward to this. I to have found this an interesting aircraft and had a poster of it on my wall as a kid. I don't build planes but if I did it would be this or a Grumman avenger.
 
If you’re unsure about which finish to go for I’d nudge you in the direction of the desert scheme.....
 
Hi Barry
I'm gonna enjoy this. I must be honest - I've never heard of Kitty Hawk but it does look a great kit. Hope the seats from Down Under don't delay things too much.
Jim
 
Morn Barry,

I'm in also!!! I too do not build planes, but your work is too good to miss. I had a kit of the Bronco back in the 60s in 1/48 and can't remember from which maker. It was molded in light green plastic though. If I was to build a plane tomorrow, it would be this one I found yesterday in 1/32 scale. Release date is 25 June and it comes in under €200.
10601351[1].jpg
Looks bad to the bone and the rigging looks like fun too!!!

I didn't mean to hijack your thread Sir.....

Prost
Allen
 
Thread owner
A bit more progress on the cockpit. It is slow going with lots of small parts including p.e. I really dont like it when companies provide impossibly small p.e. and expect you to glue end on as a lever. Ridiculous. Never succeeded in that, ever. On this kit I found a way to represent the levers with the p.e. It is not as Kitty Hawk intended but I got it done and has more chance of staying attached this way.

Here is how the pit floor looks now.
View attachment 346967
 

Attachments

  • 311652C8-D39A-441F-A399-07D31375AF6C.jpeg
    311652C8-D39A-441F-A399-07D31375AF6C.jpeg
    2.3 KB · Views: 0
Thread owner
I will post some more pics within a day or two but I have been getting on with internal sub-assemblies. The instructions continue to be a source of part amusement, part irritation. Dumb mistakes show a carelessness about them such as below.

View attachment 347199

An obvious error with two F10’s on the page. Fortunately one of the two is a very distinctive shape so I was able to find it on another sprue. The other problem is a vagueness about how parts actually fit. It is necessary to be looking a couple of steps ahead and to do a lot of dry fitting.

Make no mistake. I am enjoying this build and the kit’s issues are more irritating than anything else.
 

Attachments

  • DC56422A-64AB-4AC8-A5E8-D2894E82CAB1.jpeg
    DC56422A-64AB-4AC8-A5E8-D2894E82CAB1.jpeg
    2.8 KB · Views: 0
A positive thing I notice about those instructions is that they give FS numbers for the colours instead of model paint ones. (Or perhaps in addition to those: C311 looks like a model paint reference.)
 
Thread owner
Indeed Jakko. The FS numbers are very useful and are very easily crossed referenced to various paint brands, MRP in my case. The C number refer to the Gunze range for which an on-line search can help identify the right colour.
 
Exactly what I was thinking, yes. Far better to match an official colour number to a model paint you like, than having to convert one interpretation to another.
 
Thread owner
I have got the interior sub assemblies almost finished and ready for paint.
View attachment 347331

View attachment 347332

I won’t be painting until the resin seats are ready.

I will be pulling together more sub-assemblies while waiting.
 

Attachments

  • 1B24D6EB-58B3-4AC5-93FB-267BC7489611.jpeg
    1B24D6EB-58B3-4AC5-93FB-267BC7489611.jpeg
    2.5 KB · Views: 0
  • BF18854A-B7D3-40B6-B92A-54A1EB7683EA.jpeg
    BF18854A-B7D3-40B6-B92A-54A1EB7683EA.jpeg
    2.5 KB · Views: 0
Hi Barry, over here we affectionately call this brand Shittyhawk and have grown acustomed to their moldings and destruction sheets just like their cousins from the Island and mainland China. They do build up to nice kits but caution and thinking ahead will be needed. Cross checking parts with numbers will be the norm even for the FS colours. The parts count is an Asian thingy making the kit worth its cost hence the small PE and over engineering.

A friend of mine built one and was happy with it and I think you would to.

Cheers,
Richard
 
Thread owner
I certainly see what you mean. Tamiya these are not..... they do some great subjects though and I have certainly seen a lot worse than this.
 
A bit more progress on the cockpit. It is slow going with lots of small parts including p.e. I really dont like it when companies provide impossibly small p.e. and expect you to glue end on as a lever. Ridiculous. Never succeeded in that, ever. On this kit I found a way to represent the levers with the p.e. It is not as Kitty Hawk intended but I got it done and has more chance of staying attached this way.

Here is how the pit floor looks now.

Any chance you could share your 'how to' method of fixing those tiny PE parts Barry?
 
Thread owner
Any chance you could share your 'how to' method of fixing those tiny PE parts Barry?
Ther is no real secret Gern. There p.e. had to marks where they were meant to be bent. I assume( instructions vague to this...) that they were meant to be angled out, with two pieces glued in representing two levers. there was no hope doing this so I bent them to a full U shape (straight bottm and glued the bottom into the slot which gave me something of a surface to bond. That is all - I also only needed to use two of the four pieces of p.e. so I had spares in case of the carpet monster striking, it did!!!

OK, a purist would not like it but, hey, I have some leavers, four in all represented on the model and if I tried to do it the way they wanted there would not be any at all....

Barry, we improvise as we go along as long as it looks good enough. :thumb2: :smiling2:

Cheers,
Richard
 
Good plan Barry. Last time I had some PE throttle levers to fix I poked the throttle quadrant with the tip of a heated scalpel blade to make a small slot for the end of the lever shaft to fit into, then CA'd them in. Next day I broke them off while fitting the IP.:disappointed:

Pete
 
Thread owner
Good plan Barry. Last time I had some PE throttle levers to fix I poked the throttle quadrant with the tip of a heated scalpel blade to make a small slot for the end of the lever shaft to fit into, then CA'd them in. Next day I broke them off while fitting the IP.:disappointed:

Pete
I feel the pain.
 
Status
Not open for further replies.
Back
Top