Theme editor

Scale Model Shop

Andrew's 1/72 ICM SdKfz 222 - Decals! Recce GB

adt70hk

New member
Joined
Sep 4, 2019
Messages
10,558
Reaction score
561
Points
0
1/3
Thread owner
Hi all

Been following this GB since joining and had thought about doing something else but the part count was too high for my liking. Then I came across this whilst reorganising my cupboard last night!

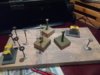
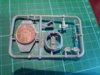
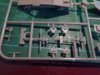
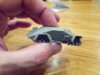
Obligatory box, sprue and instructions shots below.

Andrew

--------------------------------------------------------------------------------------

48717722588_818876f17d_c.jpg


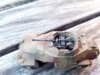
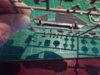
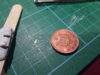
First impressions of the sprue are very good. Nice crisp moulding and no obvious flash. It even comes with a little bit of PE for the anti-grenade wire mesh turret cover.

48720802956_5a676e8c7c_c.jpg


Instructions - only 1 sheet A4 size but very clear and easy to follow

48720971677_433a1d58f4_c.jpg

48720802316_a023c18f11_c.jpg
 
Andrew,
I've made the HobbyBoss 1/35 version, and that's small! Will follow with interest
Dave
 
Thread owner
Dave, Steve - Thanks for stopping by.

All

Below are some closer sprue shots (including penny for scale) to give you an idea of the size. Flash is unfortunately not as absent as I first thought but it's not awful.

You'll see that there's some reasonable detail even down to the suspension springs (last shot). I've already started assembly but dinner got in the way and so three parts is not much to show! ;)

Andrew

View attachment 356666

View attachment 356667

View attachment 356668

View attachment 356669
 

Attachments

  • 48722552281_7bbcfa5a52_c.jpg
    48722552281_7bbcfa5a52_c.jpg
    3.5 KB · Views: 0
  • 48722716262_3810fcc2ce_c.jpg
    48722716262_3810fcc2ce_c.jpg
    3.2 KB · Views: 0
  • 48722553551_70b54e6cea_c.jpg
    48722553551_70b54e6cea_c.jpg
    3.1 KB · Views: 0
  • 48722554091_f279f8f26b_c.jpg
    48722554091_f279f8f26b_c.jpg
    3.3 KB · Views: 0
Thread owner
Hi all

So for once I had a productive modelling weekend and have the hull/body complete. All parts are off the sprue but I've deliberately not fully assembled it to make the really small parts easier to paint.

On the whole it was pretty straightforward, the fit on the the two halves of the hull. The only downside was me cutting off what was meant to the filler cap off in the mistaken belief it was bad moulding. The flash on the thinner pieces also made it interesting!

I even managed to give it a blast of primer yesterday but forgot to take the pic. Sorry.

ACW as usual

Andrew

------------------------------------------------------------------

Main hull assembled

View attachment 357173

View attachment 357174

View attachment 357175

View attachment 357176


Small parts ready for priming (I have masked the gluing surfaces with PVA glue)

View attachment 357177


The smallest part of the kit..... :fearful:

View attachment 357178
 

Attachments

  • 48733555476_0d2a25fcda_c.jpg
    48733555476_0d2a25fcda_c.jpg
    2.8 KB · Views: 0
  • 48737928762_c8a2c29191_c.jpg
    48737928762_c8a2c29191_c.jpg
    2.7 KB · Views: 0
  • 48733332293_28a8c1924e_c.jpg
    48733332293_28a8c1924e_c.jpg
    2.3 KB · Views: 0
  • 48733669931_88ff1dd699_c.jpg
    48733669931_88ff1dd699_c.jpg
    2.7 KB · Views: 0
  • 48733853502_227c7ca146_c.jpg
    48733853502_227c7ca146_c.jpg
    2.8 KB · Views: 0
  • 48733853657_f255b855b6_c.jpg
    48733853657_f255b855b6_c.jpg
    2.8 KB · Views: 0
Good luck getting that penny to stick LOL. I may start using PVA as I find masking fluid seeps out everywhere and as it's blue it can be easily seen. Nice update Andy
 
Thread owner
Good luck getting that penny to stick LOL. I may start using PVA as I find masking fluid seeps out everywhere and as it's blue it can be easily seen. Nice update Andy

Thanks Steve.

To be honest I have no idea if it will work well or not as the idea only came to me as I was putting the parts on my newly patented 'Specially Sticky Spray Surface Sheet' (aka upside down masking tape stuck onto cardboard). Most of it has been applied to the hull, although I did do a few bits on the chassis and in that case it appears to have been a success but I will have to see.

As for the penny I've got a 6" bolt that I'm planning to use just to make sure it stays in place!!! :tongue-out3:


That is tiny, nice start though Andrew.

Thanks Ian. It is indeed small but quite nicely formed! :smiling3:
 
Thread owner
Hi all

So this is one of the things that received some attention as part of my mass spray session (HERE) but as you'll see below I still have a way to go on various bits and pieces.

I'm still working on the pressure and paint consistency with the new AB so it's not quite as 'tight' a pattern as I was aiming for but I'm getting there.

I just hope I can make the GB's end of November deadline......:confused:.

ACW

Andrew


View attachment 364124

View attachment 364125
 

Attachments

  • 49098601821_f324a9782a_c.jpg
    49098601821_f324a9782a_c.jpg
    3 KB · Views: 0
  • 49098793702_dd3fdf404e_c.jpg
    49098793702_dd3fdf404e_c.jpg
    2.7 KB · Views: 0
Thread owner
Hi all

So this one of the things that was 'attacked' during my mass paint session a couple of weeks ago and on the whole I'm happy with how it's looking.

I had a bit of a play around with with the new rust paint set I got on this build. I need to tone it down a bit on the mesh but as I've not yet weathered the vehicle its very obvious in comparison to the fresh paint job on the rest of the vehicle. I also put some short lengths of 0.5mm square rod on the inside of the turret to make it easier to mount the grenade guard and fortunately they're not visible from anything other than an obscure angle.

Unfortunately I had an accident with the co-axial machine gun so had to bodge a replacement barrel.
sad.png
. I've also managed to lose the shovel but I have no idea where it went.....
sad.png
notamused.png


I've got a bit of touching up and some stowage to add next and then the pre-decal varnish coat.

ACW as usual.

Andrew


View attachment 364799

View attachment 364800

View attachment 364801

View attachment 364802

View attachment 364803

View attachment 364804
 

Attachments

  • 49114581763_58c47c75f9_c.jpg
    49114581763_58c47c75f9_c.jpg
    2.9 KB · Views: 0
  • 49132811277_ea3c825f90_c.jpg
    49132811277_ea3c825f90_c.jpg
    3.2 KB · Views: 0
  • 49132131188_7496cc4199_c.jpg
    49132131188_7496cc4199_c.jpg
    3.1 KB · Views: 0
  • 49132135323_171c4bba07_c.jpg
    49132135323_171c4bba07_c.jpg
    3.2 KB · Views: 0
  • 49132677071_791f8a21f1_c.jpg
    49132677071_791f8a21f1_c.jpg
    2.8 KB · Views: 0
  • 49132678241_d22f8a8c86_c.jpg
    49132678241_d22f8a8c86_c.jpg
    3.1 KB · Views: 0
Thread owner
Luv it Andrew. Glad you toned down the mesh. Looking a lot better now

Thanks for stopping by Steve and the support. Never having used PE or a rust set like this before, I'm still learning. Hopefully, it will tie in quite nicely once I've weathered the vehicle.

ATB

Andrew
 
Thread owner
Hi all

So I missed the deadline on this GB but it was always going to be a big ask. Anyway I've added some decals.

Most of the decals came with the kit but I've also added the divisional marking for my German forces (9th SS Pz Div). I now understand that the Germans were not as systematic in their markings as us Brits, especially when it came to divisional markings, but I'd started the practice before I found out and so have continued the practice.

I also had to put the front number plate somewhere else as I'd not left enough room underneath the front mounted jerry cans.

ACW

Andrew

View attachment 366286

View attachment 366287
 

Attachments

  • 49184346971_db7a32b46b_c.jpg
    49184346971_db7a32b46b_c.jpg
    1.7 KB · Views: 0
  • 49183852663_7629e57ea2_c.jpg
    49183852663_7629e57ea2_c.jpg
    2.5 KB · Views: 0
Andrew,

Brilliant finish on that, especially in such a small scale.
:thumb2: :thumb2::thumb2::thumb2:

Paul.
:smiling:
 
Hi Andrew - there should really be two rear number plates and the ones you have used are Wehrmacht (WH) not SS
 
Thread owner
Hi Andrew - there should really be two rear number plates and the ones you have used are Wehrmacht (WH) not SS
Simon

Good spot and DOH!!!! One of the rear number plates broke up but I had completely missed the kit supplied one being Wehrmacht. Will correct it this afternoon.

Thanks for pointing it out before it was too late!!

Andrew
 
Back
Top