Theme editor

Scale Model Shop

Zvezda 1/35 Kamaz "Mustang"

  • Thread starter Thread starter Guest
  • Start date Start date
G

Guest

Guest
Thread owner
Carrying on with my love of multi-wheeled things I received and started this kit today.

I doubt it's been seen much around here so I'll add plenty of sprue shots, but in usual recent Zvezda style it has lots of highly detailed and cleanly moulded parts. Let's hope I don't make a hash of nailing it all together!
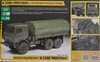
Box shots to start

View attachment 388478

View attachment 388479

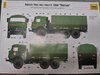
The sides of the box (usual sturdy inner box with printed outer sleeve) has pictures of similar models in the range and the colour call outs in Zvezda and Tamiya paints. It's not an exhaustive list though, just some basic colours you'll need, the rest are on the painting sheet inside.

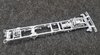
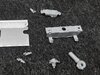
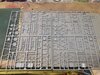
Inside the tightly packed box there's plenty of plastic

View attachment 388480

View attachment 388481

View attachment 388482

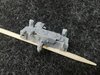
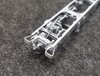
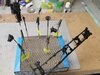
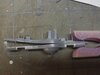
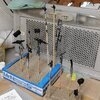
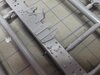
Some very nicely moulded detail on show

View attachment 388483

View attachment 388484

View attachment 388485

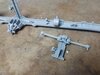
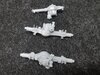
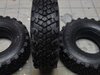
Tyres seem well made too. Sprue gates in the middle of a tread block, very little in the way of a mould parting line, and writing on the sidewalls

View attachment 388486

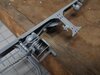
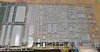
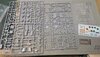
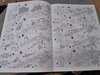
For anyone that isn't used to Zvezda instructions they can seem a bit :dizzy: at first, but basically the sub assemblies are displayed in the margin, and once complete they get added as per the main diagram.

View attachment 388487

Double sided full colour paint sheet.

View attachment 388488


Well done if you've managed to make it this far lol.

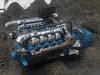
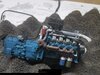
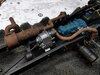
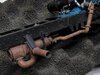
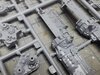
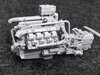
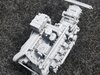
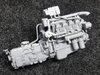
The instruction start with the engine, and what an engine! So many parts that I lost count, even the two turbochargers needed assembling before fitting. The only thing I've omitted is the large cooling fan as it masks the whole front of the engine, which will make painting a nightmare I reckon.

View attachment 388489

View attachment 388490

View attachment 388491

Thankfully there is an option to have the cab tilted forward so that all this detail can be displayed. That's probably the option I'll go for, or try and fudge something to make it moveable.
 

Attachments

  • HkUEUPz.jpg
    HkUEUPz.jpg
    2.5 KB · Views: 0
  • 2T50P70.jpg
    2T50P70.jpg
    2.7 KB · Views: 0
  • ZitkwIy.jpg
    ZitkwIy.jpg
    2.3 KB · Views: 0
  • JvD9oiI.jpg
    JvD9oiI.jpg
    3.1 KB · Views: 0
  • KTFWECh.jpg
    KTFWECh.jpg
    2.4 KB · Views: 0
  • slnlRh1.jpg
    slnlRh1.jpg
    2.7 KB · Views: 0
  • IKVCJbY.jpg
    IKVCJbY.jpg
    3.6 KB · Views: 0
  • iDVXLlV.jpg
    iDVXLlV.jpg
    2.8 KB · Views: 0
  • LRDJkVI.jpg
    LRDJkVI.jpg
    2.7 KB · Views: 0
  • k9Ik9Ki.jpg
    k9Ik9Ki.jpg
    2.8 KB · Views: 0
  • d2v7WXa.jpg
    d2v7WXa.jpg
    3 KB · Views: 0
  • xPVIv4F.jpg
    xPVIv4F.jpg
    3.3 KB · Views: 0
  • eJbF1bY.jpg
    eJbF1bY.jpg
    3.5 KB · Views: 0
  • 2hjUCKO.jpg
    2hjUCKO.jpg
    3.4 KB · Views: 0
Blimey, Andy, had the postie got to the end of your drive before you opened the box??
That looks like a lot of parts.................that engine looks very good - should keep you occupied for a day or so.............
Zvezda have a civilian Mustang on their Facebook page, that certainly looks different, but a quick internet search finds some different camouflage patterns for the Mustang
Dave
 
Thread owner
The bench was cleared and ready for it to arrive Dave :smiling5:

I've seen a few interesting camo schemes too. Undecided yet but looking at the number of parts I think I'll have plenty of time to decide!
 
I reckon it will be a nice model when finished, a rub with sandpaper will sort the tyres no problem.

Andy.
 
Thread owner
I hope so Andy. If it doesn't it'll definitely be my fault rather than the kits!

So I moved on to assembling the chassis today. Again everything is made up of multiple parts. Thankfully there's very little clean up needed, mostly just the sprue scar, although some parts are so small I couldn't even manage that.

Loads of little bits added to the main rails, and some part for the suspension that I haven't figured out yet. I could really go the whole hog and add brake lines etc as all of the fittings/tanks/compensator valves are in, with connection points. I know how I am though, if I don't get them all arrow straight I'll wish I hadn't bothered. One to ponder overnight...

View attachment 388740

And the rear mounted winch. For some reason this isn't fitted on the box build pictures, and I can understand why. Super fiddly with well over a dozen parts, it even has the chain & drive gears as a separate piece, even though they are buried within the chassis, never to be seen. Even the PTO prop shaft is 3 piece with moving joints.

View attachment 388741

These are the parts making up the rear "bumper"

View attachment 388742

After much swearing, tweezers in both hands, glue brush in my teeth, I got it together. Regular cocktail stick for scale.

View attachment 388743

I then fixed the two chassis halves together. With several cross members, the winch, engine mounts, hoses and bumpers to line up I figured I'd better leave it to dry for an hour or so whilst weighted down, to ensure it was all square

View attachment 388744

Once dry, and after adding some more pieces, I trial fitted the engine. I'm pretty sure I'll have to start painting or at least black priming very soon, as short of dunking it in a bucket I'll never reach some areas once it's glued together.

View attachment 388745

Rear bumper / winch detail. The nylon string looks a bit funky here but it's the same stuff I've used on other Zvezda models and it looks reasonable once painted. Hook is not fixed so I could alter it's position later if I need to.

View attachment 388746
 

Attachments

  • OsNX3VR.jpg
    OsNX3VR.jpg
    3.2 KB · Views: 0
  • UCB0c4Q.jpg
    UCB0c4Q.jpg
    2.7 KB · Views: 0
  • Edu9OFK.jpg
    Edu9OFK.jpg
    2.2 KB · Views: 0
  • N93REME.jpg
    N93REME.jpg
    3.2 KB · Views: 0
  • ClMlbaS.jpg
    ClMlbaS.jpg
    3 KB · Views: 0
  • lb52CBQ.jpg
    lb52CBQ.jpg
    2.7 KB · Views: 0
  • PUdqTOr.jpg
    PUdqTOr.jpg
    2.6 KB · Views: 0
Andy,
when building up chassis from multiple parts, I always let the assembly dry off overnight, and next day, If I feel that some joints look a little fragile, I strengthen them with a few drops of CA. It's a bit belt & braces, but there's nothing worse than a chassis coming apart on final touches ( yes, I've had that )
Dave
 
Thread owner
Thanks Dave, I'm pretty much doing that.

I wanted to check the engine would fit since every point of contact was an extra bracket or mounting I'd glued on to the chassis. Just wanted to make sure I hadn't messed any of them up before it was too late.

After taking the pictures I've left it alone for the night.

Good idea with the ca though. Some of the parts have minimal gluing area so might benefit from a bit of reinforcement.
 
Typical Zvezda I see, why use one part when 6 fiddly bits will do? Regards the painting Andy, a lot of the inner chassis will never be seen when the model is fully built up.

Andy.
 
Andy,
Lovely work so far mate. I have never built a Zvezda kit but they look pretty good, so may have to dip my toe.
 
Thread owner
Cheers Andy, I didn't realise you had built this. Anything I need to watch out for?

Thanks Paul. I understand their early stuff was a bit ropey (the one I built certainly was!) but I've done a few of their newer ones and they were up their with the likes of Tamiya for fit & finish. Just watch out for the instructions as I've had a few errors on others, but so far so good with this.


I got some primer on early this morning, including a few of the sub assemblies that go on at the same time as the engine.

View attachment 388492

Then I've been spending a bit of time painting the engine. Tricky in the heat of the shed as it was drying as soon as I put it on, and my sweaty fingers have rubbed some paint off the exhausts, but much of it needs another coat and some weathering anyway.

I really don't like the new AK 3rd Gen lighter metallics. I keep trying but I might just throw them away to remove the temptation as I always end up repainting with Vallejo afterwards!

View attachment 388493

View attachment 388494
 

Attachments

  • nlAUMV2.jpg
    nlAUMV2.jpg
    3.4 KB · Views: 0
  • BFJbkjC.jpg
    BFJbkjC.jpg
    3 KB · Views: 0
  • H0oyvsp.jpg
    H0oyvsp.jpg
    3.2 KB · Views: 0
Thread owner
Thanks Paul.

Will try and get some more done tomorrow, but the wife's birthday takes priority!
 
Cheers Andy, I didn't realise you had built this. Anything I need to watch out for?
I have not built this particular model but was comparing it to the rocket launcher which is also a 3 axle chassis. I feel your pain with the heat as my workbench is in the loft and has been way too hot for days now, just means I can go out and play on the bike.

Andy.
 
Thread owner
I got a bit more done today, in-between pampering my better half on her birthday.

I finished off painting the engine and started a bit of weathering with a couple of washes. I'll do more later but I feel better for at least doing something to the parts that will be hard to access later. I've also done a bit of dry brushing to try and pick out some of the chassis details amongst the sea of black.

Radiator / intercooler / fan fitted, along with the air cleaner and various hoses.

View attachment 388747

More hoses, the springs, transfer box and most of the exhaust system fitted. I'm trying something different with the exhaust. I've no idea if it'll work but I'm starting with them silverish (as they would be when new) then building some rust effects on top of that. Tail pipe isn't shown as it gets fitted a bit later but it's been drilled & filed out. Strange that they would mould it with a solid end when there's so much detail elsewhere.

View attachment 388748

Then the first hiccup. I'm sure these aren't supposed to be this shape! A casualty of cramming so much into the box I'd guess as the upper part appears to have been squashed out of shape. Both rear axles (one on each of two identical sprues) were the same.

View attachment 388749

But after some clamp and boiling water action, they straightened out nicley, and here are the three finished axles after the addition of several other parts. They need a bit more clean up when the glue dries, but at least they are straight.

View attachment 388750

I've also made a start on some of the many other sub assemblies. I'm trying to paint as I go, which is taking a lot longer but I'm in no rush for a change.
 

Attachments

  • 30UucgH.jpg
    30UucgH.jpg
    3.5 KB · Views: 0
  • aK8rh9J.jpg
    aK8rh9J.jpg
    3.2 KB · Views: 0
  • eLaxdg1.jpg
    eLaxdg1.jpg
    2 KB · Views: 0
  • qOCd3iv.jpg
    qOCd3iv.jpg
    2.8 KB · Views: 0
Andy,
The chassis is beautifully painted. lets hope there are no more distorted parts to be found.
 
Thread owner
Cheers Paul, and I hope so too.

I suppose 2 out of nearly 500 isn't bad lol
 
Thread owner
Playing with the exhaust system today, in between building some more sub assemblies.

Basically on top of the silver base I've layered several washes, made from a variety of rusty acrylic colours mixed & matched, then thinned with water. Some had bicarbonate of soda added to give a bit of texture. I've put a coat of matt varnish on to seal the work so far, then I can touch up bits like the silencer brackets.

I'm really pleased with the result but I'm happy to hear opinions. There'll probably be some pigments added near the end of the build but there's no point adding them now as I'll just rub them off.

View attachment 388495

View attachment 388496

And here are some of the bits I've been putting together and priming while the exhausts dried. Axles, prop shafts, air & fuel tanks and a few other suspension parts. Most of them will probably stay in primer, maybe with just a dry brush to bring out some detail, like the chassis.

View attachment 388497
 

Attachments

  • Qdt9x6h.jpg
    Qdt9x6h.jpg
    3.3 KB · Views: 0
  • rEs18lW.jpg
    rEs18lW.jpg
    3 KB · Views: 0
  • MDZToKp.jpg
    MDZToKp.jpg
    4.5 KB · Views: 0
Rust looks superb, better than most specialist pigments I have seen
 
Thread owner
Those exhausts look really good, if you ask me. Properly rusty but not overdone.
 
Back
Top