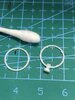
What’s try e best method of trimming small bits of sprue of tiny parts. (Inside of the two circles) I’ve managed to break these sort of parts before trying to file or trim with knife. Any other good tips please.View attachment 391431

You are using an out of date browser. It may not display this or other websites correctly.
You should upgrade or use an alternative browser.
You should upgrade or use an alternative browser.
Trimming small parts
- Thread starter Defiant911
- Start date
G
Guest
Guest
I would use a round needle file and then some fine W&D to finish.
another issue with the model, the cockpit glass seems to be slightly under size. There’s a gap either front or back depending how it’s positioned. I suspect it would be easier to fit correctly at the front due to shape and then it’s a case of fill the gap at back which you can see in this picture. The gap is between 0.40mm & 0.85mm from one side to other. What’s the best filling option for such a situation ?

1/3
I haven't built planes for a while , BUT , i would think adding a shim to the front of the ''glass' between it and body would be easier than trying to fill or make a shim for the thin back piece
Third the shimming!
I'd have to have the kit in my hands to decide where.
You might still need a bit of filling, and for that I second Dave's suggestion of PVA. I have an old and rather thick bottle for just such an eventuality. The best is that you can just wipe the excess away with a damp finger, or cotton bud.
I'd have to have the kit in my hands to decide where.
You might still need a bit of filling, and for that I second Dave's suggestion of PVA. I have an old and rather thick bottle for just such an eventuality. The best is that you can just wipe the excess away with a damp finger, or cotton bud.
You can buy thin strips of plsticard which comes in useful, Evergreen Styrene in the site sponsors shop.Cheers all, the good thing is the back of the cockpit glass is painted so no fear of fogging. When you refer to shimming what do you use, a slither of plastic spruce cut to fit?
I use a dremel cutting wheel for plastic to remove inner sprue. This method puts no strain on the ring to be saved. Then use new #11 blade to finish. I'd prolly use thin shim or PVA at rear of canopy so as to preserve good fit elsewhere. PaulE
Here you go Carl:
https://www.scalemodelshop.co.uk/product/10pk-25mm-x-50mm-x-35cm-plastic-strip-evergreen-eg100
John does a range of sizes so you can measure the gap and pick the one you need. I'd fix a strip of this to the back of the clear part rather than to the aircraft body - that way you haven't got to worry about the corrugations. The guys have suggested the front of the glass but that seems more difficult as you have multiple curves to negotiate. At least at the back you're only dealing with curves in one direction.
If you fix just one straight side flush to the outside of the window frame with a small amount of extra thin and wait for it to dry - about 20 mins should be enough - you can bend the strip to match any curves and glue it in small sections. You need to be careful and hold it in place until the glue starts to harden - only a minute - then move on to the next bit. You can pre-bend the strip with your fingers to get it to the approximate shape you need before you start. Leave an overhang at each end so you don't have to worry about precisely matching the length. Once you're done, just cut them flush with the frame.
With a suitable bit of painting, the extra strip becomes part of the window frame.
Thanks for that link and explanation Dave, I was struggling to find it in the shop. I’ve ordered some so will give this a go. Sounds useful stuff to have in the kit anyway. CarlHere you go Carl:
https:tongue-out3:/www.scalemodelsh...m-x-50mm-x-35cm-plastic-strip-evergreen-eg100
John does a range of sizes so you can measure the gap and pick the one you need. I'd fix a strip of this to the back of the clear part rather than to the aircraft body - that way you haven't got to worry about the corrugations. The guys have suggested the front of the glass but that seems more difficult as you have multiple curves to negotiate. At least at the back you're only dealing with curves in one direction.
If you fix just one straight side flush to the outside of the window frame with a small amount of extra thin and wait for it to dry - about 20 mins should be enough - you can bend the strip to match any curves and glue it in small sections. You need to be careful and hold it in place until the glue starts to harden - only a minute - then move on to the next bit. You can pre-bend the strip with your fingers to get it to the approximate shape you need before you start. Leave an overhang at each end so you don't have to worry about precisely matching the length. Once you're done, just cut them flush with the frame.
With a suitable bit of painting, the extra strip becomes part of the window frame.
Thanks for that link and explanation Dave, I was struggling to find it in the shop. I’ve ordered some so will give this a go. Sounds useful stuff to have in the kit anyway. Carl
A selection of small thin strips is definitely a useful addition to your spares box. It has multiple uses including gap filling as here, but you can also use it to create extra details such as fuselage ribs, straps for tanks and boxes, window frames, jerry can and bustle (the big mesh baskets fitted to tank turrets) frames - all sorts of stuff.
Forgot to mention. You said the gap you have to fill is not the same width everywhere. It might be an idea to carefully square up the fuselage and rear of the window frame with a file or sander so they fit together with no gaps. Then you can slide the window forward by whatever distance you need so it fits the front. That distance will be the width of your strip. That makes it a neater and easier job than filling where you can with strip then gap filling with PVA or similar. If your gap is then wider than the strip you buy - use two strips.
G
Guest
Guest
Your not related to our Simon are you Karl, there was a time when "clarett" was a familiar mention on his posts. :smiling3:.Fresh blade and carefully, best I can offer.
I usually position such a thing so I am carving torwards my thumb so my thumb supports it, means the odd bit of blood on the bench though.
There is usually blood in my builds, but I don’t think I’m related....Your not related to our Simon are you Karl, there was a time when "clarett" was a familiar mention on his posts. :smiling3:.
Legal Notice
scalemodelling.co.uk is a privately operated online discussion forum. All content posted by members reflects their own views and opinions and does not necessarily represent those of the forum owners or administrators. While reasonable efforts are made to moderate content, no responsibility is accepted for user-generated material. By using this site, you agree to comply with UK law and the forum rules.