
You are using an out of date browser. It may not display this or other websites correctly.
You should upgrade or use an alternative browser.
You should upgrade or use an alternative browser.
A13 Mk.I/Cruiser Tank Mk.III
- Thread starter Neo
- Start date
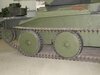
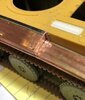
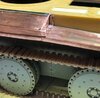
Thank you,Paul! Really pleasure to me that this topic is interesting.Great work Neo. The detailing work on this build is exceptional. The copper sheet stowage boxes and fenders are very well done.
Seeing this progress is a real treat.
Cheers
Paul
And I did it but only for one side.I think it’s safe to say that if anyone here can do that, it’s you :smiling3:
View attachment 396043
View attachment 396044
View attachment 396045
View attachment 396046
Attachments


A lot of fun. As you can see British engineers were very fun people:loudly-crying: Some their decisions are like nightmare for modeller.Nice work on the class Neo. Looks like your having a bit more fun with this build now??
View attachment 397245
View attachment 397246
View attachment 397247
View attachment 397248
View attachment 397249
View attachment 397250
View attachment 397251
View attachment 397252
Attachments


G
Guest
Guest
I have long thought that real tank designers sometimes say to themselves: “How can we make this more complicated so modellers will have a hard time with it?” ")
Unfortunately I have damaged model by bottle of water. Fortunately all tiny details are safe and only chassis crashed.
Need to be careful.
View attachment 397569
Need to be careful.
View attachment 397569
Attachments

G
Guest
Guest
I’d say this is what we in Dutch call luck in an accident: yes, things got damaged, but luckily only the bits that are easy to repair and not the major work you did. Just some drilling to put pins into the axles should see this right, I think.
You do have me wondering whose phone number that is, though
You do have me wondering whose phone number that is, though
- Joined
- Apr 27, 2018
- Messages
- 15,028
1/3
Glad to see there was no major damage and all your hard work survived.
Yes, I was lucky. I will do that way. I think it won't be very difficult.I’d say this is what we in Dutch call luck in an accident: yes, things got damaged, but luckily only the bits that are easy to repair and not the major work you did. Just some drilling to put pins into the axles should see this right, I think.
You do have me wondering whose phone number that is, though :smiling3:
The phone number...ah yes,but she is too old:smiling5:
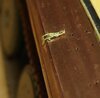
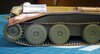
Good news! Chassis has been fixed by chrome wire. I was little frightened but the result is good. Nobody guess that something was damaged.
I also has started to work with tiny details. I know that I could do better all that little thing. I think I am little tired of this endless project so I need to finish it faster.
View attachment 398457
View attachment 398458
View attachment 398459
View attachment 398460
View attachment 398461
I also has started to work with tiny details. I know that I could do better all that little thing. I think I am little tired of this endless project so I need to finish it faster.
View attachment 398457
View attachment 398458
View attachment 398459
View attachment 398460
View attachment 398461
Attachments


Hello,Steve! I afraid I don't have such a problem. I have another. I lose many tiny details while using tweezers.
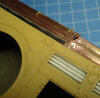
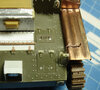
Next update. I afraid this is only 60% of front details :loudly-crying:
View attachment 398925
View attachment 398926
View attachment 398927
View attachment 398928
View attachment 398929
View attachment 398930
View attachment 398931
View attachment 398932
View attachment 398933
Next update. I afraid this is only 60% of front details :loudly-crying:
View attachment 398925
View attachment 398926
View attachment 398927
View attachment 398928
View attachment 398929
View attachment 398930
View attachment 398931
View attachment 398932
View attachment 398933
Attachments


- Joined
- Apr 27, 2018
- Messages
- 15,028
1/3
Neo,
Great skills what do you use for the really small rivet detail. My punches only go down to 0.5mm
Great skills what do you use for the really small rivet detail. My punches only go down to 0.5mm
Hi! I always use Masterclub nuts and rivets. But smallest one is 0,4mm in their stuff.Neo,
Great skills what do you use for the really small rivet detail. My punches only go down to 0.5mm
- Joined
- Apr 27, 2018
- Messages
- 15,028
1/3
Thanks I will look them up.Hi! I always use Masterclub nuts and rivets. But smallest one is 0,4mm in their stuff.
This is really useful aftermarket.Thanks I will look them up.
G
Guest
Guest
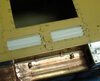
 Wow, those catches and wingnuts, brass bins !
Thanks I will look them up.
I used to get mine from Historex Paul. You might want to try there first
- Joined
- Apr 27, 2018
- Messages
- 15,028
1/3
Thanks mate.I used to get mine from Historex Paul. You might want to try there first
Legal Notice
scalemodelling.co.uk is a privately operated online discussion forum. All content posted by members reflects their own views and opinions and does not necessarily represent those of the forum owners or administrators. While reasonable efforts are made to moderate content, no responsibility is accepted for user-generated material. By using this site, you agree to comply with UK law and the forum rules.