Theme editor

Scale Model Shop

Meng 1/35 British Army HUSKY TSV

Steve Brodie

New member
Joined
Sep 17, 2014
Messages
4,652
Reaction score
0
Points
0
1/3
Thread owner
Starting on this one, Mengs Husky;


7 sand coloured plastic sprues, Engine Hood, Truck Bed, Drivers Cab. 4 Rubber Tires, 4 Poly-caps. A photo etch fret with 11 pieces of etch and a decal sheet for all the instruments and markings;
sprue 1.jpegsprue 2.jpegsprue 3.jpegsprue 4.jpegsprue 5.jpegsprue 6.jpegsprue 7.jpegsprue 8.jpegsprue 9.jpegdecals.jpeginstructions.jpeg

I am going to do something different with this one and add the RV conversion set from Accurate armour, to hopefully produce something like this;

a150_053a.jpga150_044a.jpga150_043.jpg

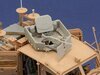
The set also comes some Comms gear to fill up the empty slots along with some upgraded seats;

a150_014.jpg

Along with an improved Weapon station;

a150_042.jpg
 

Attachments

  • a150_042.jpg
    a150_042.jpg
    3.1 KB · Views: 0
Thread owner
Steps 1-4 complete;
1 thing i would change is in step 2 not to glue parts A36 at this stage (front swing arm ?) as its a bit ambiguous as to what angle it should be glued at, i would attach it at stage 3 when you fix the under chassis guard plate, it would be easier to line up, i had to bend both my pieces to fit into place.

20200922_104638_resized.jpg

The chassis coming together. Seems a good approach not to bother adding parts and building the drive train when it will never be seen, totally opposite to the RFM MAT-V kit;

1.jpg2.jpg3.jpg


Close up of the front details;

4.jpg
 
Steve,

Looking good so far, should be impressive when it's finished!!
Does the steering turn or is it fixed??

Paul.
:smiling5:
 
In for the build Steve. I want to add one of these to the stash for my desert armour dio.
 
Thread owner
Steps 5-8 complete, no issues putting any of these pieces together;

20200922_132432_resized.jpg20200922_132442_resized.jpg

Which builds into a nice sturdy Bonnet. Glass for the lens has been left off until after painting has been completed.
 
Thread owner
Cab and bed dry fitted, its a fair sized beast for just 4 people.

20200923_151201.jpg
Figure just for comparison;
20200924_095446_resized.jpg
 
Thread owner
Communication racks built, needed a swipe of putty,but the etched brass fitted like a dream, will eventually be fitted with some radio gear and some Gizmology wiring

20200924_161529_resized.jpg20200924_161557_resized.jpg20200924_161607_resized.jpg

Just placed on the cab floor
20200924_161647_resized.jpg
 
Thread owner
Accurate Armour set has arrived, superbly cast resin pieces, just need to remove very carefully from the casting stubs;
20200930_131204_resized.jpg

replacement seats compared to kit version;

20200930_131402_resized.jpg

Nice etch, rod and solder wire;

20200930_131506_resized.jpg

Very Comprehensive Instruction Manual;

20200930_131121_resized.jpg
 
Thread owner
AA Seats have been removed from their stubs and added to the Meng supports. Made a hash of one of the rear seats, thinking some of the resin was a pour stub removed it to realise it was part of the bracket base :angry: , Not to worry as superglued the posts at the right angle, and it cant be seen;
20201007_095801_resized.jpg20201007_095808_resized.jpg20201007_095815_resized.jpg20201007_095830_resized.jpg

They should look great when painted up especially the rear ones as Meng produced them as basic sheets of plastic, with no belts !

20201007_110515_resized.jpg

The real deal

h 38.jpgh 45.jpg
 
Thread owner
Couple of hours (split here and there) to get the bits for the spade cut out and sanded;

20201008_145305_resized_1.jpg
Just noticed that part 14 needs a bit more of resin shaving away :worried:

All goes together very well (just push fitted);

20201008_145214_resized_1.jpg
 
Steve,

Looking better each time I pop in!! :smiling2: Turning into a great "compact" looking vehicle now.

Are you going to replicate all the clutter on the rear bulkhead as in the last picture?? ;):smiling2:

Those replacement seats look the dogs b**** - should look fantastic once you've waved the hairy stick over them.

Paul.
:smiling2:
 
Thread owner
Steve,

Looking better each time I pop in!! :smiling2: Turning into a great "compact" looking vehicle now.

Thankyou

Are you going to replicate all the clutter on the rear bulkhead as in the last picture?? ;):smiling2:

To some degree, yes, maybe a bit of Gizmology added in, just waiting for a few packs of different sized lead wire and i can get started. The comms kit /bowman radio(s), also come with the AA upgrade set.

Those replacement seats look the dogs b**** - should look fantastic once you've waved the hairy stick over them.

Hopefully they will.
 
Steve

My knowledge of modern afvs is sadly lacking, so I'd not heard of this particular vehicle.

Judging by the work you've done so far it is going to look very impressive.

ATB

Andrew
 
Looking good Steve, I am sure it is the little brother of the 6 wheeler MRAP I built, full size vehicles made by the same company.

Andy.
 
Thread owner
Looking good Steve, I am sure it is the little brother of the 6 wheeler MRAP I built, full size vehicles made by the same company.

Andy.
Thanks, (geek alert :smiling4: ) think the MRAP is built by General Dynamics and the Husky by Navistar
 
Hi Steve
That is a lot of kit for a fairly small vehicle. Fiddly to assemble perhaps but stunning detail. The AA resin conversion looks comprehensive and AA stuff is well fitting. What are the AA instructions like. Sometimes after market stuff instructions take some figuring out. Looks like you're off to a good start.
Jim
 
Thread owner
Started work on the weird looking but fully detailed Rotzler TR080 winch;

rotz_800x.png

The AA bits and bobs;

20201009_141620_resized.jpg20201009_141639_resized.jpg20201009_141836_resized.jpg
 
Back
Top