
You are using an out of date browser. It may not display this or other websites correctly.
You should upgrade or use an alternative browser.
You should upgrade or use an alternative browser.
Andrew's 1/35 North Africa Vignette (SimonT Tribute GB)
- Thread starter adt70hk
- Start date
- Joined
- Apr 27, 2018
- Messages
- 15,127
1/3
Andrew the paint looks very good.
G
Guest
Guest
Fine AB work Andrew. The pre-shading has worked a treat.
The pre-shade has come out nicely Andrew, the wheels look ok too, you don't need a big difference in shades.
Andrew the paint looks very good.
Fine AB work Andrew. The pre-shading has worked a treat.
Thanks gents, your support is much appreciated.
ATB.
Andrew
Hi all
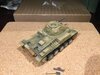
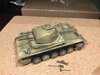
So fired up our digital SLR (once the battery had been charged) and had a quick play around with the settings, to try and get some better shots.
The below are not perfect but are much closer to the true colour than before, if a touch on the dark side, and so give a much better impression of how close the two colours are.
ACW as usual.
ATB.
Andrew
PS the white stuff you can see under the engine grills is kitchen roll to catch the worst of the main coats as I sprayed it on.
- Joined
- Apr 27, 2018
- Messages
- 15,127
1/3
Andrew,
The paint job looks great.
The paint job looks great.
Thanks Paul. Much appreciated. It's come out ok on the whole.Andrew,
The paint job looks great.
ATB.
Andrew
SteveWell done Andrew. Great build and a nice start with the base coats. Bring on the dust!
Apologies - completely missed your comment, so a very belated thank you!
Andrew
Hi all
So this has stalled a bit due to a lack of time, although I did manage to get some done last week.
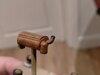
I thought I'd have a go at chipping not having it done before. I used a technique demonstrated by Martin Kovac aka Night Shift (vid below):
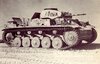
Having come across a picture of a Pz IIF in North Africa, with very worn front road wheels I thought I'd have a go at that too - although I have not gone as extreme as the real life thing as I was bit nervous!
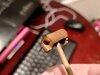
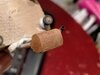
Finally I gave the exhaust some rust treatment. The black around the top you'll see is yet another first - as it's the first time I've used pigments.....
ACW as usual.
ATB
Andrew
------------------------------
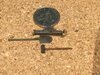
I had create my own enamel rust tone. It's a bit heavy in places but as a first attempt I think it actually looks pretty good - all things considered.
View attachment 413969
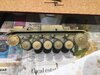
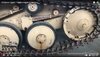
As you can see very worn road wheels....
View attachment 413970
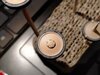
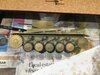
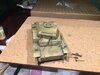
Some of my versions.....in hindsight my 'less is more' approach left it less obvious than I intended but you live and learn....
View attachment 413971
View attachment 413972
View attachment 413973
The exhaust....the mesh cover actually doesn't look quite this red in real life and still has some of the dark yellow base coat visible....I also struggled to get a consistent colour in the photos, so apologies....
View attachment 413974
View attachment 413975
View attachment 413976
So this has stalled a bit due to a lack of time, although I did manage to get some done last week.
I thought I'd have a go at chipping not having it done before. I used a technique demonstrated by Martin Kovac aka Night Shift (vid below):
- Use a lighter paint and sponge to great some lighter marks.
- Paint some dark grey inside the bigger marks to represent where it's got to the bare steel.
- Very faint enamel rust tones on some of the larger chips.
- Most importantly of all - if you're new to the technique, practice where it's not visible!!
Having come across a picture of a Pz IIF in North Africa, with very worn front road wheels I thought I'd have a go at that too - although I have not gone as extreme as the real life thing as I was bit nervous!
Finally I gave the exhaust some rust treatment. The black around the top you'll see is yet another first - as it's the first time I've used pigments.....
ACW as usual.
ATB
Andrew
------------------------------
I had create my own enamel rust tone. It's a bit heavy in places but as a first attempt I think it actually looks pretty good - all things considered.
View attachment 413969
As you can see very worn road wheels....
View attachment 413970
Some of my versions.....in hindsight my 'less is more' approach left it less obvious than I intended but you live and learn....
View attachment 413971
View attachment 413972
View attachment 413973
The exhaust....the mesh cover actually doesn't look quite this red in real life and still has some of the dark yellow base coat visible....I also struggled to get a consistent colour in the photos, so apologies....
View attachment 413974
View attachment 413975
View attachment 413976
Attachments
-
 50927129637_81cd1d67e6_b.jpg1.7 KB · Views: 0
 -
 50927110882_3c374d8514_b.jpg3 KB · Views: 0
 -
 50926301048_20e38c39be_b.jpg2.5 KB · Views: 0
 -
 50926301053_3260e54a69_b.jpg2.9 KB · Views: 0
 -
 50926301043_ce950a3528_b.jpg3.2 KB · Views: 0
 -
 50926987516_63987b6796_b.jpg3.2 KB · Views: 0
 -
 50905345058_af0f8a4fd9_c.jpg3.3 KB · Views: 0
 -
 50926987496_9275c32ea0_b.jpg3.2 KB · Views: 0
Andrew. The Exhaust looks very impressive
1/3
Looks good Andrew. I’ve used this technique myself, but I stole it from Mike Rinaldi :thumb2:
If I may, there are a couple of wrinkles that can improve the effect.....
You can refine the chips a little by putting on the light chips with a sponge, then using a lighter rust shade painted inside them to mimic new rust. After that paint darker spots inside some of the new rust with either dark rust or base coat rust. This will mimic old rust and break up the uniformity a bit.
The other improvement is to group the rust spots a little more. If they are too evenly spaced it doesn’t quite read correctly.
Well done Andrew, I like how this is progressing :smiling4:
I quite often use the area underneath to try out weathering or varnish on :thumb2:.
Thank you Si, coming from you I'll take that as a compliment. As for the underside, as it will be glued to the base at some point, it seemed the obvious place to have an experiment
Andrew. The Exhaust looks very impressive
Lee, thank you very much. It actually looks even better in real life - but isn't hat always the way! :sad-face:
TimLooks good Andrew. I’ve used this technique myself, but I stole it from Mike Rinaldi :thumb2:
If I may, there are a couple of wrinkles that can improve the effect.....
You can refine the chips a little by putting on the light chips with a sponge, then using a lighter rust shade painted inside them to mimic new rust. After that paint darker spots inside some of the new rust with either dark rust or base coat rust. This will mimic old rust and break up the uniformity a bit.
The other improvement is to group the rust spots a little more. If they are too evenly spaced it doesn’t quite read correctly.
You 'may' indeed.....and so thank you very much for the tips. I'll give that a try on the next sets.
Thanks again gents.
All the best.
Andrew
Glad you like it Jim. Thank's very much.Hi Andrew
I'm liking what I see :thumb2:
Jim
Andrew
Hi all
So I managed to get this fully chipped over the weekend. I tried to keep it within reason - not easy given it's my first time doing this.
That said I decided the commander's favourite way up onto the tank was up over the rear left of the vehicle. I therefore gave the shot deflector(?) to the rear left of the turret and the rear left corner of the turret some heavy chipping to represent the extra wear and tear that area would see as a result - at least that's my excuse!
I also reasoned (quite possibly wrongly) that the rear idlers would receive quite a bash from the sand, stones, small rocks etc. as the tracks came up around them. I just need to give them a coat of steel paint to represent where they were in contact with the tracks (and sand). The underside of the track guards also had a heavy chipping for the same reason.
As I've said before, the Ft Benning walk around of their Pz II has been invaluable as it's not been subject to any restoration, meaning you get a good idea of where real where and tear occurred. To that end I tried to recreate the effect from the springs - albeit not quite so rusty.
I also managed to get the tools done too. The jack and shovel have been on the vehicle for quite some time and are showing it all too well. But to lift it a bit I decided that the crew have just picked up a new sledgehammer from somewhere and so the handle is nice and new looking - at least in theory.
I found a good online German camo site that said this about the 'rules' for wheels (link HERE): "Small surfaces (including spoke and disk wheels) can be kept in one color."
So with half the wheels painted one colour and half the other, I've jumbled them them up on either side for better or worse. The wheels are dry-fitted. In fact they are held in place so securely by the black plastic sleeves inside the wheels/idlers/sprockets I won't need to glue them in place at final assembly.
I also decided that the front road wheel on side has just been replaced after its predecessor finally have up the ghost from the battering it took, hence a very new looking one in it's place.
The exhaust is also just dry-fitted at this stage.
All comments are welcome as usual but please note that the chipping has come out much stronger on the pictures than it is in real life - to the point of looking a bit overdone in places. I'm guessing it's the contrast between light and dark being accentuated by the iPads camera for some reason.
ATB.
Andrew
-----------------------------------
The Fort Benning walk around
The spring effect I was trying to mimic
View attachment 414887
My version as it is so far.......
Remember the chipping is not quite this stark in real life at least to my eyes...
View attachment 414888
View attachment 414889
View attachment 414890
View attachment 414891
View attachment 414892
View attachment 414893
Attachments
-
 50966805357_f971b1d5de_b.jpg3.3 KB · Views: 0
 -
 50966805307_ae7772c15f_b.jpg3.3 KB · Views: 0
 -
 50966696521_9eba37e613_b.jpg2.8 KB · Views: 0
 -
 50966805337_2372382407_b.jpg2.9 KB · Views: 0
 -
 50965992013_0382b679ef_b.jpg2.9 KB · Views: 0
 -
 50967460722_9005241588_b.jpg2.9 KB · Views: 0
 -
 50966805362_6ac8c0a989_b.jpg3.2 KB · Views: 0
1/3
That looks excellent Andrew. Really nice work. Love the Fort Benning shots as well. The oil leak on the wheel hubs add interest.
Thank you very much indeed Tim. I'm genuinely pleased with it, even if I do say so myself.That looks excellent Andrew. Really nice work. Love the Fort Benning shots as well. The oil leak on the wheel hubs add interest.
ATB.
Andrew
- Joined
- Apr 27, 2018
- Messages
- 15,127
1/3
Andrew,
Really nice work on the chipping not overdone and very convincing. The damage to the road wheels is spot on.
Really nice work on the chipping not overdone and very convincing. The damage to the road wheels is spot on.
Legal Notice
scalemodelling.co.uk is a privately operated online discussion forum. All content posted by members reflects their own views and opinions and does not necessarily represent those of the forum owners or administrators. While reasonable efforts are made to moderate content, no responsibility is accepted for user-generated material. By using this site, you agree to comply with UK law and the forum rules.