
You are using an out of date browser. It may not display this or other websites correctly.
You should upgrade or use an alternative browser.
You should upgrade or use an alternative browser.
1/24 Italeri Peterbilt 378.
- Thread starter outrunner
- Start date


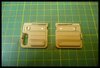
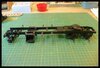
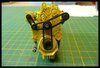
Well. that went very well, the chassis came together with no problems, no flash and built up square easily.
View attachment 416289
View attachment 416290
This kit was a present and I will admit to being a bit wary as my last Italeri kit did not go well but they must have upped their game as I have come across no major problems other than having to open out a few holes that were smaller than the pins on the parts which is nothing really.
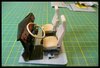
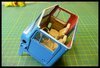
The cab internals all done including the door pockets.
View attachment 416291
View attachment 416292
View attachment 416293
I did deviate from the instructions which would have you assemble the cab around the floor/dash components but on having a bit of a dry fit the cab internals can be fed up through the completed cab, then fit the door pockets and the windows before fitting the roof. I forgot to take pictures of the cab before painting and it is now being left to dry until tomorrow.
Andy.
View attachment 416289
View attachment 416290
This kit was a present and I will admit to being a bit wary as my last Italeri kit did not go well but they must have upped their game as I have come across no major problems other than having to open out a few holes that were smaller than the pins on the parts which is nothing really.
The cab internals all done including the door pockets.
View attachment 416291
View attachment 416292
View attachment 416293
I did deviate from the instructions which would have you assemble the cab around the floor/dash components but on having a bit of a dry fit the cab internals can be fed up through the completed cab, then fit the door pockets and the windows before fitting the roof. I forgot to take pictures of the cab before painting and it is now being left to dry until tomorrow.
Andy.
Attachments
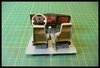
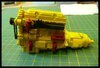
Got the engine finished.
View attachment 416698
View attachment 416699
View attachment 416700
Nothing fancy as I wanted a clean build out of the box so just did as the instructions called for although looking at the photos I notice a couple of bits need tidying up.
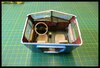
Last look inside the cab, a lot of work in there but when the roof goes on it will hardly be seen.
View attachment 416701
View attachment 416702
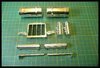
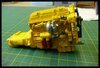
All the large chrome bits assembled.
View attachment 416703
Should not be long now but the sleeper and cab roof are to paint and laquer and there are 12 tiny decals to go on the chassis, something else that will go unnoticed.
Andy.
View attachment 416698
View attachment 416699
View attachment 416700
Nothing fancy as I wanted a clean build out of the box so just did as the instructions called for although looking at the photos I notice a couple of bits need tidying up.
Last look inside the cab, a lot of work in there but when the roof goes on it will hardly be seen.
View attachment 416701
View attachment 416702
All the large chrome bits assembled.
View attachment 416703
Should not be long now but the sleeper and cab roof are to paint and laquer and there are 12 tiny decals to go on the chassis, something else that will go unnoticed.
Andy.
Attachments
I’m in Andy. Now your talking my language. I was 21 years old when I drove my first Peterbilt it was a 359. Never drove a 378 drove a 1989 379 in 1990 for a good friend of mine coast to coast. Looking good
I would imagine that will be right but the decals are too small to decipher the writing."Heat treated, do not weld" decals? Nice engine. PaulE
Andy.
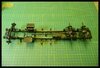
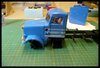
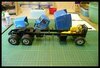
A bit of a dry fit to see how much the cab mounting needs to be tweeked to get a good fit with the bonnet.
View attachment 416982
The decals are not great as they do not match up to the hole for the air filter, the handle and the air filter mount, they are also not very high quality and I must have used about half a gallon of micro sol and they still sit proud in some places. The alternative would be to mask and paint them on but no way am I going down that route as I doubt very much if I have the skills to do that so they will have to be what they are.
Andy.
Attachments
Should not be too long now, all major lumps are together just need to fit the decals (other words are available) and stick it all together, I mean, how hard can it be? :smiling5:
Edit. Just noticed I did not include the picture as I just pressed the post button and went to do something else.
View attachment 417212
Andy.
Edit. Just noticed I did not include the picture as I just pressed the post button and went to do something else.
View attachment 417212
Andy.
Attachments
Legal Notice
scalemodelling.co.uk is a privately operated online discussion forum. All content posted by members reflects their own views and opinions and does not necessarily represent those of the forum owners or administrators. While reasonable efforts are made to moderate content, no responsibility is accepted for user-generated material. By using this site, you agree to comply with UK law and the forum rules.