Theme editor

Scale Model Shop

1/48 Hachette U96 Part 1

Thread owner
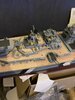
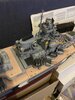
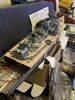
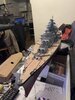
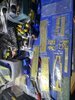
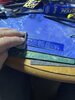
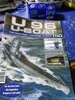
1/48 Hachette U96 Part 20

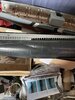
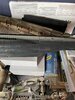
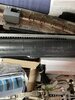
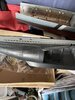
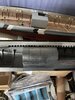
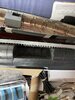
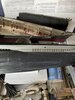
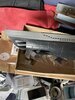
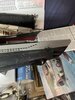
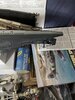
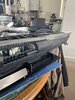
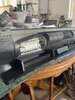
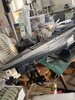
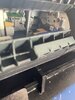
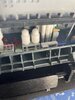
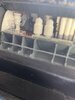
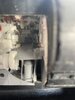
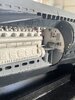
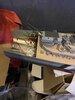
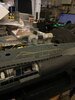
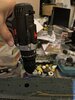
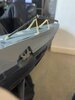
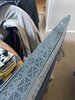
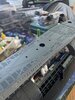
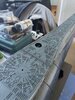
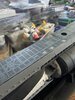
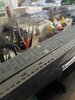
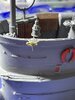
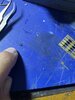
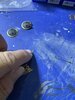
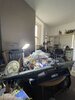
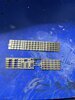
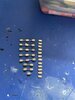
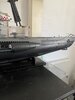
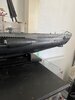
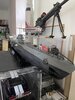
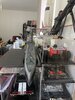
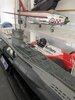
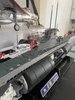
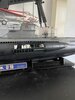
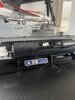
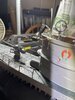
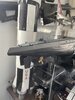
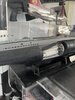
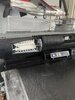
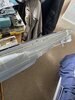
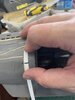
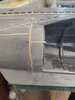
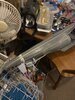
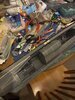
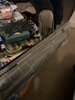
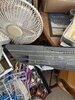
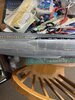
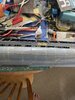
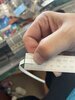
Just finished adding all the brass strips to the outer hull so here’s what it looks like before it gets painted and all those shiny brass strips disappear under paintwork
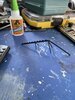
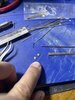
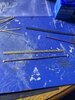
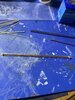
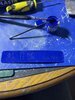
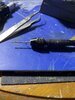
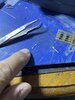
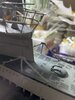
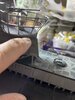
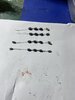
I’ve also included my way of measuring where things go on a curved surface basically I used a 10 thou strip of plastic laid alongside a steel rule measured of the required length then marked the flexible strip which I could then lay over the model to mark where the next brass strip was going to go
It would have been easier with a dressmakers tape but I didn’t have one so I improvised

Regards

ColinView attachment 425603View attachment 425594View attachment 425595View attachment 425596View attachment 425597View attachment 425598View attachment 425599View attachment 425600View attachment 425601View attachment 425602
 

Attachments

  • B8EE43E0-2BBB-4311-88C5-9B481103131E.jpeg
    B8EE43E0-2BBB-4311-88C5-9B481103131E.jpeg
    3.6 KB · Views: 0
  • A04BC694-E61B-41F1-9839-00889A2C88DD.jpeg
    A04BC694-E61B-41F1-9839-00889A2C88DD.jpeg
    3.3 KB · Views: 0
  • E33F5DE7-12B2-4E59-BF7F-38B907C7CDF2.jpeg
    E33F5DE7-12B2-4E59-BF7F-38B907C7CDF2.jpeg
    3.1 KB · Views: 0
  • F0255267-DB95-4081-9A10-19AE7C07ED68.jpeg
    F0255267-DB95-4081-9A10-19AE7C07ED68.jpeg
    4.1 KB · Views: 0
  • 54B18E32-3D4D-46F9-8F20-1FFE2043C147.jpeg
    54B18E32-3D4D-46F9-8F20-1FFE2043C147.jpeg
    4.1 KB · Views: 0
  • 8CA67C59-9030-4A7C-813F-DD7F52FC78A6.jpeg
    8CA67C59-9030-4A7C-813F-DD7F52FC78A6.jpeg
    3.2 KB · Views: 0
  • 4A19A7E5-FE8A-4D03-A87B-897A1B6E0E7F.jpeg
    4A19A7E5-FE8A-4D03-A87B-897A1B6E0E7F.jpeg
    4.2 KB · Views: 0
  • 959BBE7B-28B5-447C-8B49-7EA453394158.jpeg
    959BBE7B-28B5-447C-8B49-7EA453394158.jpeg
    4.1 KB · Views: 0
  • 0FA905B1-0F80-458C-AA75-44E020FDBF09.jpeg
    0FA905B1-0F80-458C-AA75-44E020FDBF09.jpeg
    3.7 KB · Views: 0
  • E3F54776-663A-473A-8B86-149DC451C6AD.jpeg
    E3F54776-663A-473A-8B86-149DC451C6AD.jpeg
    3.5 KB · Views: 0
Thread owner
1/48 Hachette U96 Part 21

Just a short one this time after a week of trying I finally have a paint scheme I’m happy with so here’s the hull fully painted the dark grey used was mixed from mouse grey , dark grey , dark green & black which explains the slight colour variations caused by having to repaint the brass strips which the paint seems to fall off at the slightest touch need to come up with some way of stopping that
The light grey was just standard acrylic humbrol mouse grey for the upper part

Regards

Colin
View attachment 425969View attachment 425970View attachment 425971View attachment 425972View attachment 425973View attachment 425974View attachment 425975View attachment 425976View attachment 425977View attachment 425978View attachment 425979
 

Attachments

  • BC5F2055-E7A9-496B-A0ED-B4B42D007F8A.jpeg
    BC5F2055-E7A9-496B-A0ED-B4B42D007F8A.jpeg
    4 KB · Views: 0
  • D0D44AED-B4A6-4BE0-BAC4-ACA4929DCBCD.jpeg
    D0D44AED-B4A6-4BE0-BAC4-ACA4929DCBCD.jpeg
    3.9 KB · Views: 0
  • 7A3CE82D-15FA-4941-A9BA-BE939570474B.jpeg
    7A3CE82D-15FA-4941-A9BA-BE939570474B.jpeg
    3.9 KB · Views: 0
  • EF2FCA8F-20E5-44F1-8DD7-DDA9284C384D.jpeg
    EF2FCA8F-20E5-44F1-8DD7-DDA9284C384D.jpeg
    3.9 KB · Views: 0
  • 92579256-5C24-4CA2-8CD1-402CEF1F0FB4.jpeg
    92579256-5C24-4CA2-8CD1-402CEF1F0FB4.jpeg
    3.9 KB · Views: 0
  • B26EC6E8-3B12-421A-AA2D-8EFCE738B0AA.jpeg
    B26EC6E8-3B12-421A-AA2D-8EFCE738B0AA.jpeg
    3.8 KB · Views: 0
  • CB9D94AF-5601-490C-A476-73A3A47A6C6C.jpeg
    CB9D94AF-5601-490C-A476-73A3A47A6C6C.jpeg
    3.9 KB · Views: 0
  • 8008585E-7171-454D-9690-3015CCB08B81.jpeg
    8008585E-7171-454D-9690-3015CCB08B81.jpeg
    3.8 KB · Views: 0
  • 0A0530FC-9CC8-4B0B-80D4-39AA08F76936.jpeg
    0A0530FC-9CC8-4B0B-80D4-39AA08F76936.jpeg
    3.9 KB · Views: 0
  • 5FE26984-BEBC-48E6-90CC-7B6F8F0830C3.jpeg
    5FE26984-BEBC-48E6-90CC-7B6F8F0830C3.jpeg
    3.8 KB · Views: 0
  • 005ABC7A-22B6-4689-BD82-86CDFB71E944.jpeg
    005ABC7A-22B6-4689-BD82-86CDFB71E944.jpeg
    3.9 KB · Views: 0
Thread owner

Attachments

  • 2524D2AE-3558-4026-8741-393BBAD6D417.jpeg
    2524D2AE-3558-4026-8741-393BBAD6D417.jpeg
    4 KB · Views: 0
  • 9F2BBC50-14E4-4EDE-A8BE-DDB89D969747.jpeg
    9F2BBC50-14E4-4EDE-A8BE-DDB89D969747.jpeg
    4 KB · Views: 0
  • 2B4B17CB-BFA5-4270-8967-E25E363477C1.jpeg
    2B4B17CB-BFA5-4270-8967-E25E363477C1.jpeg
    4.4 KB · Views: 0
  • D2C6177A-B497-4685-BDA1-1F577958EA55.jpeg
    D2C6177A-B497-4685-BDA1-1F577958EA55.jpeg
    3.8 KB · Views: 0
  • 9F47EB66-3036-4BC0-AD47-5353AB757226.jpeg
    9F47EB66-3036-4BC0-AD47-5353AB757226.jpeg
    3.7 KB · Views: 0
  • 2BAC1490-BB18-4404-89AA-35D74FB413D3.jpeg
    2BAC1490-BB18-4404-89AA-35D74FB413D3.jpeg
    3 KB · Views: 0
  • 2194028E-0389-46F6-A939-7ABE6544F84E.jpeg
    2194028E-0389-46F6-A939-7ABE6544F84E.jpeg
    3.1 KB · Views: 0
  • CF770163-8242-4F20-A1D2-9B2A70578581.jpeg
    CF770163-8242-4F20-A1D2-9B2A70578581.jpeg
    3.7 KB · Views: 0
Great stuff Colin.
I'm really enjoying this build....

I'm intrigued with the earlier shots of Bismark too.
 
Thread owner
Great stuff Colin.
I'm really enjoying this build....

I'm intrigued with the earlier shots of Bismark too.

Ah yes the Bismarck that’s an ongoing monthly collection what you saw was the metal hull which is bolted together
The superstructure is also being built and includes rotating elevating & recoiling main turrets rotating radars working search lights working internal lights navigation lights and rotating secondary turrets oh and working anchor chains and probably although I haven’t got that far yet rotating prop shafts
Here’s a few pictures of it so far

Enjoy

Regards

Colin
View attachment 426303View attachment 426304View attachment 426305View attachment 426306View attachment 426307
 

Attachments

  • 767EEF7D-1F34-49C5-9029-95A4B2422731.jpeg
    767EEF7D-1F34-49C5-9029-95A4B2422731.jpeg
    3.5 KB · Views: 0
  • B4BBC9E1-F2E8-4D36-81D9-7D7A07DF9242.jpeg
    B4BBC9E1-F2E8-4D36-81D9-7D7A07DF9242.jpeg
    3.7 KB · Views: 0
  • C8F20AEB-FBCC-43D6-9103-6509DCCFEC6A.jpeg
    C8F20AEB-FBCC-43D6-9103-6509DCCFEC6A.jpeg
    3.9 KB · Views: 0
  • 35700708-17A3-477F-82EA-1EAC19DF31D7.jpeg
    35700708-17A3-477F-82EA-1EAC19DF31D7.jpeg
    4.4 KB · Views: 0
  • 536DF2E7-2073-4922-8859-8E894249EBE9.jpeg
    536DF2E7-2073-4922-8859-8E894249EBE9.jpeg
    3.9 KB · Views: 0
Thread owner
1/48 Hachette U96 Part 23

So moving on next we have the decking being fitted no issues here just 14 sections from bow to stern basically glue each one down next the previous until you get to the stern
Next comes the fun bit making the stand and nameplate I chose a sea blue to contrast with the black stand
Next up is the net cutter the supports were unusable as you were supposed to bend the brass work into a 90 degrees angle but both sets of supports were twisted out of shape and unusable so I fashioned my own using some brass strip off cuts once painted you couldn’t tell the difference
Also a multitude of tiny triangular angle plates were added in numerous parts of the deck along with the 2 torpedo loaders as they call them which were made from several brass strips then a copper tube was glued on top along with end pieces again made up of several brass pieces why they just didn’t use a thicker piece of brass or plastic is a mystery to me instead of multi glue several pieces together which just needs the glue to fail and it will separate into its component part whereas they could have used moulded plastic
Next come some more decking details along with fitting the conning tower the main gun and 2 main hatch’s all of these items have tiny parts attached to them see the pictures to see the details they mostly are tiny eyebolts made by bending a brass piece around a former I used a 1mm drill shank to get the curve radius
Then comes to fitting the main railings to the deck as you can see time for a power tool to drill the holes for the railings to fit into as all they did was mark them out on the deck and left it to the builder to drill out the holes
To conclude this section next comes all the insulators construction again made up of in some cases 13 separate pieces which again they could have moulded it from a single piece of plastic
Finally a couple of pictures of the sub to show how it’s progressing still got some hatch covers to add a bit of clean up and then the aerial rigging to finally finish it off

Regards

ColinView attachment 426740View attachment 426741View attachment 426742View attachment 426743View attachment 426744View attachment 426745View attachment 426746View attachment 426747View attachment 426748View attachment 426749View attachment 426750View attachment 426751View attachment 426752View attachment 426753View attachment 426754View attachment 426755View attachment 426756View attachment 426757View attachment 426758
 

Attachments

  • 0B8B4B66-6C09-44BA-96A3-68D6D99E7C15.jpeg
    0B8B4B66-6C09-44BA-96A3-68D6D99E7C15.jpeg
    3.4 KB · Views: 0
  • 3A8F48D7-ED08-4F70-9403-1B83D9FBAA64.jpeg
    3A8F48D7-ED08-4F70-9403-1B83D9FBAA64.jpeg
    3.8 KB · Views: 0
  • 10AAD642-3064-4DDA-B11C-A1091430BB28.jpeg
    10AAD642-3064-4DDA-B11C-A1091430BB28.jpeg
    3.2 KB · Views: 0
  • FC352B08-122C-4383-9EE6-5EBE03D2767E.jpeg
    FC352B08-122C-4383-9EE6-5EBE03D2767E.jpeg
    3.9 KB · Views: 0
  • 72396C66-A919-4B63-BFAE-A9C7A2F47C37.jpeg
    72396C66-A919-4B63-BFAE-A9C7A2F47C37.jpeg
    3.7 KB · Views: 0
  • 4AC4461F-4B05-48FF-A05E-55E984E71CA2.jpeg
    4AC4461F-4B05-48FF-A05E-55E984E71CA2.jpeg
    3.9 KB · Views: 0
  • CF866BC3-5032-49FB-BD1D-BD9C07366181.jpeg
    CF866BC3-5032-49FB-BD1D-BD9C07366181.jpeg
    3 KB · Views: 0
  • 5946E66C-5E24-478D-937D-77FB48214AFD.jpeg
    5946E66C-5E24-478D-937D-77FB48214AFD.jpeg
    3.8 KB · Views: 0
  • 7E89D014-B877-4D8E-B18F-86E471DEBC2C.jpeg
    7E89D014-B877-4D8E-B18F-86E471DEBC2C.jpeg
    3.7 KB · Views: 0
  • 9150CCE3-3D1F-4449-9FDB-F95742963CF8.jpeg
    9150CCE3-3D1F-4449-9FDB-F95742963CF8.jpeg
    3.8 KB · Views: 0
  • FE78927E-6DC2-4F35-8A24-50907A6D78CD.jpeg
    FE78927E-6DC2-4F35-8A24-50907A6D78CD.jpeg
    4.4 KB · Views: 0
  • D82FDB56-D12C-4B55-92A2-7139DFD717C5.jpeg
    D82FDB56-D12C-4B55-92A2-7139DFD717C5.jpeg
    3.8 KB · Views: 0
  • D14C727D-CB76-4EC4-A754-BF339A16AC03.jpeg
    D14C727D-CB76-4EC4-A754-BF339A16AC03.jpeg
    3.4 KB · Views: 0
  • 18856C44-B7A4-43B8-8E25-6D585EEBC6C9.jpeg
    18856C44-B7A4-43B8-8E25-6D585EEBC6C9.jpeg
    4.1 KB · Views: 0
  • 40BA0866-8DF3-4C43-883E-ADAEDC5D1E9C.jpeg
    40BA0866-8DF3-4C43-883E-ADAEDC5D1E9C.jpeg
    3.7 KB · Views: 0
  • E49C5065-52EC-4563-B003-51A28DCC956D.jpeg
    E49C5065-52EC-4563-B003-51A28DCC956D.jpeg
    4 KB · Views: 0
  • 12FACE26-B7C3-4578-B0FE-91DB746D1B67.jpeg
    12FACE26-B7C3-4578-B0FE-91DB746D1B67.jpeg
    3.8 KB · Views: 0
  • 741C6F83-0751-41B8-8F9F-BBAC655C07E3.jpeg
    741C6F83-0751-41B8-8F9F-BBAC655C07E3.jpeg
    4 KB · Views: 0
  • 7DF20996-9245-42E4-BEBC-6B3CB02D50F8.jpeg
    7DF20996-9245-42E4-BEBC-6B3CB02D50F8.jpeg
    3.7 KB · Views: 0
Thread owner

Attachments

  • 34AC2890-C110-4E35-9622-6710C45D885F.jpeg
    34AC2890-C110-4E35-9622-6710C45D885F.jpeg
    3.5 KB · Views: 0
  • 72D4DF3E-4A16-400C-B4F8-F843FAE1DF47.jpeg
    72D4DF3E-4A16-400C-B4F8-F843FAE1DF47.jpeg
    3.7 KB · Views: 0
  • D2320EC4-29F2-47CA-B861-55B4F2619280.jpeg
    D2320EC4-29F2-47CA-B861-55B4F2619280.jpeg
    3.6 KB · Views: 0
  • 0FC9CDCE-87D3-4212-B558-C56E48F65655.jpeg
    0FC9CDCE-87D3-4212-B558-C56E48F65655.jpeg
    4.5 KB · Views: 0
  • 72FDB841-D64B-4DEC-A15A-3236F1D78DD1.jpeg
    72FDB841-D64B-4DEC-A15A-3236F1D78DD1.jpeg
    3.3 KB · Views: 0
  • ECFD3023-42C9-43F3-97FE-4B1BC7944E73.jpeg
    ECFD3023-42C9-43F3-97FE-4B1BC7944E73.jpeg
    3.3 KB · Views: 0
  • 5CBB82D3-741D-4B0F-B605-855AA3302C2E.jpeg
    5CBB82D3-741D-4B0F-B605-855AA3302C2E.jpeg
    3.3 KB · Views: 0
  • D253FC23-19D1-4872-9950-BF5FAE056F82.jpeg
    D253FC23-19D1-4872-9950-BF5FAE056F82.jpeg
    3.2 KB · Views: 0
  • 0B5035D3-6503-4F05-B593-B2731B9C2F51.jpeg
    0B5035D3-6503-4F05-B593-B2731B9C2F51.jpeg
    3 KB · Views: 0
  • 2F049BD3-E0FD-470C-A62A-82DC31C062A8.jpeg
    2F049BD3-E0FD-470C-A62A-82DC31C062A8.jpeg
    3 KB · Views: 0
Colin,

That's coming on really well. Apologies got a bit behind with it. A truly mammoth enterprise.

Keep up the good work.

ATB.

Andrew
 
Thread owner
1/48 Hachette U96 Part 24 & Finished

Well we’ve reached the final stage and again a frustrating and four letter wording one to boot so 1st off measured the lengths and positions the insulators would occupy along the various lengths of fishing line supplied by the kit which as it was nearly 15 years old was all coiled and totally useless for this type of work so I’ve used my paper flower wrapping wire instead
Next added some tiny eyebolt to the front of the conning tower and 2 more to the rear next took the tiny hooks and attachment plates and attached them to the eyebolts previously added to the top of the conning tower sides took my 1st measured length of insulators and attached them to this attachment then run a wire from the last insulator in that sequence all the way down to the net cutter where the next set of insulators were added tightened this section up then run a wire from the eyebolt at the front of the conning tower to the last insulator in the 1st sequence again tightened the wire this time too much as it snapped in the middle so had to start from scratch anyway got the front section done next came the rear
This time a similar arrangement without the snapping wire start with the 2nd set of measured insulators running to the 3rd set finally attaching to the tripods on the rear then a short run of wire to eyebolts on the deck
Next those 1 of the 2 eyebolts came into use running a wire from it to the to link up with the last insulator in the 2nd sequence and finally a wire from the flagpole mounting to the 1st insulator in the 2nd sequence see the photos they should make it clear I hope
Next added various angle plates to the hull deck edges and remaining hatch covers then had to repeat the entire process on the left or port side of the model I did it like this so I could match up the placement of the other insulators so they all more or less lined up with each other
Finally added the flag pole as I kept snapping it off whilst working on the model went round with the paintbrush to touch up any areas that looked shabby and then painted the propellers brass which for some reason the kit has had a multitude of brass pe fitted to it but they decided to make the propellers out of pewter why not use brass you wouldn’t needed to have painted them oh well they probably had their reasons
So here is U96 from Das Boot in 1/48th scale it’s not perfect but it’s the best I’m able to do I hope those of you following along have enjoyed the build and maybe some tips have emerged so onto my next project which will be the Silver Spitfire

Regards

ColinView attachment 427130View attachment 427131View attachment 427132View attachment 427133View attachment 427134View attachment 427135View attachment 427136View attachment 427137View attachment 427138View attachment 427139View attachment 427140View attachment 427141View attachment 427142View attachment 427143View attachment 427144View attachment 427145View attachment 427146View attachment 427147
 

Attachments

  • A3376018-E88F-4262-AA40-9A31ACDAD234.jpeg
    A3376018-E88F-4262-AA40-9A31ACDAD234.jpeg
    3.8 KB · Views: 0
  • CD97D30D-34AB-4933-8882-E0B75A86F864.jpeg
    CD97D30D-34AB-4933-8882-E0B75A86F864.jpeg
    2.8 KB · Views: 0
  • 2C50886F-7A7D-4A0F-A221-4AF5AD2BBB09.jpeg
    2C50886F-7A7D-4A0F-A221-4AF5AD2BBB09.jpeg
    2.8 KB · Views: 0
  • 0CBEC684-E14F-4616-8E9E-4F26FD2FCBF5.jpeg
    0CBEC684-E14F-4616-8E9E-4F26FD2FCBF5.jpeg
    3.7 KB · Views: 0
  • 81ABE7C1-0D9E-4DB7-8A00-B7C4B6B5FE8A.jpeg
    81ABE7C1-0D9E-4DB7-8A00-B7C4B6B5FE8A.jpeg
    3.9 KB · Views: 0
  • C2513C30-61A9-4C50-B8BA-05695DCE85C9.jpeg
    C2513C30-61A9-4C50-B8BA-05695DCE85C9.jpeg
    3.8 KB · Views: 0
  • 4E0DF5C3-1E05-4E65-885B-CBE73E64F436.jpeg
    4E0DF5C3-1E05-4E65-885B-CBE73E64F436.jpeg
    3.7 KB · Views: 0
  • 89312FFC-841D-4A4B-BCE0-5B47A8BE27A4.jpeg
    89312FFC-841D-4A4B-BCE0-5B47A8BE27A4.jpeg
    3.8 KB · Views: 0
  • 18A2DA56-74F3-4591-93FF-F733E33D3E0D.jpeg
    18A2DA56-74F3-4591-93FF-F733E33D3E0D.jpeg
    3.8 KB · Views: 0
  • 8883C4C4-1806-42F1-AD5A-B48D7F51C77F.jpeg
    8883C4C4-1806-42F1-AD5A-B48D7F51C77F.jpeg
    3.1 KB · Views: 0
  • AA94AD8E-BC45-41F4-B3EF-3D4C4DCB8843.jpeg
    AA94AD8E-BC45-41F4-B3EF-3D4C4DCB8843.jpeg
    3.1 KB · Views: 0
  • 8A32E4DF-F703-4E5C-8DFA-BBBE29A847EE.jpeg
    8A32E4DF-F703-4E5C-8DFA-BBBE29A847EE.jpeg
    3.7 KB · Views: 0
  • EC08699F-1531-467F-9C6B-385F05F13998.jpeg
    EC08699F-1531-467F-9C6B-385F05F13998.jpeg
    3.6 KB · Views: 0
  • 13A5AC00-9084-4764-884A-133373B1BE47.jpeg
    13A5AC00-9084-4764-884A-133373B1BE47.jpeg
    3.7 KB · Views: 0
  • D4919154-841E-45AF-BFA7-B87824C7000B.jpeg
    D4919154-841E-45AF-BFA7-B87824C7000B.jpeg
    2.6 KB · Views: 0
  • B4F84881-1FCF-4CE8-ABCC-EE28C476AF51.jpeg
    B4F84881-1FCF-4CE8-ABCC-EE28C476AF51.jpeg
    3.7 KB · Views: 0
  • BE478E5E-BF45-437F-83EF-9AF9B1A93ECC.jpeg
    BE478E5E-BF45-437F-83EF-9AF9B1A93ECC.jpeg
    3.7 KB · Views: 0
  • FF7EF55A-2F4A-4C10-8F47-6E72ACD91AF3.jpeg
    FF7EF55A-2F4A-4C10-8F47-6E72ACD91AF3.jpeg
    3.3 KB · Views: 0
Just stumble on your post .. Wow, pretty impressive and you bet I'll be following your WIP ..Keep it up !
 
Back
Top