Theme editor

Scale Model Shop

1/72 Italeri Douglas C-47 Skytrain

Thread owner
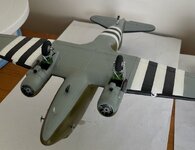
Skytrain is on it's feet and glossed:
IMG_1831.jpg

I had doubts about the strength of the landing gear and associated struts, but it's surprisingly robust, even with a repair to a leg which was broken out of the box.

Next on the menu are the decals, and some weathering to dirty it up.
 

Attachments

  • IMG_1831.jpg
    IMG_1831.jpg
    158.7 KB · Views: 0
Thread owner
I got the decals on finally. I had a few issues. Firstly, I should have checked the port 'D 8' code, as it had to fit either side of a protrusion in the fuselage. It didn't even occur to me until I was fitting the decal. Ended up slicing the centre portion of the decal and treating it as two individual pieces. Secondly, the stars and bars came out a little translucent over the invasion stripes:
IMG_1841.jpg

I opted to cut a spare decal from a second Italeri C-47 kit into sections and apply them over the affected portions. There's a very slight difference between the blues on the decals, but under a varnish I don't think it will be very noticeable. The second kit's decals are, despite being a little grubby from storage over the years (it's an older issue), were much easier to manipulate.
IMG_1842.jpg

I'm going to Gloss varnish next, followed by some pin washing, then a flat finish with some staining etc.
 
Thread owner
Once they had dried, I checked the touched-up decals. I put another gloss coat over them, and they seem to have blended in to a reasonable standard. Was hoping to get weathering done today, but just been informed I am going out for the day...
 
Thread owner
IMG_1896.jpg I applied acrylic washes to the main areas, using dark brown on the white stripes and some grey on other areas. The upper panel lines are very pronounced, so I elected not to do the whole thing. I used Ammo enamel washes on the landing gear and propeller hubs, which were painted in acrylics.

I've added some chipping but have stopped for the day to review it tomorrow. Don't want an olive drab/aluminium polkadot aeroplane, I seem to get carried away. After that I will airbrush some exhaust, add some oil and fuel stains, and finally use some pigment dust on the tyres. Nearly there team!
 
I've added some chipping but have stopped for the day to review it tomorrow. Don't want an olive drab/aluminium polkadot aeroplane, I seem to get carried away.
Less is more as they say Joe. This is looking lovely, definately on my wish list for the future.
 
Thread owner
Update. A few issues as the finish line approached.

First the flat coat (Humbrol) ended up rough on the nose and wing roots. I either did not mix the varnish enough, sprayed in humid conditions, or put too much on at once. This produced a haze with what I would describe as 'pebbles' on the paint surface. I had intended to use an acrylic flat varnish, but decided to do this job after minimal sleep after working the previous few days, and just grabbed the Humbrol.

So, delicately sanding (I had fixed the propellers in place prior to varnishing 😐), I rubbed down the rough surface and will need to go back over it with a gloss once I get rid of the dust that has accumulated.

Second issue, I snapped the fuselage aerial antenna off. I've grabbed the antenna from my other kit, which won't be required for that build.

IMG_1906.jpg
 
Just joined this build Joe, you’ve done a great job with it, even with the few issues you’ve had. It’s looking very good indeed.
 
I had a very similar experience with Humbrol Matt on my last model. I think I didn't mix it enough and applied it too thickly even though it was airbrushed on. I hope you get this one sorted Joe. I went on to use a satin finish instead of matt and it looked much better.
 
Back
Top