Theme editor

Scale Model Shop

1/72 Revell Tornado "Eye of the Tiger"

Thread owner
\ said:
really really good start,and the harnesses in 1/72 eeekkk,micro surgeons would have trouble doing it,and you did it really well indeedmobear
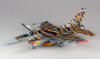
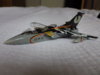
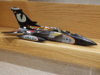
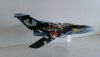
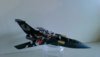
Your right about the micro surgery Ole. 1/72 is nt my prefered scale. I only make them because I put a model in to a club competion once a year at my local RC flying club. Originally any model larger that a 1/72 incurred penalty points as the competion was originally designed soley for 1/72.One year, unaware of the rules I built a 1/32 scale f4 Phantom. It dwarfed everything on the table. After the penalty points had been applied the F4 came third but everyone agreed at that point that the rules needed changing. So you can now enter any scale without encuring penalty points but I still knock up a 1/72 just to keep the people who opposed to the rule changes happy.
 
Thread owner
Well I told you not to hold your breath but even I didn't think that this would be still ongoing 8 years after opening this post. Just resurected this build. Quite a decal challenge. Just letting everything dry properly before masking and spraying the nose and fuz black back to the decal under the cockpit.
 

Attachments

  • WIN_20200214_08_57_26_Pro.jpg
    WIN_20200214_08_57_26_Pro.jpg
    1.5 KB · Views: 0
  • WIN_20200214_08_57_04_Pro.jpg
    WIN_20200214_08_57_04_Pro.jpg
    1.4 KB · Views: 0
Interesting scheme, I think it'd take me a while too, to feel ready to apply those decals.
Pete
 
8 years, that has to be a forum record - I shouldn't of said that, someone will prove me wrong.
 
For time between build being first posted on the forum and finally finished, probably. For old model started and then finished without being covered from start to finish on this forum, I know for sure it’s not :)
 
Wow long time no see on this one steve!!! Worth the wait though , those decals look amazing . Cheers tony
 
Thread owner
Not sure why I fell out with this one and put it away not completed. I think I fell out with the PE in the cockpit. Anyway, it will be finished within the next two weeks,,,,,,,,,,,I promise.;)
 
Thread owner
Wow long time no see on this one steve!!! Worth the wait though , those decals look amazing . Cheers tony
I do like these Tiger liveries Tony. Particularly like the way on this one that when the wings fold back they compete the big Cat face on the aircraft.
 
Thread owner

Attachments

  • index.jpg
    index.jpg
    2.3 KB · Views: 0
  • rg_4669_title.jpg
    rg_4669_title.jpg
    2.1 KB · Views: 0
Thread owner
Just a word of caution to anyone building one of these. The horizontal stabilisers work in tandem and the build requires them to be joined and fitted early in the construction. They are very fragile and have to withstand a lot of stresses throughout the rest of the build process, prepping, prima, paint, decals, varnish and finally weathering if desired. The part of the stabiliser that passes through the fuselage is very thin, about the size of a cocktail stick. Make sure you dont get any glue on it as you join the two halves of the fuselage together or it will rot through the thin plastic. Mine broke off so I decided to complete the model first and add them back on at the very end. This also made adding the complex decals scheme a lot easier. For this reason I left the tail pipes off so that I had access into the rear of the fuselage. Rather than just glue the stabilisers on I wanted to retain some movement in them so have added some steel pins into the stabilisers. which will be pushed into and glued into a thin piece of tubing concealed inside the fuzz. Hope this helps.
 

Attachments

  • IMGP0003.JPG
    IMGP0003.JPG
    2 KB · Views: 0
  • IMGP0002.JPG
    IMGP0002.JPG
    2.6 KB · Views: 0
  • IMGP0004.JPG
    IMGP0004.JPG
    3 KB · Views: 0
Thread owner
While Im waiting for the varnish to harden prior to masking over the decals just thought I would dry fit the canopy.
 

Attachments

  • IMGP0005.JPG
    IMGP0005.JPG
    2.1 KB · Views: 0
Thread owner
Worst fears were confirmed today. So the front of the Tornado needs to be painted black right up to the striped decal that runs down the fuzz below the cockpit. The intention was to mask off and spray the nose of the plane and the nose of the wing pods black. Despite applying the decals over a week ago onto a gloss varnished surface and applying a coat of varnish on top of the decals 5 days ago when I came to mask off today a small piece of decal broke off. Fortunately this was underneath and will be easily repaired and hidden. However I took this as a warning and not wanting to risk further damage to the decals I have reluctantly decided to hand paint the nose section. First coat has gone on OK and I will tidy it up with a second coat tomorrow. The joys of modeling.
 

Attachments

  • IMGP0007.JPG
    IMGP0007.JPG
    2.2 KB · Views: 0
  • IMGP0009.JPG
    IMGP0009.JPG
    2.5 KB · Views: 0
Nice progress, sad to read about the masking problem, hope you'll be able to fix it easy. Looks quite complicated that scheme :astonished: ...
Cheers, Steven
 
I feel your pain steve , having had a similar masking glitch on my thunderflash. I had to resort to touching up the wing walks by hand as i didnt want to risk further damage.You’ll sort it no problem , the first coat looks fine . , cheers tony
 
I feel your pain. Although I got lucky with a JP build a while back. I masked up over the decals, and slowly removed the tape, expecting the worse, but no, they stayed put. I should have bought a lottery ticket that day.
 
Thread owner
I can only assume that I didn't press the decal down enough at the point it pulled away. I was using Micro Sol and Set and only had limited amount of time to position them. The stripes were very fiddly. Never mind, onwards and upwards.
 
Back
Top