Theme editor

Scale Model Shop

21st Century 1/32 A6M3 Zero model 22

Status
Not open for further replies.

Vaughan

Active member
Joined
Apr 1, 2011
Messages
3,246
Reaction score
51
Points
48
1/3
Thread owner
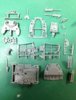
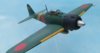
Well this could be a bit of a mistake but here goes I'm starting another model. This is the kit I bought at Duxford last Sunday. It's an interesting kit that should be screwed together(I won't be) but some gluing is required.


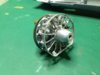
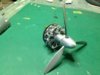
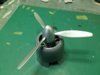
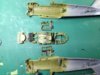
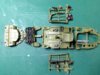
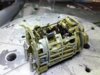
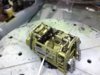
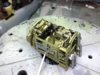
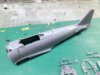
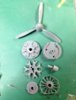
The office is very well detailed with but the moulding is a little crude. I will try and clean up most of the flash but they should look ok. No sprues on this one in fact no part numbers in the instructions but the sub assemblies are bagged up so there shouldn't be any problems. The engine has both rows of pistons and includes the pushrods. Panel lines are a little deep on the wings and fuselage but no worse than some older models.. Will make a start in between juggling the Airacobra


and Dauntless.


View attachment 120152


View attachment 120149


View attachment 120150


View attachment 120151


View attachment 233171

View attachment 233172

View attachment 233173

View attachment 233174
 

Attachments

  • 152509_5289.jpg
    152509_5289.jpg
    2.7 KB · Views: 0
  • Screen shot 2015-09-25 at 12.46.49.jpg
    Screen shot 2015-09-25 at 12.46.49.jpg
    5.1 KB · Views: 0
  • 152509_5291.jpg
    152509_5291.jpg
    2.7 KB · Views: 0
  • 152509_5290.jpg
    152509_5290.jpg
    2.3 KB · Views: 0
It's not a bad kit at all. The hardest bit for me was filling the holes where the screws go. The little plastic caps supplied in the kit are about as much use as a nun in a brothel :)


Didn't use the undercarriage on mine, as I did want to use the excellent pilot figure:


View attachment 120235


Cheers


Steve

View attachment 233257
 

Attachments

  • IMG_0576_web_zpsrixkk4ww.jpg
    IMG_0576_web_zpsrixkk4ww.jpg
    1.7 KB · Views: 0
Screwed together. this is a first for me- I have never heard of this method.


Theuns
 
Nice start Vaughan , theyre a bit of a contradiction arent they these 21st century kits? on one hand theyre designed to be screwed and clipped together (presumably for younger modellers) but on the other hand the level of detail is very good . As steve and a few others have shown they can be made into excellent models with a bit of work , Ive done their Macchi mc 205 Veltro and really enjoyed it although filling the screw caps was a bugger and I found the plastic to be a bit strange too- make sure you use plenty of water when rubbing down and watch out when gluing , the plastic seems a bit reluctant to join together sometimes , cheers tony
 
\ said:
filling the screw caps was a bugger and I found the plastic to be a bit strange too
100% with you Tony. I filled the holes with Milliput (which doesn't shrink) and finished with a skim of some filler or another. The plastic is a bit odd, but Tamiya extra thin did work for most of the major joins.


Cheers


Steve
 
i have done four of these kits and loved them. i resorted to using superglue and talc to fill the screw holes. the stuka is very nice but the snake decal is a bit of a bugger
 
Thread owner
Thanks everyone for the information regarding filling those screw hole, it sounds like it will be fun(not). Steve I forgot you built the Zero a few years back , you made a good job of it. I have made some progress with cleaning up the office parts and have primed and top coated them followed with some detail painting. The pilots seat seems a bit on the small size looks more like 1/48 scale, maybe that was the size, but it will do I'm not going to scratch build one. Engine and pushrods have been sprayed Aluminium and a wash added.


View attachment 120571

View attachment 120572

View attachment 120573

View attachment 120574

View attachment 120575


View attachment 233593

View attachment 233594

View attachment 233595

View attachment 233596

View attachment 233597
 

Attachments

  • 153009_5140.jpg
    153009_5140.jpg
    2.3 KB · Views: 0
  • 153009_5141.jpg
    153009_5141.jpg
    2.3 KB · Views: 0
  • 153009_5142.jpg
    153009_5142.jpg
    2.1 KB · Views: 0
  • 153009_5143.jpg
    153009_5143.jpg
    2.7 KB · Views: 0
  • 153009_5139.jpg
    153009_5139.jpg
    2.7 KB · Views: 0
Looking very nice, currently building a pre war ka-14 and I wonder if you know if the cockpit is the same green and what green that is?
 
Thread owner
Dougie, I think it should be a grey green but not 100% sure. I've gone with interior green but I think there's a lot of debate over colour depending when it was built and which manufacturer.
 
That is a very nice start. You did get a lot for your money with the 21st Century kits.


Cheers


Steve
 
\ said:
Dougie, I think it should be a grey green but not 100% sure. I've gone with interior green but I think there's a lot of debate over colour depending when it was built and which manufacturer.
Thanks mate... This one was a Mitsubishi form their own factory as a prototype. I'll keep that in mind when looking


Cheers
 
Wow that's a lot more detail than I would have expected! I always thought 21st Century kits were ... well, toys really
 
Like others I have built these kits - the Stuka and Me109. They were great, cheap kits, sadly no more, but if you see one on ebay, get it.


The pilot is second to none, probably one of the best around....even his head and arms turn!


Be warned, for some reason I found the figures impossible to fit in the cockpit after the fus. halves were fitted together. Hence my models are shown with crews either on the wing or sitting rather crudely on the cockpit rim!
 
Status
Not open for further replies.
Back
Top