Theme editor

Scale Model Shop

A-10 by Tamiya, First wingy thing project

Status
Not open for further replies.
Thread owner
Thanks chaps. Not yet in the bin but keeping the bin handy John.

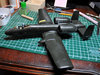
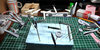
Spent a few happy hours messing about with the office furniture. I think it is about done now.

View attachment 315514

When I screw up the canopy and make it all foggy this will look fine.
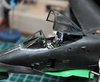
I have also joined the fuselage halves together. Quite a decent fit except for my errors. Its interesting to learn how important a micro milimeter can be when trying to get an invisible seam. Oh well first attempt it can only get better.

John
 

Attachments

  • Cockpit 2.jpg
    Cockpit 2.jpg
    6.7 KB · Views: 0
Hi John
They say "A change is as good as a rest" - certainly true here as you're enjoying this new venture. You're also making a great job of it. The seat/cockpit looks superb. Enjoying your progress.
Jim
 
Thread owner
Thanks guys. This is a real challenge but so far, more fun than I expected.

Got the fuselage stuck together and some more etch stuck on.

View attachment 315551

The filler at the front is due to my screw up.

John
 

Attachments

  • sealed up.jpg
    sealed up.jpg
    5.9 KB · Views: 0
Hi John B, the interior decorating of the office looks real good. Whats a plane build without filler...don't sweat it John, once the glue cures there is bound to be hairline gaps to fill and sand. It's a good thing you can see because of the contrast of the filler against the dark plastic. Glad you're having fun.

Cheers,
Richard
 
Thread owner
Richard

First experience and I have learned a lot. I don't expect anything like your level of finish but at least the next one will be better. And I think I am going to have fun painting the thing.

It is slowly beginning to look like a warthog. Just had to dry fit the wings. It is bigger than I had expected so if I do another one it will have to be down to 1/72nd.

View attachment 315596

Now to attack the undercarriage. I think most of the little etch pieces will be destined for the spares box.
I would also like to know how you experts guess how much weight to put in the nose. This has some real heavy bits towards the back (engines, tail fins etc) I stuffed 3 medium fishing weights in the nose but I am still not sure that this won't be sitting on its tail.

John
 

Attachments

  • Dry Fit.jpg
    Dry Fit.jpg
    7.7 KB · Views: 0
John,
Great work so far. As to the weights in the nose sorry I cant help as planes are not my area of expertise.
 
Hi John
It is a big model isn't it. I have only done a few planes but the joins of the fuselage halves and the wing roots is the most difficult part for me.
Jim
 
John, I put 40g in the nose of mine, and it wasn't enough. :sad:
 
Hi John,
The A-10 is one of the few Jet aircraft of these times that has a faily straight and long wing that takes up a lot of real estate. Tamiya has made the wings to fit without any filler. For weights I would dry fit the fuselage and tail bits then tape the weights to the nose then balance the fuselage with a dowel or anything cylindrical at around the point at which the rear undercarriage wheels would be aligned. Add more weights till it tips confidently forward. Then I would find all means to pack that weight into the nose.

Cheers,
Richard
 
John
Very nice result on the office and seams and filler are part and parcel of planes, as long as you are enjoying the build and learning it's all good. Weights are always iffy, I always put in much more than I need just to be safe.

cheers
Ross
 
Thread owner
Still having fun....I think. Some really silly PE that I've been struggling with. Got some of it on and some will be binned. Then I ran out of primer. So trip to the LHS is scheduled for tomorrow. Meantime I made a hedgehog of bits.

View attachment 315833

John
 

Attachments

  • Accessories 1.jpg
    Accessories 1.jpg
    6.7 KB · Views: 0
Looking very good John, really like how the office turned out, why not leave the canopy open?
Have fun painting all the ordnance.:thumb2:
 
Thread owner
Fernando I think I will leave the canopy open. It saves having to get a tight fit with it closed.

Much work has happened, not all progress. Aaaargh! I hate working with the canopy. My heads up display won't fit under the front canopy so it has been left out. I painted the frame by hand since I couldn't face the masking. Got it all covered up now for main painting.

View attachment 316103

Much filling to be tidied up. Wings are stuck on, not a bad fit. Just finishing the wheel wells before the main painting starts. Still plugging away at the weapons payload, boy there is a lot of flash bangs on this kit.

John
 

Attachments

  • Cockpit 3.jpg
    Cockpit 3.jpg
    6.8 KB · Views: 0
Hi John, sad that the HUD had to be left out...blings have arrived for the cannon and pitot tube...nice.

Cheers,
Richard
 
Status
Not open for further replies.
Back
Top