Theme editor

Scale Model Shop

Airfix 1/32 Bond Bug (M10C) - Restoration

davecov

SMF Supporters
Joined
Jul 3, 2014
Messages
888
Reaction score
193
Points
43
Age
67
1/3
Thread owner
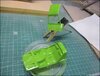
I recently started a restoration of an Airfix 1/32 Bond Bug (M10C). It had been hanging around for almost eighteen months and I thought it time to get working on it.

I had spent years looking for an Airfix Bond Bug to add to the stash but was unable to find an unbuilt one. However, I managed to get hold of this built one on eBay. It has some vinyl stickers on it and has been glued pretty badly with what seems to be Evo-Stik contact adhesive. As it turned out, that was a blessing in disguise:
Bond_Bug_32_001.jpg

Since I purchased this built one, I did manage to get an unmade polybag kit but I will still carry out this restoration:
Bond_Bug_32_000.jpg

Because this had been assembled with Evo-Stik, it was pretty easy to pull it apart:
Bond_Bug_32_002.jpg

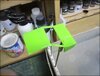
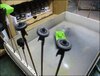
The parts were put in a freezer bag along with a good dose of Mr Muscle Oven Cleaner and left for 24 hours. Note that this stuff is powerful stuff and ventilation is a must when using it. I sprayed it outside:
Bond_Bug_32_003.jpg

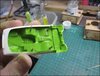
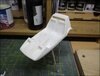
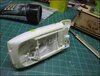
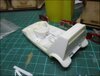
Here the parts have been rinsed of Mr Muscle, cleaned with soapy water and then rinsed with water. Once that was done I was able to carry out some more disassembly. It is now ready for final cleaning up before I get down to painting and re-assembly:
Bond_Bug_32_004.jpg

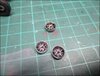
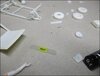
These decals are the ones included in the polybag version shown earlier and I will be scanning them so that I can produce another set for this build:
Bond_Bug_32_005.jpg

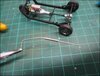
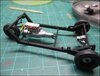
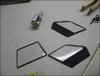
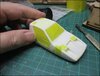
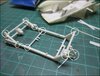
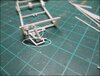
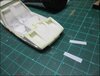
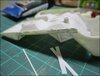
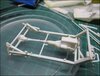
The windows were cleaned up and I have masked them up ready for painting the frames and lower screens black. The engine halves were glued and I began to assemble the chassis and suspension:
Bond_Bug_32_006.jpg

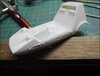
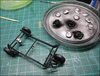
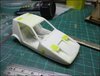
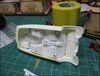
In order for the chassis/suspension assembly to align correctly, I have dry-fitted it to the underside of the bodyshell while the glue sets. Once it has dried I will add some small pieces of plastic card to certain areas to give added strength and then move on to the assembly of the front suspension:
Bond_Bug_32_007.jpg

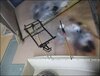
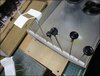
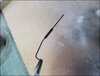
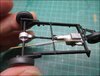
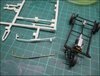
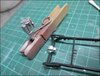
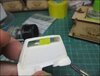
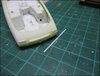
Talking of the front suspension, I discovered that somebody had done a repair job on it using some of the black parts shown in the third picture of my first post. Here is a picture of a Bond Bug sprue showing the three parts that are missing. The tin gives a good idea of the sizes of these pieces that should be easy to make:
Bond_Bug_32_008.jpg

That is all for now

Dave
 
Thread owner
I am enjoying this restoration and got a lot more done last night.

I added extra plastic card to the areas circled in order to strengthen the chassis. On the right I have added some brass rod for part of the steering linkage to fit onto:
View attachment 437326

The steering linkage was fitted to the brass rod which was then trimmed back. I also fitted a shock absorber fashioned from a piece of sprue and constructed the missing parts of the steering linkage from plastic card:
View attachment 437327

The engine was filled, sanded and fully assembled and dry-fitted to the chassis, along with the propshaft. They won't be glued until they have been painted:
View attachment 437328

There is a very thin lip along the edge of the bodyshell which is badly damaged on both sides. I have glued some plastic card along each side and applied filler:
View attachment 437329

Once the sides were sanded smooth, I glued the top part of the bodyshell to the bottom part - having ensured that the chassis can be fitted later. The back of the bodyshell was fitted as well. I found it necessary to added a thin piece of plastic card behind the seats to fill a tiny gap between them and the parcel shelf:
View attachment 437330

View of the underside:
View attachment 437331

The Bond Bug has a black strip above the number plate but this is missing from the Airfix Bug. I fashioned a strip from plastic card:
View attachment 437332

Once the strip was fitted, the number plate fixing position had to be lowered by use of another piece of plastic card, the same depth as the earlier one. On the right are two "number plates" cut from plastic card that will be fitted at the end of the build. A second coat of filler was applied to the bodyshell joins each side:
View attachment 437333

The transparency that was glued in this old Bug actually came from a different kit and did not fit. I cut a piece of acetate from some food packaging and trimmed to shape. After dropping the acetate twice on the floor and finding it very difficult to locate it, I put some masking tape on it! The joins of each side of the back still need to be filled and sanded:
View attachment 437334

An aide-memoire that is self-explanatory:
View attachment 437335

The back of the bodyshell was filled and sanded as were the bodyshell sides. I have taped the roof onto the car to check it's alignment:
View attachment 437336

Test fitting of chassis again:
View attachment 437337

The windscreen and doors were dry-fitted in place and the fit of them was pretty good:
View attachment 437338

I will probably leave this build for a couple of days now so that I can concentrate on some of my other builds. When I return to it, it will be painting time.

That is all for now

Dave
 

Attachments

  • Bond_Bug_32_021.jpg
    Bond_Bug_32_021.jpg
    3 KB · Views: 0
  • Bond_Bug_32_020.jpg
    Bond_Bug_32_020.jpg
    3.2 KB · Views: 0
  • Bond_Bug_32_019.jpg
    Bond_Bug_32_019.jpg
    3.1 KB · Views: 0
  • Bond_Bug_32_009.jpg
    Bond_Bug_32_009.jpg
    3.3 KB · Views: 0
  • Bond_Bug_32_010.jpg
    Bond_Bug_32_010.jpg
    3 KB · Views: 0
  • Bond_Bug_32_018.jpg
    Bond_Bug_32_018.jpg
    2.2 KB · Views: 0
  • Bond_Bug_32_017.jpg
    Bond_Bug_32_017.jpg
    2.9 KB · Views: 0
  • Bond_Bug_32_016.jpg
    Bond_Bug_32_016.jpg
    2.8 KB · Views: 0
  • Bond_Bug_32_015.jpg
    Bond_Bug_32_015.jpg
    2.7 KB · Views: 0
  • Bond_Bug_32_014.jpg
    Bond_Bug_32_014.jpg
    3 KB · Views: 0
  • Bond_Bug_32_013.jpg
    Bond_Bug_32_013.jpg
    3 KB · Views: 0
  • Bond_Bug_32_012.jpg
    Bond_Bug_32_012.jpg
    3 KB · Views: 0
  • Bond_Bug_32_011.jpg
    Bond_Bug_32_011.jpg
    3.2 KB · Views: 0
Thread owner
Thanks lads! :thumb2:

I'll let you into a secret, Steve - I've already painted it but lots to post before you get to see it! ;)

Dave
 
You have made happy as I have never made or cannot afford one now I know its a bit late but the steering linkage is slightly wrong the part you have attached to the steering box is actually located on the left hand side as I own a reliant Robin and they share a few parts.
 
Wonderful work Dave. Coming along really well

My reliant Robin story is from my school days. We had a rather large Maths teacher called Miss Dinnis who drove a Robin. She had tractor weights in the passenger foot well to balance out the weight. Sad but true
 
Thread owner
When I was in the Sea Cadets in the 70's, one of the instructors had a Reliant and took me from Rainham to Tilbury along the old A13. It was so scary!

This build started about two weeks ago so I am able to post another progress report now and as promised, painting time.

The bodyshell was sprayed with white primer:
View attachment 437347

So was the top. Then it was time for the black primer which was sprayed on the wheels and engine:
View attachment 437348

Lots of smaller items and window frames were done as well:
View attachment 437349

The chassis and steering column weren't missed either:
View attachment 437350

The join of the bodyshell parts needed a little more filler:
View attachment 437351

The top was given a first coat of H38 Gloss Lime Green:
View attachment 437352

Then the underside was done and I wiped off the excess before doing the upper bodyshell:
View attachment 437353

The upper bodyshell has received it's first coat of Lime Green:
View attachment 437354

The tyres were painted with H67 Matt Tank Grey:
View attachment 437355

I also painted some of the primed black parts with H85 Satin Coal Black including the chassis. The gear lever, steering wheel, column and radiator surround were painted with H22 Gloss Black.

That's all for now.

Dave
 

Attachments

  • Bond_Bug_32_029.jpg
    Bond_Bug_32_029.jpg
    2.3 KB · Views: 0
  • Bond_Bug_32_028.jpg
    Bond_Bug_32_028.jpg
    3.3 KB · Views: 0
  • Bond_Bug_32_027.jpg
    Bond_Bug_32_027.jpg
    3.1 KB · Views: 0
  • Bond_Bug_32_026.jpg
    Bond_Bug_32_026.jpg
    2.4 KB · Views: 0
  • Bond_Bug_32_025.jpg
    Bond_Bug_32_025.jpg
    2.8 KB · Views: 0
  • Bond_Bug_32_024.jpg
    Bond_Bug_32_024.jpg
    2.4 KB · Views: 0
  • Bond_Bug_32_023.jpg
    Bond_Bug_32_023.jpg
    3.2 KB · Views: 0
  • Bond_Bug_32_022.jpg
    Bond_Bug_32_022.jpg
    2.9 KB · Views: 0
  • Bond_Bug_32_030.jpg
    Bond_Bug_32_030.jpg
    3.4 KB · Views: 0
Thread owner
I was able to get another coat of Lime Green on the bodyshell and roof:
View attachment 437356

Whilst that was drying, I painted the engine and diff housing:
View attachment 437357

I have also started painting the driver but he won't be revealed until he is finished!

The wheels were glued to the axles and the hubs were painted with Alclad 2 Gloss Black Base in readiness for Alcad 2 Chrome:
View attachment 437358

The fan belt has been fitted to the engine block and the manifold painted with H113 Matt Rust. I also removed the masking from the windscreen and doors which are almost ready for fitting although I will be applying some Klear to the clear sections before doing so:
View attachment 437359

The engine block has been glued to the chassis. At some point I will have to fashion an exhaust system which had been lost from this second-hand Bug:
View attachment 437360

I fashioned an exhaust from sprue and brass rod:
View attachment 437361

It fits pretty well but it needs painting before it can be glued:
View attachment 437362

The exhaust got a coat of Alclad 2 Gloss Black Base:
View attachment 437363

The wheel hubs were sprayed with Alcad 2 Chrome and I used a black marker to pick out the sections. Once dry, the hubs were glued to the wheels:
View attachment 437364

Whilst I had the Alcad 2 Chrome out I gave the exhaust a spray:
View attachment 437365

That is definitely all for the time being as I haven't progressed any further than this.

Dave
 

Attachments

  • Bond_Bug_32_040.jpg
    Bond_Bug_32_040.jpg
    2.7 KB · Views: 0
  • Bond_Bug_32_031.jpg
    Bond_Bug_32_031.jpg
    2.8 KB · Views: 0
  • Bond_Bug_32_039.jpg
    Bond_Bug_32_039.jpg
    2.6 KB · Views: 0
  • Bond_Bug_32_038.jpg
    Bond_Bug_32_038.jpg
    2.1 KB · Views: 0
  • Bond_Bug_32_037.jpg
    Bond_Bug_32_037.jpg
    3 KB · Views: 0
  • Bond_Bug_32_036.jpg
    Bond_Bug_32_036.jpg
    3.1 KB · Views: 0
  • Bond_Bug_32_035.jpg
    Bond_Bug_32_035.jpg
    3.2 KB · Views: 0
  • Bond_Bug_32_034.jpg
    Bond_Bug_32_034.jpg
    2.5 KB · Views: 0
  • Bond_Bug_32_033.jpg
    Bond_Bug_32_033.jpg
    3.3 KB · Views: 0
  • Bond_Bug_32_032.jpg
    Bond_Bug_32_032.jpg
    3.3 KB · Views: 0
Hi Dave
What a great restoration of this odd little car. The built kit has cleaned up well and thanks to your efforts looks really good. I remember seeing Wheeler Dealers work on one of these. I think they sold it for a ridiculously high price.
Jim
 
Absolutely love it……when I was a sprog that knew nothing about cars I thought these were really cool………like something out of Captain Scarlet….…..there was always an orange one parked outside of a house by my junior school.
This is a great build log. Excellent restoration job, but the colour isn’t a favourite.…..I‘d love it in orange ;)
 
Thread owner
The choice was deliberate seeing as there were only four white and six lime green Bond Bugs ever made, the other 2260 were all orange. So, I decided to make a stand for the minority.

Dave
 
I seem to recall that the colour was actually in the fibreglass rather than painted on. Was that the case?
 
Love this. I'm watching. When these came out they were right up there with beach buggies as my idea of cool.

For all things small and sexy, the Bubble Car Museum near Boston, Lincs, is a must-see. They have a Bug, of course.
 
Thread owner
You have made happy as I have never made or cannot afford one now I know its a bit late but the steering linkage is slightly wrong the part you have attached to the steering box is actually located on the left hand side as I own a reliant Robin and they share a few parts.
The linkage has been attached in accordance with the Airfix instructions. Right or wrong, they are good enough for me but thanks for pointing that out. :thumb2:

Dave
 
Great thread Dave, never seen this kit before either .
You've put a lot of effort into this and it shows .:thumb2:
 
Thread owner
Thank you all for your comments, likes etc. so far. It is nice to see how others are enjoying this restoration as much as me.

Dave
 
Apologies just realised I forgot to comment.....as others have said an interesting build......

Keep up the good work.

Andrew
 
Back
Top