Theme editor

Scale Model Shop

Airfix 1/48 Sepecat Jaguar

langy71

SMF Supporters
Joined
Apr 27, 2018
Messages
2,126
Reaction score
182
Points
63
Age
54
1/3
Thread owner
Made a start on the Airfix Jaguar,

First impressions of this new mould version are absolutely brilliant,

Airfix really did their homework with this kit, It's literally a 'shake and bake' kit, everything looks perfectly designed to just fall together and all the main components fit together with all the joints hidden by existing panel lines.

The infamous intake joints fit together like a dream and if a little bit of care is used along with the supplied jig it's so easy to end up with a pair of seemless intakes.

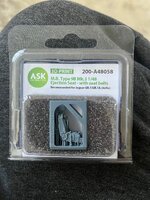
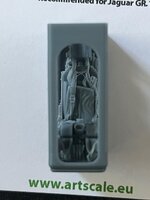
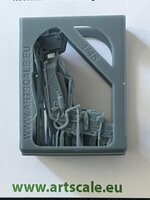
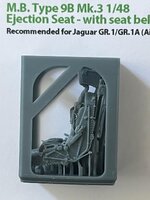
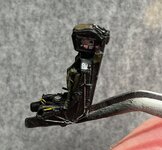
The only couple of let downs I can see within the build is the pilot, the moulding seems a little soft, and the ejector seat, although looks fairly good as it is, it really needs proper seat belts adding to it... as such it's the one part I may end up replacing with a resin version.

but this isn't going to really put me off enjoying what many have already stated as 'the definitive 1/48 Jaguar'..

so a couple (..ish) of pictures of progress so far.. (the cockpit and wheel bays)

More to follow as the build takes shape.


IMG_0363.jpg
IMG_0364.jpg
IMG_0366.jpg
IMG_0361.jpg
IMG_0360.jpg
IMG_0359.jpg
IMG_0373.jpg
IMG_0374.jpg
IMG_0375.jpg
IMG_0370.jpg
IMG_0369.jpg
IMG_0371.jpg
IMG_0372.jpg
 
Off to a great start. Really looks like a fine kit, credit to Airfix. Detail looks excellent. The soft moulding of the pilot may not be bad with a matt coat of primer. The plastic is rather shiny.
 
Thread owner
Off to a great start. Really looks like a fine kit, credit to Airfix. Detail looks excellent. The soft moulding of the pilot may not be bad with a matt coat of primer. The plastic is rather shiny.

Good idea Jim, I'm gonna prime him and pop a wash on on him to highlight the details a bit more.. then I can make a better decision about whether he stays or goes..
 
Thread owner
Right then..

had a look at the pilot after giving him a prime and black wash... he looks better, not 100% sure about him, it's an improvement,

I've also ordered a replacement resin bang seat..luverly stuff indeed.

Had a bonus find as well, whilst messing around with the Airfix pilot I found another British pilot in resin, must have been the one I originally lost whilst making the Kinetic Sea Harrier a while back..after giving him a look over and re-attaching his arms he looks like he'll do just fine after a strip and repaint, to stand outside the Jag, enabling me to use the resin bang seat..

what do ya think guys ?

Here's Bob.


and here's Steve.. seeing as everything I've read about Jag's seems to have a pilot called Steve..lol

 
Nice start with the Jag Chris, the original pilot looks like he was left in the oven a bit too long :p I definitely agree about some nice seat belts in there.
 
Fantastic work chris , the cockpit and wells look superb , it really looks like Airfix have pulled out all the stops on this one . Pilot does look a little softly detailed but if youre using the standing resin one it doesn't matter . The kit is a massive improvement on the older Airfix 1/48 jag , which was originally a Heller tooling , not an awful kit but a lot simpler in detail than this one , although funnily enough the one I did had a very nice pilot ,which I used .
 
Thread owner
Just a quick update,
haven't had much time this week to crack on with this, however the replacement bang seat turned up..

didn't realise it's actually a 3D printed part but I'm absolutely stunned by the level of detail on this..it's gorgeous.

Haven't removed it from it's 'protective cage' yet but hopefully I'm gonna get some work done on it this weekend.
 

Attachments

  • photo254400.jpg
    photo254400.jpg
    512.9 KB · Views: 0
  • photo254401.jpg
    photo254401.jpg
    177.8 KB · Views: 0
  • photo254402.jpg
    photo254402.jpg
    195.7 KB · Views: 0
  • 553.5 KB · Views: 0
Thread owner
Had a couple of hours this morning to throw a bit of paint at the seat.. needs a tiny bit more work on it,

whatd'ya think ?

IMG_0391.jpg IMG_0392.jpg IMG_0393.jpg

I'm not too sure about the colour of the droge chute..(the bag thing on the top, as I can't find any pics of the top of the seat).


Also, anybody got any idea's if the strap colour is correct..(the orangy sections), as I keep finding different colours for these. if so would you say it's more of a burnt orange /dirty orange colour than a pure bronze ..ish colour.

IMG_0390.png
 
Very nice Chris. It reminds me of my first resin seat that I did. So much detail that I didn't know where to start on the painting. That has come out really well.
 
I have this on my list to start after the EE Lightning I’ve just started, just out of interest, what colour did you paint the undercarriage bays? Looks a bit like Chromate yellow/green? If the answer is in the instructions, feel free to answer ‘RTFM’ 😀
 
Thread owner
I have this on my list to start after the EE Lightning I’ve just started, just out of interest, what colour did you paint the undercarriage bays? Looks a bit like Chromate yellow/green? If the answer is in the instructions, feel free to answer ‘RTFM’ 😀

RTFM...LOL

Seriously though, Be wary of the instructions as I seem to remember they list the bay colours as black when they should be green chromate / chromate green, so I gave them a blast of Tamiya XF-4, over a black base, then a thin wash of brown oil paint just to soften the harshness down a tad..

Whatever you throw into these bays can't be wrong as they end up quite grubby in the pictures I've seen online..
 
Thread owner
Right then, the seat is finally done...(finally they say !!..lol), straps repainted a lighter shade for contrast, decals added, and a couple of extra bits of paint ,(yellow handles and the red 'blob' on the headbox)done.. to be honest I could easily mess around for ages with various bits on here, but you've gotta call time on it eventually.

Click image for larger version  Name:	IMG_0401.jpg Views:	0 Size:	380.5 KB ID:	1266645

Click image for larger version  Name:	IMG_0403.jpg Views:	0 Size:	315.1 KB ID:	1266646

Click image for larger version  Name:	IMG_0402.jpg Views:	0 Size:	285.9 KB ID:	1266647

I'm thinking about grabbing some replacement exhausts for it as well,

got my eye on these.. they're gorgeous.

However they're out of stock at the minute, that said I've got the rest of the build to do before I need to come to a decision on them..(but you've gotta admit, it'd be rude not too)

https://www.hannants.co.uk/product/ITA348035
 

Attachments

  • IMG_0401.jpg
    IMG_0401.jpg
    380.5 KB · Views: 0
Last edited:
Back
Top