
You are using an out of date browser. It may not display this or other websites correctly.
You should upgrade or use an alternative browser.
You should upgrade or use an alternative browser.
Airfix 1/72 Ju 88
- Thread starter stona
- Start date
- Status
- Not open for further replies.
Hard to believe that is the same kit Steve, very nice and clean work as usual from you. Look forward to seeing the framing. When I did the Revell Hurricanes I used painted decal strips. Not seen tape used, but it might be easier to apply than the decal strips.
G
Guest
Guest
Interesting you ended up there Steve. That is exactly how I used to do canopies as a youngster, with probably the same kind of standard of plastic you are dealing with now.\ said:I've made a start with painted tape and it looks like it'll be a goer.
Cheers
Steve
It looks okay Richard. At this scale it might be a little over scale as there's a limit to how thin I can cut it and still have it stick to the canopy (I've been experimenting!). I've made an intentional decision, having looked at drawings of the original framing, to do an impression of the framing which should look okay rather than literally replicating every element. On the grounds that the little bit I did worked I've got more painted tape drying for tomorrow. Last chance to finish this tomorrow as I fly to Vancouver on Monday and won't be home until November!\ said:Interesting you ended up there Steve. That is exactly how I used to do canopies as a youngster, with probably the same kind of standard of plastic you are dealing with now.
Cheers
Steve
I'm calling this done as I've run out of time anyway!
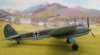
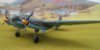
I've not done a proper photo job, just selected a few snapshots that aren't to blurred with a suitably Norwegian looking background")
View attachment 118751
View attachment 118752
View attachment 118753
View attachment 118754
It's a horrible old kit but quite fun to knock into shape. If I was trying to make a serious 1/72 scale model of a Ju 88 this would not be the starting point I'd choose!
Cheers
Steve
View attachment 231773
View attachment 231774
View attachment 231775
View attachment 231776
I've not done a proper photo job, just selected a few snapshots that aren't to blurred with a suitably Norwegian looking background
View attachment 118751
View attachment 118752
View attachment 118753
View attachment 118754
It's a horrible old kit but quite fun to knock into shape. If I was trying to make a serious 1/72 scale model of a Ju 88 this would not be the starting point I'd choose!
Cheers
Steve
View attachment 231773
View attachment 231774
View attachment 231775
View attachment 231776
Attachments
G
Guest
Guest
You've certainly beat the old bear into shape steve, nice work and it looks great.
scott
scott
G
Guest
Guest
Lovely job.
Would really like to hear a bit more about the canopy framing you did, have a similar beastie in the queue and was thinking I might try the same thing.
Would really like to hear a bit more about the canopy framing you did, have a similar beastie in the queue and was thinking I might try the same thing.
Looks a really neat job Steve from very humble plastic. Might be worth giving a little 'how to...' on the canopy framing. I know that 1/72 really isn't your scale but I think it would be of interest to the 'Braille scale' modellers and I'm sure they'd appreciate having another technique in the locker.
I love the backgrounds too. Do you print these off on your own printer?
One last thing, what's up next? Back to 1/32?
Again, great job
P
I love the backgrounds too. Do you print these off on your own printer?
One last thing, what's up next? Back to 1/32?
Again, great job
P
Cheers fellas.
For the framing I just cut some thin strips of Tamiya tape, stuck it on some tin foil and painted it RLM 70 and RLM 65. Once dry I could liberate lengths, clean up the edges, and apply them to the canopy. I did look at the framing on the full size version and decided not to replicate it exactly. Discretion got the better part of valour! If you make the strips too thin they won't stick which means the framing is inevitably slightly over scale, but the strips give a reasonable impression and are a lot easier than the alternatives.
The trickiest bit is cleaning up the edges of the strips when you lift them from the foil. I had to put them back on a cutting mat and run a very sharp blade along the edges to remove excess paint and tidy them up. You're going to need a new scalpel blade to cut the strips anyway.
Next up, when I get home, will be a 1/32 Bf 110.
Cheers
Steve
G
Guest
Guest
Wow Steve, you surely made a "difficult" model into a very nice looking one
Theuns
Theuns
G
Guest
Guest
Im sure you will come out on Top with the build Steve, Looking good so far...
John.
John.
G
Guest
Guest
Well done bud, lovely work here it looks fantastic. Nice one
G
Guest
Guest
Great work Steve!
Err....and sorry again
Err....and sorry again

")
- Status
- Not open for further replies.
Legal Notice
scalemodelling.co.uk is a privately operated online discussion forum. All content posted by members reflects their own views and opinions and does not necessarily represent those of the forum owners or administrators. While reasonable efforts are made to moderate content, no responsibility is accepted for user-generated material. By using this site, you agree to comply with UK law and the forum rules.