Theme editor

Scale Model Shop

Airfix 1/72 Mitsubishi A6M2 Zero

yak face

Moderator
Staff member
Joined
Jun 13, 2009
Messages
14,395
Reaction score
936
Points
113
Age
60
1/3
Thread owner
Heres one I picked up when they had them in Aldi before xmas . Its a 2011 tooling so not the latest but is very nicely done nevertheless . The cockpit is well enough detailed , especially as the canopy only gives a closed option , only thing I added were some spare decal belts from the recent Eduard spitfire ( if it had been an open canopy I would have used etch , but under a closed one the decals will be good enough)
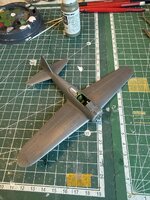
heres where I am at the moment, with a bit of careful painting the pit looks quite nice.
IMG_6438.jpg IMG_6439.jpg IMG_6434.jpg IMG_6435.jpg IMG_6436.jpg
 
It's a great little kit Tony, I've built one and have another that is 80% done on my bench as an aside project in alternative markings. Nice start in the cockpit. You really can't see much at all once the canopy is on.
 
Thread owner
Main airframe now altogether . No dramas just a tiny bit of filler needed to smooth the joint on the rear deck behind the cockpit opening. The section of the front upper fuselage had the gunsight lens moulded onto it in solid plastic so this has been cut off and will be replaced with a more suitable clear piece. IMG_6490.jpg
 

Attachments

  • IMG_6490.jpg
    IMG_6490.jpg
    489.6 KB · Views: 0
Thread owner
Gunsight lens replaced with a tiny bit of holographic confetti cut to shape and ive done my favourite job in the whole world - masking up a multi framed canopy :mad: .
The canopy has now been glued on so next step is priming . What about the engine i hear you cry ! , that will be added last off along with the cowling as these dont interfere with any of the rest of the build .
IMG_6493.jpg IMG_6494.jpg
 
Looking nice old boy. I feel your pain, masking multi-frame canopies. The problem is, a mask might cost nearly as much as the Aldi special.
 
Thread owner
Airframe now painted ,a custom mix of Tamiya acrylics , the fabric control surfaces were done in a slightly darker shade as these were a noticeably different colour . Next up a coat of Klear then decals , maybe only a few though as I’m hoping to mask and spray the hinomaru ( meatballs)
IMG_6508.jpg IMG_6509.jpg
 
Thread owner
After getting out the compass cutter and a masking session it was ready for the hinomaru and fuselage band to be sprayed . Very pleased with how it turned out , no creep along the panel lines , just a tiny bit of overspray near the nose to touch up . Next is a coat of Klear then the decals , not many though , just the tail codes and yellow stripes , the red wing walk lines and a small info panel in japanese on the fuselage.
IMG_6512.jpg IMG_6513.jpg IMG_6514.jpg
 
Thread owner
Tail decals and wing walks now applied . The engine and cowling have both been fitted and the next step is highlighting the control surfaces joint lines - dont think I’ll be doing a full panel line wash though as they are quite deep and very noticeable already. IMG_6516.jpg
 
This is a really nice little kit to build. I did one when they first came out and I was restarting my modelling journey and skills.
 
Back
Top