Theme editor

Scale Model Shop

Airfix 15 cwt truck and 6lb AT gun.

Status
Not open for further replies.

Ian M

Administrator
Staff member
Joined
Dec 14, 2008
Messages
18,331
Reaction score
563
Points
113
1/3
Thread owner
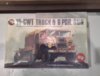
As mentioned in a thread in chit-chat, I aquired an old Airfix kit from 1976.

There where a few of you lot that said they would like to see the build, so here we go.

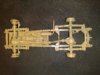
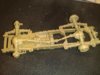
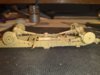
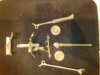
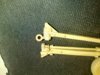
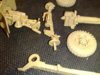
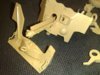
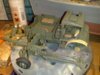
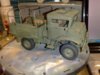
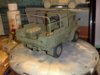
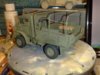
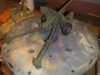
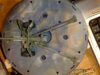
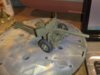
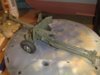
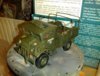
First stage it the chasis, which is now cleaned up for not uncunsiderabe amounts of flash, but being the "old palstic" it was very easy to remove. Not like todays kits where the plastic is a bit softer...

View attachment 21954

View attachment 21955

View attachment 21956

View attachment 21957

View attachment 134480

View attachment 134481

View attachment 134482

View attachment 134483
 

Attachments

  • 04032010365..jpg
    04032010365..jpg
    2.4 KB · Views: 0
  • 05032010372..jpg
    05032010372..jpg
    2.3 KB · Views: 0
  • 05032010371..jpg
    05032010371..jpg
    2.4 KB · Views: 0
  • 05032010373..jpg
    05032010373..jpg
    2.5 KB · Views: 0
Nice detail Ian.

'Ow ya gonna paint the exhaust and propshaft ect? Might be a bit tricky in situ. lol
 
Thread owner
\ said:
Nice detail Ian.'Ow ya gonna paint the exhaust and propshaft ect? Might be a bit tricky in situ. lol
Errrrr, ermmmm

Carefully?
 
Thread owner
Talking of paint. Could any of you advise as to the colour inside the cabine of British truck during WWII? I could easily imagine them to be the same base colour as the out side, be it Green or yellow. On the other hand I could invisage them being painted some form of Light grey or greengrey. Any one know ?
 
I've seen a genuine unimproved 1944 AEC Matador in 1976, (would you believe war stocks, in the event of a conflict)with a cream cab interior colour and I've seen other truck cabs painted the same green as the exterior.

I suspect it's a question of whether or not it has been overhauled and re-painted
 
Thread owner
Think I'm going to go with the out side colour on the inside theory.

Spent the afternoon building the six pounder up into sub-assemebleies ready for a splash of paint.

I would go as far as to say the detail in this litte gun is better than in the Tamiya version. The tow cleats at the back of the gun are done proper and not just one plate as on the Tamiya. The lower part of the sheild is seperate, so it can be set up or down. The Breach is way more detailed than the Tamiya to.

The Sub-assembelies for the truck have also undergone the first stage in paint.

In an attempt to break away from the derert war I might just do a green one but have no idea as to which green it should be. Anyone got a pointer in the right direction.

View attachment 21982

View attachment 21983

View attachment 21984

View attachment 21985

View attachment 21986

View attachment 21987

View attachment 134508

View attachment 134509

View attachment 134510

View attachment 134511

View attachment 134512

View attachment 134513
 

Attachments

  • 06032010377..jpg
    06032010377..jpg
    2.6 KB · Views: 0
  • 06032010379..jpg
    06032010379..jpg
    2.5 KB · Views: 0
  • 06032010383..jpg
    06032010383..jpg
    2.4 KB · Views: 0
  • 06032010380..jpg
    06032010380..jpg
    3.1 KB · Views: 0
  • 06032010381..jpg
    06032010381..jpg
    3 KB · Views: 0
  • 06032010378..jpg
    06032010378..jpg
    2.7 KB · Views: 0
Thread owner
Just a quicky before I hit the sack.

The weekends progress has gotten most off the kit done!

The cab was a total pain to get to fit, but that was more my doing rather than the kits.

Just hope the doors fit.

Left to do: Put the windows in, glue the roof/back of cab in place. paint the mud guards, Oh put the wheels on. Then I can go round it a few times and touch up all the yucky bits.

Here is a quick picture as it stands now.

View attachment 13087

As you can see it ended up in the Green theater!

More later

View attachment 22027

View attachment 134553
 

Attachments

  • 07032010384..jpg
    07032010384..jpg
    2.9 KB · Views: 0
looking good Ian. Not a bad kit at all by the looks, keep at it and if the doors don't fit, have them open lol.
 
looks like you got a cracking kit there ian , great details. keep the pics coming, cheers tony
 
Thread owner
Almost done

Well the doors went in but they put up brave fight!

The last of the fiddly bits are in place and painted.

There was no driver!! After totally mutilating a couple of figure I gave up on that idea. I'll find some one or a compleat gun crew to pose with it later.

Painted worn and scratched; Check!

Weathered; not yet! I'm awaiting a bottle of klear before I get into that! Then its Decals and weathering.

Talking of Decals, that was the only part of this old kit, it is from '76, the Decal sheet is pretty dried up and quite yellowed. I could try to print some but there lies the problem.

My printer dont do white, and as the service numbers are white I'm sort of stuck untill I can find some from an other kit!!

Heres the almost finished build:

View attachment 22139

View attachment 22140

View attachment 22141

View attachment 22142

View attachment 22143

View attachment 22144

View attachment 22145

View attachment 22146

View attachment 134665

View attachment 134666

View attachment 134667

View attachment 134668

View attachment 134669

View attachment 134670

View attachment 134671

View attachment 134672
 

Attachments

  • 10032010392..jpg
    10032010392..jpg
    2.9 KB · Views: 0
  • 10032010393..jpg
    10032010393..jpg
    2.8 KB · Views: 0
  • 10032010394..jpg
    10032010394..jpg
    2.9 KB · Views: 0
  • 10032010398..jpg
    10032010398..jpg
    2.5 KB · Views: 0
  • 10032010397..jpg
    10032010397..jpg
    2.9 KB · Views: 0
  • 10032010396..jpg
    10032010396..jpg
    2.5 KB · Views: 0
  • 10032010395..jpg
    10032010395..jpg
    2.5 KB · Views: 0
  • 10032010391..jpg
    10032010391..jpg
    2.9 KB · Views: 0
That looks the business mate - looks like you did a good job on it, can't believe it's from 1976!! Is that a Humber Mk II in the background in the last set of pics??

Stuart
 
Thread owner
Hej Stuart, Not a humber...

The one that looks like its above the 15cwt is in fact a Kfz222, so way off target there. The one lower down to the left is a bren carrier.
 
\ said:
Hej Stuart, Not a humber...The one that looks like its above the 15cwt is in fact a Kfz222, so way off target there. The one lower down to the left is a bren carrier.
Dear dear... I'll get me coat!!! At least I was right about one thing - the truck looks good :lol:
 
This is looking spot on mate that is a beauty of a kit. keep up the good work.

scott
 
Thread owner
Well just a little up-date:

There is a nice smell of Klear in the study. I had purchased a bottle of the new clear, (which Ron was so helpfull in sending to me), So it was time to give it a go.

The 15cwt has been given a coat of Klear which has had a whole 24 hours to dry.

The decals have now gone on and I am glad to say that even though they are, what, nearly 24 years old, went on a treat! Surprisingly thin carrier film to given their vintage!

The decals on the clap at the back of the cargo area will need a bit of micro sol to really pull the down to the 'planking' but other than that all's fine.

All that remains now is to weather is a bit. Hmmm Muddy field?

A couple of snaps for the album;

View attachment 22320

View attachment 22321

View attachment 134846

View attachment 134847
 

Attachments

  • 19032010401..jpg
    19032010401..jpg
    2.8 KB · Views: 0
  • 19032010400..jpg
    19032010400..jpg
    3.1 KB · Views: 0
You have done a great job of that Ian. The decals have brought it to life. Looking forward to the weathered finish. The new Klear does smell nice doesn't it.
 
Ian,

Yet more proof that Airfix kits can be made to look really good. I still don't understand why they get criticised so much.

Gern
 
Status
Not open for further replies.
Back
Top