
Hello,
Just have finished this and I'd like to share with you.
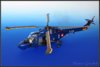
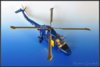
First as usual, couple things about the kit. i was really really surprised when I first open the box. First glance on some pieces, mainly the fuselage and the cabin and only thing I could say was "wow!". The "wow" factor ended couple steps later. Don't get me wrong, most of the kitis really amazing. Great detail, a lot of rivets and nice panel lines, but when I get to the engine cowling I was shocked. I've looked on different websites to see if real Lynx has this section completely flat, as on this kit.. Well it still looked good. then I went to fitting the main canopy and beautiful 1mm gap appeared! I've managed to fill it with some putty, but I don't really like surprises like this. I don't mind some gaps, but this one was way too big. Other disappointment was engine intake cover which should be a mesh, but in the kit is made with clear plastic. I scratch build it with some old PE leftovers.
The kit gives you couple options of the aircraft to build. I decided to build anti-piracy Danish version. I kind like it I must say.
I've installed an internal light to lighten up the cabin a bit. It was just a try before my general and main project for this year and it worked fine.
Ok, no more talking, there come the pictures:
Light off:
View attachment 104375
View attachment 104376
Light on:
View attachment 104377
View attachment 104378
View attachment 104379
View attachment 104380
View attachment 104381
View attachment 104382
View attachment 104383
View attachment 104384
View attachment 104385
View attachment 104386
View attachment 104387
View attachment 104388
View attachment 104389
View attachment 104390
Thanks!
Bart.
View attachment 217398
View attachment 217399
View attachment 217400
View attachment 217401
View attachment 217402
View attachment 217403
View attachment 217404
View attachment 217405
View attachment 217406
View attachment 217407
View attachment 217408
View attachment 217409
View attachment 217410
View attachment 217411
View attachment 217412
View attachment 217413
Just have finished this and I'd like to share with you.
First as usual, couple things about the kit. i was really really surprised when I first open the box. First glance on some pieces, mainly the fuselage and the cabin and only thing I could say was "wow!". The "wow" factor ended couple steps later. Don't get me wrong, most of the kitis really amazing. Great detail, a lot of rivets and nice panel lines, but when I get to the engine cowling I was shocked. I've looked on different websites to see if real Lynx has this section completely flat, as on this kit.. Well it still looked good. then I went to fitting the main canopy and beautiful 1mm gap appeared! I've managed to fill it with some putty, but I don't really like surprises like this. I don't mind some gaps, but this one was way too big. Other disappointment was engine intake cover which should be a mesh, but in the kit is made with clear plastic. I scratch build it with some old PE leftovers.
The kit gives you couple options of the aircraft to build. I decided to build anti-piracy Danish version. I kind like it I must say.
I've installed an internal light to lighten up the cabin a bit. It was just a try before my general and main project for this year and it worked fine.
Ok, no more talking, there come the pictures:
Light off:
View attachment 104375
View attachment 104376
Light on:
View attachment 104377
View attachment 104378
View attachment 104379
View attachment 104380
View attachment 104381
View attachment 104382
View attachment 104383
View attachment 104384
View attachment 104385
View attachment 104386
View attachment 104387
View attachment 104388
View attachment 104389
View attachment 104390
Thanks!
Bart.
View attachment 217398
View attachment 217399
View attachment 217400
View attachment 217401
View attachment 217402
View attachment 217403
View attachment 217404
View attachment 217405
View attachment 217406
View attachment 217407
View attachment 217408
View attachment 217409
View attachment 217410
View attachment 217411
View attachment 217412
View attachment 217413
Attachments
-
 DSC_7221.jpg5.9 KB · Views: 0
 -
 DSC_7225.jpg6 KB · Views: 0
 -
 DSC_7230.jpg5.7 KB · Views: 0
 -
 DSC_7231.jpg5.6 KB · Views: 0
 -
 DSC_7235.jpg5.6 KB · Views: 0
 -
 DSC_7239.jpg5.9 KB · Views: 0
 -
 DSC_7241.jpg6.1 KB · Views: 0
 -
 DSC_7243.jpg5.6 KB · Views: 0
 -
 DSC_7249.jpg5.6 KB · Views: 0
 -
 DSC_7251.jpg6.5 KB · Views: 0
 -
 DSC_7253.jpg6.1 KB · Views: 0
 -
 DSC_7254.jpg5.8 KB · Views: 0
 -
 DSC_7255.jpg6.2 KB · Views: 0
 -
 DSC_7258.jpg6.6 KB · Views: 0
 -
 DSC_7260.jpg5.9 KB · Views: 0
 -
 DSC_7261.jpg6.1 KB · Views: 0
")

 We need a "weeps copiously" smiley.