
You are using an out of date browser. It may not display this or other websites correctly.
You should upgrade or use an alternative browser.
You should upgrade or use an alternative browser.
AIRFIX WWI MALE TANK MARK 1 - WWI Memorial GB
- Thread starter Steve Jones
- Start date
- Status
- Not open for further replies.
G
Guest
Guest
Steve welcome and great start,
hats off to those of you that work in such small scale .
hats off to those of you that work in such small scale .
Hi Steve
A build with really personal connections. That makes it special. Even without your meticulous research and detailing it will be excellent. The camo will be a breeze for a modeller of your talents.
Jim
A build with really personal connections. That makes it special. Even without your meticulous research and detailing it will be excellent. The camo will be a breeze for a modeller of your talents.
Jim
Solomon Joseph Solomon, I think it was he whom came with the idea of camouflage during WW1. So you can blame him for the slightly tricky camo' scheme on your tank. I built a couple of these very old kits a couple of years ago and actually thought, they were quite good, considering their age. Masking fluid was the answer (for me) for the many layers of camouflage.
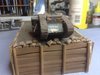
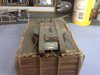
1:76 :thumb2: and as old as an old thing, only a year younger than me in original issue but yours is in a red box so should have the cleaned up mouldings
These used to get bought just so people could slice off the rivets to use on scratch builds and conversions
Lacking a bit of detail but should still look the part
These used to get bought just so people could slice off the rivets to use on scratch builds and conversions
Lacking a bit of detail but should still look the part
G
Guest
Guest
Great introduction once again Steve, and having that personal history with your great Uncle will make this a great build .
Taking my seat near the kitchen door, ready to make the tea .
John.
Taking my seat near the kitchen door, ready to make the tea .
John.
Hi Everyone
Brad - It's only since I brought an Optivisor a year ago that I have been able to build this small. It's great fun once you get the hang of it
Jim - I appreciate you confidence. However I will be trying out some new methods on the painting and weathering. You know me - always like to push the boundaries:smiling3:
Colin - I have been studying Solomon's work for a few weeks now. There are a lot of grey areas surrounding the Mk 1 at Fleurs due to the lack of photographic evidence. A lot of peoples opinions are based on what came later especially the camo work on Mk IV's. The grey areas are; was there camo on the top or on the rear wheel unit and wheels? Was the paintwork hard lined, blended or a mixture of both?. I think there will be some artistic license so the jury is still out on which way I go
Ian - I would like to see that. That sounds cool. Please feel free to post pictures of it on this blog if possible:thumb2:
JR - With this camo pattern on 1 76 I may need something a little stronger:smiling3:
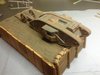
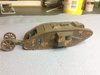
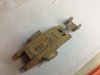
Mr T - Kit Size When I put the kit together I thought this looks very big! So I compared it to the Tiger in 1 72 and this was the result
Brad - It's only since I brought an Optivisor a year ago that I have been able to build this small. It's great fun once you get the hang of it
Jim - I appreciate you confidence. However I will be trying out some new methods on the painting and weathering. You know me - always like to push the boundaries:smiling3:
Colin - I have been studying Solomon's work for a few weeks now. There are a lot of grey areas surrounding the Mk 1 at Fleurs due to the lack of photographic evidence. A lot of peoples opinions are based on what came later especially the camo work on Mk IV's. The grey areas are; was there camo on the top or on the rear wheel unit and wheels? Was the paintwork hard lined, blended or a mixture of both?. I think there will be some artistic license so the jury is still out on which way I go
Ian - I would like to see that. That sounds cool. Please feel free to post pictures of it on this blog if possible:thumb2:
JR - With this camo pattern on 1 76 I may need something a little stronger:smiling3:
Mr T - Kit Size When I put the kit together I thought this looks very big! So I compared it to the Tiger in 1 72 and this was the result
G
Guest
Guest
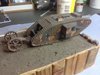
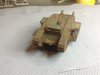
Steve can't see that bit of damage posing a problem for you.
Looking good on the last photo.
JR
Looking good on the last photo.
JR
G
Guest
Guest
Steve, I have one, it still won't make a difference... I need injection of mojo... Lol, great stuff by the way.
Don't know if this is any use to you.. Taken at Fleurs - Courcelette. 1915
View attachment 310799
Courtesy IWM. No copyright infringement intended, for discussion purposes only.
Don't know if this is any use to you.. Taken at Fleurs - Courcelette. 1915
View attachment 310799
Courtesy IWM. No copyright infringement intended, for discussion purposes only.
I suspect that it would have been brush painted, so a hard edge.Hi Everyone
Was the paintwork hard lined, blended or a mixture of both?
Pete
Attachments
JR - Cheers mate.The advantages of doing a muddy vehicle is that a lot of issues can be hidden:smiling3:
Brad - Many thanks for the photo. I have some others with the camo scheme on them and they are all different. So whichever way I go I should get away with the accuracy factor
Fernando - Great to have you along
Peter - Totally agree:thumb2:
Ian - That's terrific mate. I really appreciate you posting the pics. This will help me a lot.:thumb2::thumb2::thumb2:
Mr T - I am a big fan of Landships but I have never seen this page before. It's fantastic. Really appreciate you digging it out. I was very tempted to start making the changes but I have enough headaches on my bench at the moment with the Holt and the FAT CAT so I will stick with plan A. I will just have to rename him "the Mark II that used to be a Supply Tank and has the tail-wheels from a Mark I attached" build:smiling5:
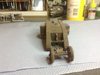
Having fun and games cleaning up the rear springs so hopefully will update at the weekend. many thanks for all your help and support
Brad - Many thanks for the photo. I have some others with the camo scheme on them and they are all different. So whichever way I go I should get away with the accuracy factor
Fernando - Great to have you along
Peter - Totally agree:thumb2:
Ian - That's terrific mate. I really appreciate you posting the pics. This will help me a lot.:thumb2::thumb2::thumb2:
Mr T - I am a big fan of Landships but I have never seen this page before. It's fantastic. Really appreciate you digging it out. I was very tempted to start making the changes but I have enough headaches on my bench at the moment with the Holt and the FAT CAT so I will stick with plan A. I will just have to rename him "the Mark II that used to be a Supply Tank and has the tail-wheels from a Mark I attached" build:smiling5:
Having fun and games cleaning up the rear springs so hopefully will update at the weekend. many thanks for all your help and support
Steve,
Your off to a great start. A very nice idea to build something with a personal touch.
Your off to a great start. A very nice idea to build something with a personal touch.
Hi Everyone
Scottie - Glad to see you have joined the rest of the rabble. Thanks for the support
Mr T - :smiling2: I had a look at the springs but I just dont have any wire that thin to do the right amount of coils. Look forward to seeing how you tackle them
Scottie - Glad to see you have joined the rest of the rabble. Thanks for the support
Mr T - :smiling2: I had a look at the springs but I just dont have any wire that thin to do the right amount of coils. Look forward to seeing how you tackle them
G
Guest
Guest
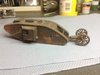
Steve that nylon thread looks perfect. Is it from Mrs Jones sewing box ? If so what make and size please. Management here might have some.
JR
JR
- Status
- Not open for further replies.
Legal Notice
scalemodelling.co.uk is a privately operated online discussion forum. All content posted by members reflects their own views and opinions and does not necessarily represent those of the forum owners or administrators. While reasonable efforts are made to moderate content, no responsibility is accepted for user-generated material. By using this site, you agree to comply with UK law and the forum rules.