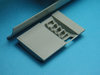
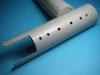
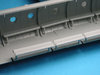
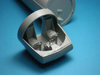
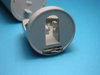
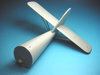
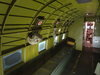
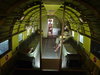
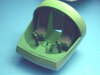
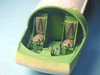
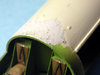
Theme editor

Scale Model Shop

Airspeed Horsa Glider 6th Airborne mount on D-Day

Status
Not open for further replies.

rtfoe

Active member
Joined
Apr 29, 2018
Messages
9,251
Reaction score
542
Points
113
Location
Shah Alam, Malaysia
1/3
Thread owner
Hi,
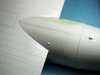
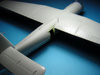
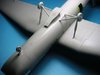
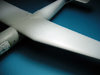
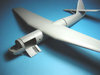
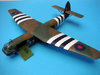
I have always been fascinated by the exploits of the Airborne during D-Day. No doubt the Longest Day scene on Pegasus bridge captivated me to build not only a bridge captured by the Airborne dio but also the chariot they rode in for the operation. The Horsa glider from Italeri has been with me like ages and in one crazy D-Day inspired year I built a couple of D-Day marked kits and the Horsa was one of them. This is her finished...i'll later take you through her build...

View attachment 308570

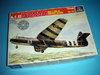
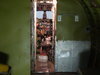
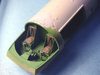
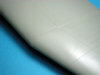
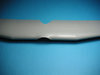
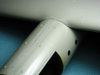
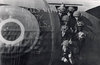
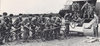
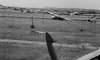
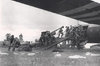
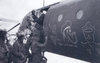
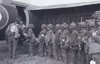
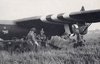
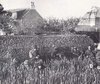
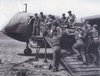
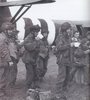
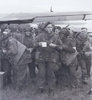
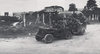
Below for reference only are some pictures that inspired and also gave some ideas to decorate the fuselage...


View attachment 308558 View attachment 308559 View attachment 308560 View attachment 308561 View attachment 308562 View attachment 308563 View attachment 308564 View attachment 308565 View attachment 308566 View attachment 308567 View attachment 308568 View attachment 308569

On the next post I'll start the blog build. Hope you'll join me.

Cheers,
Richard
 

Attachments

  • Pic_Angels.jpg
    Pic_Angels.jpg
    2.6 KB · Views: 0
  • Pic_Bicycles.jpg
    Pic_Bicycles.jpg
    2.4 KB · Views: 0
  • Pic_Glider1.jpg
    Pic_Glider1.jpg
    2.1 KB · Views: 0
  • Pic_HorsaAtGun.jpg
    Pic_HorsaAtGun.jpg
    2.5 KB · Views: 0
  • Pic_HorsaDraw2.jpg
    Pic_HorsaDraw2.jpg
    2.3 KB · Views: 0
  • Pic_HorsaMedics.jpg
    Pic_HorsaMedics.jpg
    2.5 KB · Views: 0
  • Pic_HorsaTrailer.jpg
    Pic_HorsaTrailer.jpg
    2.3 KB · Views: 0
  • Pic_HorsaWall.jpg
    Pic_HorsaWall.jpg
    3.6 KB · Views: 0
  • Pic_Jeep.jpg
    Pic_Jeep.jpg
    3 KB · Views: 0
  • Pic_ParaHorsa1.jpg
    Pic_ParaHorsa1.jpg
    3.2 KB · Views: 0
  • Pic_ParaHorsa2.jpg
    Pic_ParaHorsa2.jpg
    3 KB · Views: 0
  • Pic_UlsterJeep.jpg
    Pic_UlsterJeep.jpg
    2.1 KB · Views: 0
  • 52a.jpg
    52a.jpg
    3.4 KB · Views: 0
Thread owner
We start with the kit box...

View attachment 308571 You can build either the MkI or II which is the longer version with the huge side loading door.
View attachment 308572 Cockpit detail is not bad. The side pockets on either side of the seats were packed with lead weights. this aircraft is a real tail sitter.
You can already see me stuffing lead under the floor boards of the cockpit. The tail section was easy to assemble with no gaps to fill. Minor sanding was needed.

View attachment 308573 View attachment 308574

The kit comes with a very nice complete interior with fuselage ribbing and seats.

View attachment 308575 View attachment 308576

You will need to cut away the loading door carefully as it will be used

View attachment 308577 View attachment 308578

The loading door is detailed on the inside with supports and ladder that is supplied with the kit.

View attachment 308579 More next...

Cheers,
Richard
 

Attachments

  • 8.jpg
    8.jpg
    5.6 KB · Views: 0
  • 7.jpg
    7.jpg
    5.7 KB · Views: 0
  • 6.jpg
    6.jpg
    6 KB · Views: 0
  • 5.jpg
    5.jpg
    5.8 KB · Views: 0
  • 1.jpg
    1.jpg
    6.9 KB · Views: 0
  • 2.jpg
    2.jpg
    2.7 KB · Views: 0
  • 3.jpg
    3.jpg
    5.4 KB · Views: 0
  • 4.jpg
    4.jpg
    5.8 KB · Views: 0
  • 4a.jpg
    4a.jpg
    5.2 KB · Views: 0
Good start on this one Richard. Brilliant historic images as well. Love “Angels..” especially...I’ve always wondered if Margaret was hacked off ‘cos her bloke spelt her name wrong....
Cheers
Tim
 
Thread owner
Hi Guys, thanks for dropping in with kind comments.

Steve, thanks for the lovely pics of a Dakota interior
Steve O, glad you like them
Jimbo, I don't mind if you want to pull the seats up closr to the table
Tim, don't know but she could be French :smiling6:
Ian, hope the rest is just as good for you

Cheers,
Richard
 
Thread owner
Hi,
Just look at the amount of lead and areas that I managed to stuff them including the top. Base colors applied prior to shading...

View attachment 308761 View attachment 308762

I did some post shading to the interior green by adding a drop of black to the airbrush mix. Picked out detail with a paintbrush...you can just see the lead hidden on both sides of the seats.

View attachment 308763 View attachment 308764

There was aslight step between the canopy and fuselage edge so I added putty to level it off. Carefull sanding to avoid the little nodules on fuselage roof.

View attachment 308765 View attachment 308766

Next the wings...

Cheers,
Richard
 

Attachments

  • 13.jpg
    13.jpg
    2.5 KB · Views: 0
  • 14.jpg
    14.jpg
    2.8 KB · Views: 0
  • 15.jpg
    15.jpg
    2.5 KB · Views: 0
  • 16.jpg
    16.jpg
    3 KB · Views: 0
  • 17.jpg
    17.jpg
    2.9 KB · Views: 0
  • 18.jpg
    18.jpg
    2.8 KB · Views: 0
Paying full attention Richard, I'm with Steve down the front as he's got the biscuits.
John
 
Thread owner
Hi John...now there's enough biscuits to go around and I've reserved a seat for you at the front.

Cheers,
Richard
 
Thread owner
Italeri captured the wing right here...thick and broad.

View attachment 308958 View attachment 308959

Preparing all the sections to go together...

View attachment 308966 View attachment 308960

The fit of the wing on the fuselage went well. It just overlapped onto the fuselage without any filler. This was the first time I used CA for seam joints of the fuselage which can be seen after sanding.

View attachment 308961 View attachment 308963

Undercarriage had locating holes on the wing but not the fuselage. Slight dimples on skids were filled and sanded. Any apatures werre plugged ready for airbrushing. I used white glue for masking of the portholes.

View attachment 308964 View attachment 308965

Cheers,
Richard
 

Attachments

  • 9.jpg
    9.jpg
    1.8 KB · Views: 0
  • 10.jpg
    10.jpg
    4.8 KB · Views: 0
  • 11.jpg
    11.jpg
    2.1 KB · Views: 0
  • 12.jpg
    12.jpg
    2 KB · Views: 0
  • 20.jpg
    20.jpg
    2.9 KB · Views: 0
  • 21.jpg
    21.jpg
    2.9 KB · Views: 0
  • 22.jpg
    22.jpg
    2.4 KB · Views: 0
  • 19.jpg
    19.jpg
    6.1 KB · Views: 0
Did someone mention biscuits!?
I love Horsas too, so I'm here for the ride! And Richard's up to his magic again! Yippee!
Anyone bring some wine??
Andy B
 
Thread owner
Hi Andy, good to have you here...if you're expecting a magic show, it's down the hall way to the left. Sadly Tim will not be joining us so Vino is off the list. Better hurry, Steve and John are already at the biscuits. If you want tea just join the line with the rest of the lads having their sandwiches about to embark later on their Horsa's for the operation Dead Stick.

Cheers,
Richard
 
Thread owner
Hi Steve, the remark on the line of lads waiting to embark would have hinted some figures would be put in but I hadn't done any since. It had crossed my mind for a dio together with the Stirling with lines of paratroops boarding their transports but that would be crazy big. :smiling6:

Cheers,
Richard
 
A bit disappointed that there's no wine or magic and Steve and John have eaten all the biscuits! But I'll stay, because I love what you do! And I'll try to behave!
Andy
 
Hi Richard
Cracking progress with this. I think the dio in your head may indeed be a bit too big. Shame the biscuits have gone but I shall follow the rest anyway.
Jim
 
Thread owner
Hi Ian, Andy and Jim, thanks for the continued support even without the biscuits and wine. No worries , there's no class monitor minding the class.:smiling6:

Cheers,
Richard
 
Status
Not open for further replies.
Back
Top