Theme editor

Scale Model Shop

BarryW’s Zoukei Mura 1/32 Ta152 H-0

Status
Not open for further replies.
Thread owner
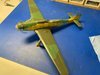
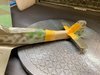
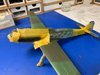
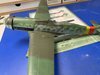
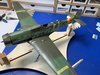
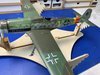
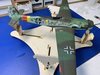
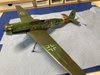
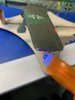
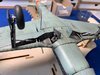
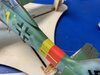
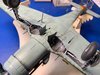
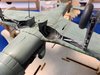
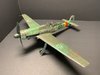
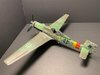
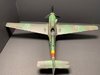
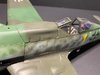
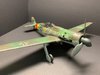
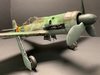
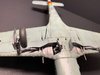
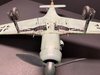
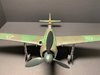
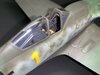
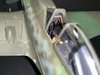
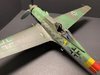
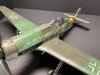
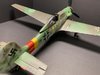
I masked off the part of the fuselage sides to get a clean dividion between wings and fuselage and then freehand sprayed the upper wing camo, I am very please with the result and tonight will remove the masking and do a little bit of touching up before addressing some of the detail.
View attachment 322586
View attachment 322587
 

Attachments

  • IMG_0557 (002).jpg
    IMG_0557 (002).jpg
    2.9 KB · Views: 0
  • IMG_0558 (002).jpg
    IMG_0558 (002).jpg
    2.8 KB · Views: 0
Thread owner
More painting progress

I masked up ready to paint the fuselage band and the area around the exhausts.

View attachment 322656

The band is two colours, yellow and red. Yellow first and as you know there are always issues with yellow coverage.

So I did my usual, a thin yellow primer coat using MRP primer as this colour does cover well.

View attachment 322657

After that came RLM4 and I painted the exhaust area with exhaust metal

View attachment 322658

I will do some more masking tonight ready for RLM23 Red and burnt iron on the actual exhausts.

then a little more detail painting with a brush and on to decals and masks.
 

Attachments

  • IMG_0559 (002).jpg
    IMG_0559 (002).jpg
    3 KB · Views: 0
  • IMG_0560 (002).jpg
    IMG_0560 (002).jpg
    2.9 KB · Views: 0
  • IMG_0563 (002).jpg
    IMG_0563 (002).jpg
    3.2 KB · Views: 0
Just found this one Barry, I don't normally look at the group builds. An interesting subject and your making a fine job of it. Will watch with interest.
 
Thread owner

Attachments

  • 9DEE2405-EEF3-4001-9137-DF53F001FB49.jpeg
    9DEE2405-EEF3-4001-9137-DF53F001FB49.jpeg
    3.4 KB · Views: 0
  • 1B6A599E-DF8E-447F-98E2-3CE93D13C55B.jpeg
    1B6A599E-DF8E-447F-98E2-3CE93D13C55B.jpeg
    4.2 KB · Views: 0
  • 492823EC-9261-447F-BA18-01467021E01F.jpeg
    492823EC-9261-447F-BA18-01467021E01F.jpeg
    3.5 KB · Views: 0
  • ED3BEA49-7B15-4986-943B-3A293F4481A3.jpeg
    ED3BEA49-7B15-4986-943B-3A293F4481A3.jpeg
    4.1 KB · Views: 0
  • BB0506CB-6D10-43A4-9872-9FB6B7E3B31F.jpeg
    BB0506CB-6D10-43A4-9872-9FB6B7E3B31F.jpeg
    3.9 KB · Views: 0
Hi Barry
That is a very impressive paint job. Quite complex and your planning and masking has paid dividends. The decals look good.
Jim
 
Thread owner
The decals went down perfectly. I remember from the Skyraider just how good the ZM decals are. These are just about the best i have used, hence not bothering with masks.

Anyway after allowing some decal solution to dry thoroughly and a wipe down with a damp cloth I have applied two thin MRP gloss coats. So here she is awaiting a panel line wash which I will do tomorrow followed by the first matt coat.
View attachment 323169
 

Attachments

  • 3BDA5FF2-B7CD-4080-B9D8-F86E04466BE3.jpeg
    3BDA5FF2-B7CD-4080-B9D8-F86E04466BE3.jpeg
    3.5 KB · Views: 0
Stunning Barry. I really need to get some more of mine done. But the farm is keeping me busy at the moment. Animals don't really like this cold easterly winds
 
All looking very smart. Just at that stage were all of a sudden, it's done.
 
Thread owner
Final touches...
After applying the first matt coat I did some weathering with silver pencil, metal powders, pigments and AKI Brown Wash. This shows up best on the underside.

Smoke, oil streaks, chipping ect

Followed by the underside 'final fittings'
View attachment 323360
View attachment 323361
View attachment 323362

Remember the wing tip lights, those small clear parts that pinged of into the ether...

Well this is how I resolved that.

The holes were partly filles and I dropped some red and green paint into them.

I then got this stuff out...
View attachment 323358
I do not have much left and I have no idea where to get more (any ideas anyone?) I placed a drop in the tray and used a cocktail stick to place a drop in each light hole. I made sure it was slightly 'proud' and then cured it with the pen-light.
View attachment 323363

It works....

Instead of my usual EZ-Line I used fishing line for the aerial as I am positioning the pit open and it needs to 'hang-loose'. I superglued it into holes that I drilled before painting.

View attachment 323359

Competed model pics in my next post.....
 

Attachments

  • IMG_0583 (002).jpg
    IMG_0583 (002).jpg
    32.2 KB · Views: 0
  • IMG_0581 (002).jpg
    IMG_0581 (002).jpg
    3.5 KB · Views: 0
  • IMG_0576.jpg
    IMG_0576.jpg
    32 KB · Views: 0
  • IMG_0577 (002).jpg
    IMG_0577 (002).jpg
    32.5 KB · Views: 0
  • IMG_0578 (002).jpg
    IMG_0578 (002).jpg
    3.7 KB · Views: 0
  • IMG_0580 (002).jpg
    IMG_0580 (002).jpg
    3.6 KB · Views: 0
Thread owner
Completed pics...

I did really enjoy this build, a kit not without issues and one not for beginners but ZM certainly justify their reputation as a 'high-end' company. I will be building more of there kits, the Raiden is in the stash and they have two more very interesting releases of Japanese and Luftwaffe aircraft.

View attachment 323364View attachment 323365View attachment 323366View attachment 323367View attachment 323368View attachment 323369View attachment 323370View attachment 323371View attachment 323372View attachment 323373View attachment 323374View attachment 323375View attachment 323376View attachment 323377View attachment 323378
 

Attachments

  • IMG_0586 (002).jpg
    IMG_0586 (002).jpg
    2.2 KB · Views: 0
  • IMG_0587.jpg
    IMG_0587.jpg
    2.3 KB · Views: 0
  • IMG_0588.jpg
    IMG_0588.jpg
    2 KB · Views: 0
  • IMG_0591.jpg
    IMG_0591.jpg
    2.6 KB · Views: 0
  • IMG_0596.jpg
    IMG_0596.jpg
    2.3 KB · Views: 0
  • IMG_0598.jpg
    IMG_0598.jpg
    2.5 KB · Views: 0
  • IMG_0599.jpg
    IMG_0599.jpg
    2.6 KB · Views: 0
  • IMG_0601.jpg
    IMG_0601.jpg
    2.7 KB · Views: 0
  • IMG_0603.jpg
    IMG_0603.jpg
    2.1 KB · Views: 0
  • IMG_0608.jpg
    IMG_0608.jpg
    2.8 KB · Views: 0
  • IMG_0610.jpg
    IMG_0610.jpg
    2.7 KB · Views: 0
  • IMG_0612.jpg
    IMG_0612.jpg
    32.2 KB · Views: 0
  • IMG_0613.jpg
    IMG_0613.jpg
    2.7 KB · Views: 0
  • IMG_0615.jpg
    IMG_0615.jpg
    32.1 KB · Views: 0
  • IMG_0616.jpg
    IMG_0616.jpg
    32.1 KB · Views: 0
Another fine build Barry. Great paint job and weathering finishes it off to perfection.
 
Simply stunning build Barry. It' s been a pleasure to watch this build from you
 
Nicely done Barry

I built one some years ago, in fact I imported the kit from Japan which made it rather expensive, so it's good to see another one.

They are nice kits, and yours look great.

Cheers

Steve
 
Thread owner
Thanks Steve and everyone. It was certainly a nice kit and I rather like ZM. I look forward to their Raiden build. They also have some interesting new releases coming out including a FW190.
 
Status
Not open for further replies.
Back
Top