Theme editor

Scale Model Shop

BarryW’s Zoukei Mura 1/32 Ta152 H-0

Status
Not open for further replies.
Hi Barry
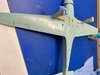
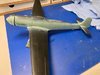
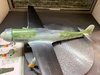
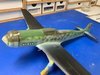
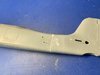
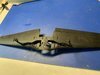
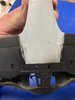
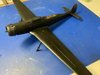
I had not heard of this manufacturer until I saw their stand at a show. Very impressive looking kit. I was going to say that the seat would look great with careful painting and yesterdays photo shows I was right - you have done that beautifully. Good luck with those wings - they're huge.
Jim
 
Have to admit i've never really watched a ZM build before and i have to say that i am mightily impressed at the detail the kit has.
 
Lovely office Peter and good foresight in adjusting parts to fit on an otherwise flawless kit. Most ZM kits I've seen are basically in friends stashes. Cost wise is keeping me from getting one. I've only seen one ZM UHU kit built by a friend and that was already huge.

I believe ZM has looked into how to manage and strengthen the fit of the long wing.

Cheers,
Richard
 
Thread owner
I have been doing more work on the fuselage.

The bottom panel fixed into place well. Only a little filler will be needed.
View attachment 320940

More work on the wing.
Some filler needed but overall a good fit.
View attachment 320941

Working on the on the undercarriage. I used a sharpie to help line up the location tab on the hub with the tyre.
View attachment 320939
 

Attachments

  • DE2F1FC4-E797-4885-BD97-0BB6127EA03B.jpeg
    DE2F1FC4-E797-4885-BD97-0BB6127EA03B.jpeg
    3.5 KB · Views: 0
  • 174E4588-093A-4D1D-8F7E-5309A673DA84.jpeg
    174E4588-093A-4D1D-8F7E-5309A673DA84.jpeg
    3.1 KB · Views: 0
  • 688ADC96-F722-458F-86A0-8CFC44144AF7.jpeg
    688ADC96-F722-458F-86A0-8CFC44144AF7.jpeg
    2.3 KB · Views: 0
Thread owner
I am progressing work on the airframe and decided to test fit the undercarriage legs.

As you can see from the instructions they twist fit into the locations. But the tolerances and very tight and I had to sand a little to ease the fit. Once in place they fitted perfectly and I was loath to remove them so I cemented them into place a lot earlier than intended. Hopefully they are strong enough to survive...
View attachment 320971

View attachment 320972
 

Attachments

  • IMG_0529 (002).jpg
    IMG_0529 (002).jpg
    2.3 KB · Views: 0
  • IMG_0528.jpg
    IMG_0528.jpg
    2.9 KB · Views: 0
I'll join you mate with my 1/48 ZM Ta 152 once I finish off my viper....
btw, good job this is looking great
Cheers, John
 
Thread owner
Some more pics.
First the wing tip light. These are so small they are impossible to pick up with fingers, a pick-up stick can pick it up but getting it into position and into the location hole is nigh on impossible, tweezers are useless given shape and size. You can just make out the part as that dot near the wing tip. Because of the challenges I decided try to cement the part in now and then paint/gloss it at the end. But no, moments after the pics was taken it disappeared into the ether, not unexpected. Consequently I filled the hole but not completely level and smooth at the top. As part of the final touches I will drop a little paint into the hole and the apply some clear material I have that will bead out slightly giving the desired effect.
View attachment 321281

The tail in cemented I to place but I need to fill a small step
View attachment 321283
A fair bit of work left on that to do.

While filler is drying I airbrushed black MRP primer
View attachment 321284
Also on the wing. There are a few minor imperfections shown up that I will fix with some sanding.
View attachment 321282
I will aim to finish off the fuselage join, sand the wing and then fix the wing to fuselage. More over the next couple of days.
 

Attachments

  • 33E2FA19-159A-4AEC-AF6B-A347CCB3476A.jpeg
    33E2FA19-159A-4AEC-AF6B-A347CCB3476A.jpeg
    3.7 KB · Views: 0
  • 8CCB0CD7-CB87-4766-B655-EA081E2E8807.jpeg
    8CCB0CD7-CB87-4766-B655-EA081E2E8807.jpeg
    2.5 KB · Views: 0
  • 0A783A2D-4989-4E35-8C2D-CFDE421A4C4A.jpeg
    0A783A2D-4989-4E35-8C2D-CFDE421A4C4A.jpeg
    2.9 KB · Views: 0
  • D93963C6-6C6C-4FB0-BAAB-AE9A893D684A.jpeg
    D93963C6-6C6C-4FB0-BAAB-AE9A893D684A.jpeg
    2.7 KB · Views: 0
Thread owner
I have fitted the wing to the fuselage and it is a perfect fit, it could not be better. A lot of reviews suggest otherwise but I think the engineering, in many ways great, does provide scope for problems to occur and I think the secret is to plan ahead and dry fit every stage.
View attachment 321478

View attachment 321479

As you can see I am getting on with some painting of sub-assemblies. I will need to apply a small amount of Mr Dissolved Putty in places finishing off with some ‘liquid sanding’ with i.p.a.

I am planning to fit the cowls around the engine before fitting that to the fuselage. As I will not be displaying the engine a snug fit is the priority and I think that will reduce the potential for problems.
 

Attachments

  • 52F5F6CC-FB66-425E-A5E6-FC4FBD7BDA0F.jpeg
    52F5F6CC-FB66-425E-A5E6-FC4FBD7BDA0F.jpeg
    4 KB · Views: 0
  • 974AADB0-AFBB-48E1-819B-8FA666D1A16E.jpeg
    974AADB0-AFBB-48E1-819B-8FA666D1A16E.jpeg
    3 KB · Views: 0
Thread owner

Attachments

  • 8B3A8D7C-E67E-4337-911C-CE06FFEB24B3.jpeg
    8B3A8D7C-E67E-4337-911C-CE06FFEB24B3.jpeg
    3.3 KB · Views: 0
  • 32991EF5-EBBD-4FFD-842E-953A02488130.jpeg
    32991EF5-EBBD-4FFD-842E-953A02488130.jpeg
    3.3 KB · Views: 0
Thread owner

Attachments

  • EE155AC4-FBD1-4EC1-AFE3-A0E42DF25423.jpeg
    EE155AC4-FBD1-4EC1-AFE3-A0E42DF25423.jpeg
    3.2 KB · Views: 0
Looking really good Barry. I've never built a Ta152. I think i might purchase the 1/48 Hobbyboss kit after seeing this being built :)
 
Thread owner
I have sprayed RLM76 on the undersides and sides. I have decided to tone down the weathering a little compaed to my last couple of builds. The tonal variation is there for the RLM76 thanks to the black basing but it is not enough to make the fuselage look 'grubby'. This aircraft did not have the bare metal panels on the underside as many Ta152s had.
View attachment 322383

View attachment 322384

Tonight I will start with RLM82 and maybe RLM83. I will be taking a different approach to normal as I will focus only on the fuselage top and sides with these two colours initially. I am also going to attempt freehand camo.
 

Attachments

  • IMG_0551 (002).jpg
    IMG_0551 (002).jpg
    2.8 KB · Views: 0
  • IMG_0550 (002).jpg
    IMG_0550 (002).jpg
    2.8 KB · Views: 0
Its always a pleasure to follow your builds Barry.
Great work and well photographed.
 
Thread owner
I have painted the fuselage...
RLM82 on
View attachment 322449

Then RLM83 joins it...
View attachment 322450
It looks a bit bright in the pictures....

I am pleased the way the mottle turned out and the freehand spraying was no problem at all. I would never have attempted freehand with any other paints than MRP.

I have the wings to do next, hopefully tonight.
 

Attachments

  • IMG_0554 (002).jpg
    IMG_0554 (002).jpg
    3 KB · Views: 0
  • IMG_0556 (002).jpg
    IMG_0556 (002).jpg
    3.2 KB · Views: 0
Status
Not open for further replies.
Back
Top