Theme editor

Scale Model Shop

Bedford Commercial C8 Quad: SKP models.

Status
Not open for further replies.

Ian M

Administrator
Staff member
Joined
Dec 14, 2008
Messages
18,333
Reaction score
570
Points
113
Location
Falster, Denmark
1/3
Thread owner
An alternative title could have been: Why is it the more expensive resin kits get the worse the quality? More about that later.
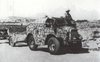
View attachment 326445
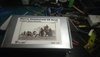
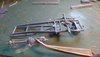
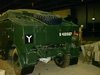
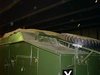
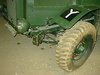
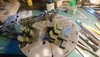
I have had this in the stash for quite a while and whilst looking over the stash for inspiration, this was the only one that really stood out and shouted "Pick Me ! Pick Me!" So a quick look told me I might actually have the paint for this one, I opened the instructions and had a look at the parts.View attachment 326446
Inside the very solid box was the main body and three baggies stopped full of parts. The Body as can be seen is going to be fun, cutting all the openings.
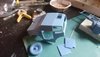
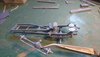
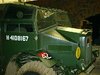
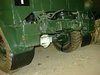
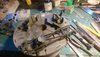
One thing of note that the frame around the wind screen is way to thin. Paper thin actually and the center upright is already in need of repair/replacement! Grr.
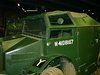
Also the main floor pan was broken in two where the lower floor steps up to the rear part. It was snapped at the angle. It is glued and setting up I just hope that it can hold with out having to reinforce it...
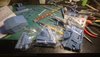
View attachment 326447
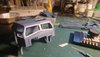
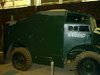
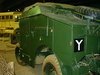
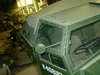
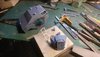
Generally the detail is good, if a little soft in places. The lower 'quarterlight' on the right was a pig to cut out and I ended up cutting the center upright out as it will be easier to replace than to cut out two windows. There are a few bubbles here and there. one in the very thin skin on the door. So is it a filler job or a bullet hole ? lol-
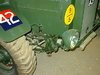
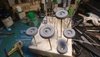
Now I'm no stranger to resin kits and conversions but I cant help but notice that some of those kits that are 'big name' the makers are riding on their name a lot more than the smaller independant makers. It seems to me that the independents put a lot more care into their work than the big names, I cant recall having had a garage shop casting that has been soft in detail, air bubbles and HUGE casting blocks. ( I am saving all the trimmings and will weigh then after and see how much it weighs contra the actual kit...)
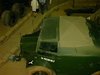
OK I have made a start, and this will take a while as I still have a ton of things to do 'In real life'.
Laters.
 

Attachments

  • DSC_1137.JPG
    DSC_1137.JPG
    2.1 KB · Views: 0
  • DSC_1138.JPG
    DSC_1138.JPG
    2.7 KB · Views: 0
  • DSC_1139.JPG
    DSC_1139.JPG
    2.6 KB · Views: 0
Take your time Ian...anyway I will be watching, looks an interesting build.
 
Thread owner
Been a really grey and boring day today, so after half an hour splitting firewood, thought better of it and came back in the warm...
I managed to get the chassis parts cut and cleaned yesterday and got the sticky stuff out.

View attachment 326901View attachment 326902

A slight disaster with the cab. The windscreen surround as I think I mentioned earlier was paper thin in places and due to the handling of the cab whilst cutting out the other openings, it sort of disintegrated! Oh poop! Also the roof cracked between the windscreen and the hatch in the roof. AND the quarter post at the top. The cracks in the roof not that big an issue. The Windscreen frame a whole other kettle of fish. No way out of that other than to cut the rest out and make a whole new frame.
Looks a bit rough but I should be able to filler my way out of that.
View attachment 326903
We will have to wait and see.
It seems that Me and Windows/canopies on resin kits are not very good friends. (refers to the Fairey Gannet on which not one of the tree canopies in the kit fit!).
 

Attachments

  • DSC_1143.JPG
    DSC_1143.JPG
    2.2 KB · Views: 0
  • DSC_1144.JPG
    DSC_1144.JPG
    2.3 KB · Views: 0
  • DSC_1145.JPG
    DSC_1145.JPG
    2.7 KB · Views: 0
Thread owner
Cheers chaps. Just need to reduce the width of the white plastic by about half....
 
Is that chassis bent or does it only look that way in the photos?
 
Thread owner
It's a tiny bit but it is quite flexible. Also it is only resting on the rear axle, so it looks worse than it really is.
 

Attachments

  • Morris quad-9.JPG
    Morris quad-9.JPG
    3.3 KB · Views: 0
  • Morris quad-10.JPG
    Morris quad-10.JPG
    2.9 KB · Views: 0
  • Morris quad-11.JPG
    Morris quad-11.JPG
    3.4 KB · Views: 0
  • Morris quad-12.JPG
    Morris quad-12.JPG
    2.8 KB · Views: 0
  • Morris quad-13.JPG
    Morris quad-13.JPG
    3.3 KB · Views: 0
  • Morris quad-14.JPG
    Morris quad-14.JPG
    2.5 KB · Views: 0
  • Morris quad-8.JPG
    Morris quad-8.JPG
    3.1 KB · Views: 0
  • Morris quad-7.JPG
    Morris quad-7.JPG
    3.3 KB · Views: 0
  • Morris quad-6.JPG
    Morris quad-6.JPG
    2.6 KB · Views: 0
  • Morris quad-1.JPG
    Morris quad-1.JPG
    3.2 KB · Views: 0
  • Morris quad-2.JPG
    Morris quad-2.JPG
    2.8 KB · Views: 0
  • Morris quad-3.JPG
    Morris quad-3.JPG
    3 KB · Views: 0
  • Morris quad-4.JPG
    Morris quad-4.JPG
    3.4 KB · Views: 0
  • Morris quad-5.JPG
    Morris quad-5.JPG
    2.8 KB · Views: 0
Thread owner
Thanks Si, I do have quite a few myself. I note that this is a later model possibly a mkII late, The one I have is a mkI. I think. lol
 
Thread owner
Right then still plugging away, between stints outside splitting firewood. Much warmer in the hobby-room!
View attachment 327497
Wheels trimmed and sanded, now primed and ready for the next bit.
View attachment 327498
And the floor pan broke again! This time it will get fitted in two parts and hopefully stay in one piece.
View attachment 327499
The main chassis painted. Still a few bits to go on but after the body is zipped up.
View attachment 327500
Made a new windscreen frame and added some strips to the grill. I was going to cut the cast grill out and replace it with mesh, however as the part where the grill is, is about 1,5cm thick (!) I chose not to.

All I have to do now is make up my mind as to the paint scheme... I'm dangling between a Caunter or Malta rubble......
 

Attachments

  • DSC_1154.JPG
    DSC_1154.JPG
    2.8 KB · Views: 0
  • DSC_1155.JPG
    DSC_1155.JPG
    3 KB · Views: 0
  • DSC_1156.JPG
    DSC_1156.JPG
    3.1 KB · Views: 0
  • DSC_1157.JPG
    DSC_1157.JPG
    2.7 KB · Views: 0
Ian,
Nice job on the windshield. I for one would like to see the Malta rubble and how you tackle it.
 
Remember seeing the Maltese cammo on a Valentine...looked great so I’m rooting for that too:smiling4:
 
Hi Ian
We don't see that many resin kits so this is interesting. Quite a few problems which shouldn't be the case for the likes of SKF Models. I am sure you will sort it. Already looking good. Is there a PE fret included?
Jim
 
Thread owner
Is there a PE fret included?
There is Jim. Most of it will call for the use of a microscope to fit. LOL The mudguards and bumper are the larger parts, then there are loads of tiny latches for the locker doors....

Well I got the body cobbled together yesterday. The floor pan being snapped in two making it more of a challenge than it needed to be. Not perfect, but it will do.
I have only been able to find one tiny, very grainy photo of a C8 on Malta so I know they where there, as to the mark number and the actual colours and pattern.
It has been written that things that where Green on arrival had the 'stone block' painted on, those that where 'sand' probably Portland colour had the green or sometimes brown 'morter' painted on. All was done by hand and pretty much free design, after guidelines. Some things more freely interpreted than others. This lead to a great variety in the pattern. Every thing from neat and tint block work to squares piled up in rows up and down as well as across. Fortunately the C8 I have seen was more the expected rubble patter.
I have done the Vallentin and it is lurking on here somewhere in the armour section.
 
Thread owner
Found a larger example of the photo.
View attachment 327644
The roof vents tell that it had a solid roof and not the canvas one so it looks like I have the right mk. :-)
If anyone can shine a light on a unit number...
 

Attachments

  • camotr10.jpg
    camotr10.jpg
    2.3 KB · Views: 0
Status
Not open for further replies.
Back
Top